Mercedes-Benz Forum banner

W211 Alignment Issues (Neg Camber) Front and Rear

1 reading
67K views 43 replies 13 participants last post by  kitesurfer805  
#1 ·
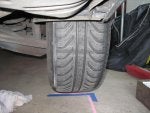
I have a 2005 E320 CDI that I bought about 6 months ago. The tires were not in great shape and I knew that going in but the other day I had the car jacked up and noticed that left rear inside tire was worn down to the belts and the right rear inside tire was also worn. I am talking just the edge of the tire, the rest of the tire is ok. I took the car in to get it aligned before getting new tires. The local tire discount shop does alignments for $90 so I went to them by the way they have a Hunter machine so its legitimate. They did a check for free but would not align it since the computer said I needed front camber bolts. Their estimate was $350 for the bolts/labor/alignment and I told them I would think about it. Since them I have done some research and plan to do the work myself. By the way the cars does pull hard to the right.

My alignment reading was front left -2.0 and front right -1.5
The spec is (-0.8 to -1.5)

The left rear reading was left rear -1.8 and right rear is -1.4
the spec is (-0.9 to -1.9)

The toe was also off too but that is easy enough to fix.

For the front camber: I have purchased (4) of the 000-330-00-18 bolt kits . I got the Delphi ones for $11 a piece from Pelican. I have done the research and will be changing both the castor and camber bolts on the left and right front suspension. Each side has a castor and camber and from what I read you are suppose to change them both out so that is why you need (4). I am a little confused on which way to install the bolts but in my case to get more positive camber I believe they should be in the 3:00 oclock position which would pull the bottom of the front end in towards the center thus reducing negative camber. I can't really find anything about how to actually change the bolts so I am hoping is that easy

As for the rear: all I could find is a Mercedes Rear Bushings - 28860 from Specialty. In this case you have to press out the bushing and install a bushing with a insert and bolt that allows you to adjust the camber. There is no caster since the rear wheels don't turn. The company has a you tube on how to change it out but its going to cost about $200 for tools, I will have to buy a ball joint press and an adapter along with the bushing kits. The ball joint press could come in handy later so I ok with buying one.

Any comments on what I have laid out so far? Has anybody installed the 28860 bushing kit?
 
#2 ·
I admire you for taking the bull by the horns and wrestling with it.
But how are you going to align your wheels?
Are you trying to install the alignment bolts and take it back into the shop, if so, I highly suggest you take it to a dealer, run of the mill shops will have no chance of aligning properly.
If you're thinking of a DIY alignment, then may the force be with you:angel
 
#3 ·
installing those bolts is just 1 piece to the puzzle of an alignment. 1 adjustment messes with the other, than you have a toe align issue. there is NO way to do this without seeing what the reading are on the machine.

also did they check ride height? if not than you can't go by those specs. if you car is sagging than you have other issues and these bolt still wont get you within spec.

good luck in what ever you do.
 
#4 ·
I have had and still have uneven inside tire wear even after replacing the rear springs with OE mercedes parts (with the correct color code for the vehicle specified ride height), and after replacing the rear struts with Bilstein HD's. My next move in getting the rear straightened out would be these bushings I guess. Let me know how they work out for you if you do it.
 
#5 ·
My experience so far is that if you need to use camber bolts then the real issue is that your lower control arm bushings are toast and need to be replaced. At least for the front. I would inspect them very carefully before moving forward with anything else
 
#7 ·
I also agree, but how far do you go? Do you replace the ball joints, springs, struts/shocks at the same time? To me, the front end does seem to be sitting lower than normal.
My cdi has 125k on it, and my indie said that I will need to replace the bushings if his last alignment does not hold. By hold, I mean my right side was still out of spec even with the camber bolts installed. My toe was way out so I am hoping that was the cause of the inside tire wear. I had the ball joints replaced at 60k.
I did find a decent former post here:
http://www.benzworld.org/forums/w211-e-class/1748033-e320-cdi-front-suspension-rebuild-right.html
Thanks!
Mike T.
 
#8 · (Edited)
The bushings are going to be the largest contributor to misalignments. They only last about 80-120k and they are broken up. Just a common wear item on this model. Every single w211 I saw while looking for mine had bad front lca bushings or impending within the next 20k.

The early ones were fluid filled they are even worse. Later solid rubber are better but not lifetime

For my car I was -2.4 deg with bad bushings. Your mechanic needs to actually look at them not just guess and charge you for multiple alignments. It's easy to see. Any cracking and it's time to replace.
 
#9 ·
My alignment had been within specs, but in a very inconvenient way, with left to the one end of the specs, the right to the other end, resulting in a clear drift that the alignment shop with its hunter machine couldn't handle.

I went to the dealer, they replaced those bolts and now the car runs straight.

I'll see what happens when I replace my wheels - likely another alignment necessary.
 
#10 ·
I recently rebuilt the front on my W211. All the lower arms/bushings and all the ball joints. Did not touch the tie rod ends ergo the alignment. Boy was it way off when I was done. That rubber, and the lower ball joint, were toast at 150k. Car drives with a real solid feel in the front now. I do have a little camber issue at 1.5 degrees, but that is due to the bilstien HD shocks. The spring perch needs to be moved up 1 or 2 notches on the shock body to correct the camber, and that is it.
 
#11 ·
Today I replaced all the front camber bolts with the new adjustable bolts. I then leveled the car and took camber reading and adjusted the toe. for camber I got Right front at -0.25 deg and Left front -0.75 degrees. I will attach the pictures of how I did it using a Longacre castor camber gauge and a home made rig, pretty simple really. I also adjusted the toe and have a 1/16" toe on both the right and left front wheels. I used a string and tape measure to do that. I did a good inspection and everything looks ok to me, all the rubber bushing appear to be in good shape. One thing to note when you install the adjustable bolts, the grooves in the bolt are not centered. The way I did it was to draw a line between the two grooves and then you can see how to install them. The skinny side has to go to the 3:00 or 9:00 position. I also had trouble getting (3) of them to install and ended up tapping them in. I did not have to tap too hard but was unable to just slide them in. They were easy enough to tap in but not so sure about tapping them out later since the nut side does not have a lot of room. I lubed them up before putting them in. One side I changed out with the tire removed the other side I did with the tire installed so you can do this without removing the tires.

My problem is the rear tires, my first problem is how do you adjust the toe? It is not intuitively obvious like the front tires are? Can anybody give me some help there?

The 2nd problem is going to be the rear camber so not sure if the Specialty W211 adjustable rear camber bushing 28860 will work or not. Right now my plan it to go talk to the local alignment guy to see if he will adjust it if I install them. How else do you change the rear camber? just start replacing suspension parts?
 

Attachments

#13 ·
Still trying to figure out how to adjust the rear toe. In the picture I attached the item circled in red, can some one tell me how it works. Is it one unit or is it a bolt screwed into a nut. Am I suppose to remove the bolt and then adjust the nut to change the toe? Is that how it works? I don't see how turning the nut will get the toe to change? There is a bolt to the right of the red circle and I have no issues getting that out, in fact if you look closely you can see I have loosened it up several turns already.

The next problem I have it getting access. The muffler pipe is right in the way, you do not have straight access to the fastener and there is no room to get between the muffler pipe and the bolt head. I can't get to it without removing the muffler system and that does not look easy. If I understand it correctly and if I was able to get the bolt out then how do you get access to adjust the nut? If I can find a 90 deg wrench with the torq 55 (like a allen wrench) I may be able to get that to work for getting the bolt out but then how do I get to the nut? What a lousy design, I thought Mercedes designers were better than that.

I can't believe you have to remove the muffler to adjust the rear toe so there has to be a trick or something. Can somebody help me to understand
 

Attachments

#16 ·
Ok I figured it out, get a 55 torq bit set like in my picture and use a 10mm wrench. What I was calling the nut is actually a washer, its cam'd so as you turn it the arm can go in or out. Before I had it totally figured out I loosed it until the washer was below the arm and then used a sledge hammer to tap the tire until I had it where I wanted it and then spun the cam washer so it would fit in tight and ran the bolt in. On the 2nd half I used the nut (21 mm wrench) and adjusted it that way, the washer wanted to spin back after I let it go so I had to hold it in place while I tighten the bolt. You also need to loosen the other bolt next to it. Got it all back together and took it for a test drive and it drives straight, I may not have had the steering wheel straight because when I drive down the road straight the steering wheel is ever so slightly to the right. Tomorrow I think I am going to take it down and get the alignment checked.
 

Attachments

#19 · (Edited)
Maybe we can put our heads together on this to make sure we get all the correct parts needed. I didn't realize that it was the outer bushings that get replaced-I was under the impression it was the lower inside bushings that would get replaced. Now that I realize it was the outer upper bushings it looks to be much easier to install. I only wish I would have done these when i did the rear suspension refresh. As far as I can tell, I will only need one set-is that what you are figuring too?
 
#20 ·
I am looking at doing both sides so according their application guide I need 1 kit per side. It appears that a kit is two bushings with the adjustable hardware so a total of two kits.

We do not have a drive on lift at the shop so I am going to do it frame and alignment shop that used to sponsor me on their drive on lift.
I do have a camber gauge from my racing kit and it will be pretty darn close. I don't expect an issue with the wheel setback. My big issue is time. If I were at the shop I am affiliated with it would be done within 7-10 days, but it may take me a month to make arrangements up the frame shop that used setup all my track cars. They normally do not like to tie up the rack for a lot of time. I may end up doing the fronts next week at the shop I am part of and then call the frame shop on Monday and see when they can get the rack time for the rear change. If it happens that way I do not see it being a big deal for them. They only charge $65 for an alignment and a lot of times they charge me nothing for just that. As far as the labor for the bushings I am bringing a monster press kit with me and I bet they have one also. If it is really only .6/hr per side they will charge me $80 so I can not think of a reason to do this.
One thing I am going to try is using some anti seize on the adjustment bolt. Wisconsin winter salt can jam up steel threaded parts under the car in just one or two winters. I will ask SPC first about using the anti seize.

I have to do front lower control arm bushings also and then once the SPC bushings are in and the fronts are new we will align the car at the
same time. I just dropped $1065 for Nokian WRG3 tires so I want perfect wear. If it costs me $250-300 to make sure all the tires are set to
within spec and adjustable for the future it is worth it.
 
#23 ·
The Nokians are nice tires. I'm not personally familiar with the WRG3, but I am currently running Nokian Entyres. I like the tires alot, and the accelerated interior tire wear is unacceptable. I just pulled the trigger on the rear adjustable camber hardware and ball joint press adapter. I'm sure in the next week or so they will come in. Looks like I will need to get a hold of a ball joint press which I can borrow from my Father. I can get the final alignment done at a local shop that specializes in Mercedes and has the Hunter machine.
 
#21 ·
noticed last week i also am wearing all 4 tires more to the inside

we did some suspension parts up front a month or 2 ago but it has something else going on

have developed a harsh ride over the past month or 2, been slowly getting worse

my mechanic does not see anything else worn out but thinks the shocks may be weak

ordered some bilstein stock shocks to try and the shock mounts
the shocks on it now are sach boge and have about 45,000 miles on them, seems like they should not be worn out but i am starting there and doing either/and the springs all 4 and whatever other suspension stuff we think is worn out

there are no obvious cracked or torn rubber parts....

my plan is after we get the shocks on if no better will have a suspension shop i use go through it and see if they find anything different

have a feeling i will end up doing some of these things you guys are listing here too
the harsh ride and the inside wear on the tires are probably two different problems anyway

on my w210 i did a complete suspension overhaul and it was not too costly, but priced that out on the w211 and it was way more in parts

my car is a 2006 with about 210,000 miles
 
#22 ·
I took the car to the alignment shop and had them give me a free check. The front camber is now -1.0 (left) and -0.9 (right) so it does not exactly match what I measured but it's much better than it was. All my toe adjustment also came out good. The rear camber came out at -1.6 (right and left) which is out of spec so I need to correct that. I talked to the alignment shop and they said if I install the rear camber adjustable bushing/bolts they would adjust them during an alignment so I have ordered the kits. I ordered (2) kits and total cost was a $100. Now I need to order the ball joint press tool and press adapter kit. Currently trying to figure out how expensive of a ball joint press tool I want to buy.

Sounds like some more people are going to install the front adjustable bolt so I could do a detailed write up but I am not sure its needed. The pictures I attach show what to do and the big thing is to mark the bolts with the center line of the grooves so you know which way to install the bolts. When you are installing the bolts you cannot see the hole because everything is covered up so it helps if you have 2 people, one can hold the tire where you want it (bottom moves toward car) while you install the bolts. I did it all by myself so you don't need two people but it would be easier. You will also have to go buy a 21mm wrench (got to have it) I would almost say the hardest part was taking off all the bottom covers
 
#24 · (Edited)
My tech that does all of our tire stuff sells a lot of the Entyre line. They are good. I have not ordered the kits yet. Both MLs started needing minor things and once they are done I am moving
on to the E500 camber and alignment.
We only use the WR series due to the crazy drifting we get in the winter and poor highway snow removal living in a rural area.
 
#26 ·
Guy at alignment shop said "no sense doing alignment with these (worn) tires".

So bought four new Michelin Pilot Sport All Season tires. (Costco doesn't stock. Got from Indi tire place for a tad more than Costco special order price).

Drift to left problem gone.
 
#27 ·
Received my parts from the vendor on Ebay that I purchased SPC rear camber parts from. Looks like the Ebay vendor is just the middle man and the parts were drop shipped from SPC in Colorado. All was received and well packaged in a SPC branded cardboard shipping box. It took 3-4 days for delivery. Overall, the adapter tool quality looks fine. Some listings look like they are stainless steel on the ball joint press adapter parts, but they are standard steel in reality. The bushings them selves look fine. There is only around 1/8" of rubber around the center of the bushings. Not going to be much vibration isolation/dampening from them, but the tradeoff is adjustable camber.
 
#32 ·
Sounds like you have experience installing this kit? I am having a slight issue with SPC's directions and the photo they show. When reading through it and looking at the picture everything seems straight forward, however when you get everything apart and the parts are in your hands things are a bit more unclear. Their verbiage on step 5 in the NOTE appears to contradict itself. Here is a link to the instructions:

http://www.spcalignment.net/instructions/28860-INS_WEB.pdf

I have looked at the parts the old part vs. the new part and examined how it will mechanically fit together and determined I will be following the portion of the note in step 5 that is in parenthesis. That is the only thing that looks mechanically correct to me even though it contradicts the photo and the verbiage a bit. 50/50 chance I guess :eek The good thing is that I am taking quite a few installation photos and am including a couple hints and tricks to help other DIYers out. Off I go to press press press.....