Mercedes-Benz Forum banner
1 - 20 of 60 Posts

· Registered
2008 E300 4Matic
Joined
·
223 Posts
Discussion Starter · #1 ·
I thought I would make a thread to the fellow 4Matic owners who may have problems with the front lower control arm outer bushings.
I started to have cluncking noises coming from the front suspension whenever I go over little bumps.
After I visually inspected with a pry bar (watch video below),
and after hours of researching and price checking, I decided to go ahead and replace the bushings only (not the control arms themselves).

Please make sure to jack the car up safely on jack stands. I used wramps for the rear wheels as well. I used 6 tons jack stands, but you can also use the 3 tons.
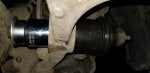
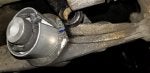
You will need to remove the 18mm bolt and nut of the sway bar (torsion bar, also called stabilizer bar) linkage to be able to remove the 21mm bolt holding the strut to the bushing. I might have been able to do without this by using a jack to lift the linkage up. This is something I regreted afterwards as I unintendedly dissassembled the linkage bolt/nut and eventually did not replace them. Check this post here (https://www.benzworld.org/forums/17753306-post5.html)
 

Attachments

· Registered
2008 E300 4Matic
Joined
·
223 Posts
Discussion Starter · #2 · (Edited)
Let me back up here a little bit. Whole control arm replacement is expensive (parts), and very hard (require subframe dissassembly). See the service manual pages for the front lower control arm replacement attached to this post.

The outer bushing is not sold separately at the dealership. The part number is A2113331914.

Other part numbers are:

SWAG 10 92 1540
FEBI BILSTEIN 21540
AYWIPARTS AW1420044
LYNXauto C8432
MAPCO 37875
MEYLE 014 033 0091
LEMFÖRDER 2604401
MOOG ME-SB-2730

I decided to go wtih the "LEMFÖRDER 2604401". They are available on eEuroparts as well as FCPEuro and very cheap ($8 each).

I had an initial attempt at replacing the bushings (please see my post https://www.benzworld.org/forums/17721884-post8.html) and I could not figure out how I could move the strut out of the way to gain access to the bushings!

@amosfella suggested that I could remove the three nuts holding the strut from the top (https://www.benzworld.org/forums/17722232-post9.html).

I had another idea that I thought I would try first, which was to compress the coil over spring so the strut lower end can be lifted up to gain access to the bushings (check the pictures below). Unfortunately, this did not work.
 

Attachments

· Registered
2008 E300 4Matic
Joined
·
223 Posts
Discussion Starter · #3 ·
I ended up removing the three nuts holding the strut from the top. Thanks @amosfella :smile!
And, this turned out to be very easy and did not affect the alignement. In fact, the W211 chassis does not have camber or caster adjustments with OEM suspension parts. So, removing the nuts should not affect the alignment at all!

I could then clearly access the bushing and use the tools to remove it. What's that little groove in the hole there?
 

Attachments

· Registered
2008 E300 4Matic
Joined
·
223 Posts
Discussion Starter · #4 ·
Notice the groove in the OEM bushing's hole? the "LEMFÖRDER 2604401" part did not have one! But I did mark the point where the bushing cut is placed (see picture). I don't think this would even matter but I thought I would insert the new bushing in the same fashion.
 

Attachments

· Registered
2008 E300 4Matic
Joined
·
223 Posts
Discussion Starter · #5 ·
Unfortunately, I did not have the bushing removal tool handy that day. So I improvised using some cups in a ball joint removal tool with some wrench sockets (1-7/8) inch.
Because the bushing socket is tappered, you should only attempt to "push" the bushing from the rear to the front (with respect to the car that is). You will notice that the diameter of the socket if measured from the rear is 50mm, and when measure from the front is 51mm. The diamter of the cup that should push the bushing should not exceed 48mm so it can fit inside the socket when operating the removal tool.

After some muscle crunching and twisting, I finally got the bushing out!
 

Attachments

· Registered
2008 E300 4Matic
Joined
·
223 Posts
Discussion Starter · #6 ·
Now comes the not so fun part! Since I did not have the right bushing removal/insertion tool, I ended up damaging the bushing to some degree. The cups I used had thin walls and were not the right size for the job. Each millimeter can make a difference here.

In addition, it seems I did not get the cup pressing the bushing aligned with the new bushing, which in turn was not aligned with the control arm. In addition, pressing the bushing inside its socket required a lot of torque and any movement while doing so would end up having the bushing inserted "unevenly"! Check the pictures.

I ended up using a mallet to get the bushing straight, which ended up bending the outer aluminum shell of the bushing!
In addition, even when starting with the bushing aligned with my mark, when it was pressed, it rotated counter clockwise and the busing's shell opening ended up above my mark!

The end result turned out to be ok, but not what I wanted. Check the last picture below.
 

Attachments

· Registered
2008 E300 4Matic
Joined
·
223 Posts
Discussion Starter · #7 ·
Important note: Tightening the nuts should be to specs and should be done when the car is on the ground. This ensures that the suspension components (bushings, sway bar, etc.) are in the "normal" orientation and are under the "normal" pressure.

I am attaching here some service manual pages related to this job for the steps and torque specs.

For the expert moderators of this forum, please let me know what you think of this procedure. Any advice, warning, or even a tip I, and others, should be aware of?
 

Attachments

· Registered
2008 E300 4Matic
Joined
·
223 Posts
Discussion Starter · #10 ·
How on earth did you find the part# for that bushing? I searched tirelessly for it years ago, then ended up replacing the entire arm. Its not shown on the EPC either.
I, too, searched tirelessly, but allow me to walk you through my mental process at the time. :rolleyes:
I searched by all sorts of keywords and part numbers until I got lucky; I found this item on amazon:
https://www.amazon.com/gp/product/B00HCP146U/ref=ppx_yo_dt_b_asin_title_o00_s00?ie=UTF8&psc=1
that seemed to be related.
At the time of writing this, it still has only one review:
https://www.amazon.com/gp/customer-...ef=cm_cr_dp_d_rvw_ttl?ie=UTF8&ASIN=B00HCP146U
and the guy said it was for the W211 4Matic. I purchased this Febest bushing (see the unboxing picture below), but turned out to be a cheap chinese after-market that's even more expensive than the LEMFÖRDER. I did not know LEMFÖRDER's part number at the time!

I started by comparing the febest part to what I saw when I jacked the car up for inspection. The rubber pattern, the alumimnum shell and core, and the sizes seemed to match. When searching for https://febestparts.com/ARM_BUSHING_FRONT_LOWER_ARM/BZAB-038, I found a lot of pictures coming up in Google images with the 4Matic lower control arm and that bushing was very clear to match.

When I received the Febest bushing, I took the measurements (check pictures) and compared to what's on the car. They matched. When I received Febest, I had already found the cross reference part numbers:
SWAG 10 92 1540
FEBI BILSTEIN 21540
AYWIPARTS AW1420044
LYNXauto C8432
MAPCO 37875
MEYLE 014 033 0091
LEMFÖRDER 2604401
MOOG ME-SB-2730

I just had to return Febest and get the LEMFÖRDER. It is available on eEuroparts and FCPEuro. Of course, I had to pay for the shipping back to Febest USA :banghead:, but at least I learned something and got the OEM brand! :whipped:
 

Attachments

· Registered
2008 E300 4Matic
Joined
·
223 Posts
Discussion Starter · #13 ·
This is a very clear picture. I can see the cracks and they are not "small"!. Please check the arrows in the first picture.
The reason mine was flexing is becuase I was applying a lot of force with the pry bar. Don't be shy to apply some force with your pry bar. You car puts more load than what you can with your pry bar. This is the only way you can diagnose the issue.

Having said that, I just would like you to note that the bushing is made out of three layers of aluminum as I illustrate in the second picture. The only thing holding the three layers together is the rubber. I believe that once you have cracks in the rubber, the three layers start to clunk together.

Conclusion, your bushing looks as bad as mine was. This is very likely the cause of the clunking you are getting over bumps. It is up to you if you woud like to change it, since you have already replaced the entire arm.

BTW, how difficult was replacing the entire arm? Do you know the procedure that was done to replace it?

Let me know if I can be of any help.
 

Attachments

· Registered
2008 E300 4Matic
Joined
·
223 Posts
Discussion Starter · #16 · (Edited)
Ok great thanks! I’ve ordered two new bushings.

I think the problem originated from the fact I mistakenly torqued the new arm when the car was not on the ground at ride height.
Right, FSM specifically states that suspension components must be torqued where the car is in a "ready to drive" position.

The arm replacement does not require anything special, disconnect the ball joint (lower) and lower strut forks, unbolt, and remove, that’s it.
Disconnecting the outer ball joint and the strut fork is not the issue. Removing the bolts of inner bushing of the wishbone is. Specific, I am referring to the "front" inner bushing where the bolt is hidden behind the sway bar (what you refer to as the anit-roll bar). Did you get a special wrench for that bolt. It is in a very tight spot.

The engine lifting you are talking about is for the anti roll bar removal. The FSM states it’s required to remove it, however even that you can get around if you grind down an Allen key
Right, makes sense.

I’ve ordered new bushings and will press them in and hopefully that’s going to resolve the issue! It started clunking about 10-15k after I replaced the arm and I’ve replaced the strut, coil, sway bar links, inner arm bushings (they were cracked and twisted already due to my mistake).
One thing I forgot to mention is that the bushing has small rubber nipples on one side (see first picture) that are not on the the other (second picture). I noticed that the OEM bushing was installed with the nipples facing towards the front of the car. Not sure if that makes a difference.

I feel like this is the problem finally and am very thankful your thread popped up and made me jog my brain thinking this has GOT to be it!

In addition, my chassisears tells me the noise is from or around this area.

Will update when I get them pressed in
Good luck. Awaiting your feedback when you are done.
 

Attachments

· Registered
2008 E300 4Matic
Joined
·
223 Posts
Discussion Starter · #18 ·
The main bushing bolt can also be torqued if you use another jack to raise the steering knuckle up to normal ride height first.
Measure the distance from wheel hub centre to fender when sitting on the ground and later jack it up just the same.
This way the rubber is not twisted when the car is lowered to the ground.
This might work for the shock absorber fork. Although, I did it when the car was on the ground (there is some clearence). So, this may work for some suspension components, but not for all. Think about the sway (stabilizer) bar. the bar has to have the same pressure on bother sides before you torque the nuts of both links.
What you could do, is probably pull the front up on wramps and raise the car from behind to make it leveled with the front. This way, the car's weight is even on both sides of the front suspension components.
 

· Registered
2008 E300 4Matic
Joined
·
223 Posts
Discussion Starter · #19 ·
My bushing arrives next week so I’ll update in my “suspension knock” thread the weekend after next and then get to the dealer for a true alignment with fresh tires if this fixes the issue (feeling confident this time)
Just to also be sure that you are aware of this.... Have you seen this video? Did you have to remove the nut/bolt of the sway bar linkage before? If you did and you did not replace the nut and bolt then the clunking might be from the loose nut.


· Registered
2008 E300 4Matic
Joined
·
223 Posts
Discussion Starter · #21 ·
I used the 1 7/8" socket to push the old bushing out. The socket was pushing mostly against the rubber, but I did not worry about damaging the old bushing.
When pushing the new bushing in, I used a 50mm cup from a ball joint tool kit. That's what caused the damage on one of the bushings because it was very hard to align the cup perfectly perpendicular over the bushing outer shell.

My advice to you is to to use a proper bushing tool kit. Bear in mind that when the bushing is fully inserted in the tappered hole of the control arm, it will have a diameter of 49mm when looking from the back of the control arm, and 50mm when looking at it from the front.

Since you live in the US, can't you rent the bushing kit from a place like Harbor Freight, O'Reilly Auto Parts, Auto Zone, etc.?
 

· Registered
2008 E300 4Matic
Joined
·
223 Posts
Discussion Starter · #23 ·
OK was doing more searching last night through my tools, and there actually was a perfect size cup that was a missing part I set aside from another MB bushing kit. Should fit perfect for the reinstall, but going to have to disconnect the tie rod and the other end of the sway bar so I can move them out the way for enough space.
You don't need to disconnect the tie rod, at least I did not. The only thing I disconnected on each side was the sawy bar end link to gain access to the strut bolt. I did not give enough attention to the fact that the bolt and nut were self tighnening and installed them again and hence the cluncking you saw in the video (https://www.benzworld.org/forums/17759540-post21.html). So, make sure to have new bolts and nuts or some kind of thread locks. I got the bolts and nuts from the dealer (around $12 each side).


So are you saying the bushing needs to be both removed and reinstalled from the front (of the car) as it is slightly tapered?
Correct. Push back to front to remove. Push front to back to insert.
 

· Registered
2008 E300 4Matic
Joined
·
223 Posts
Discussion Starter · #25 ·
ps2cho, I just have to say that you already had several more difficult projects documented on this forum, some of which I myself learned from, and applied. I think it is safe to say that this is easier than what you think. If you got the right tools, it should not be hard. In any case, I am not sure if freezing the bushing would make any difference to the diameter because the bushing is mostly rubber, unlike ball joints that can shrink when frozen because they are metal.

I am sure you were trying to insert the bushing from the right side of the control arm (front), but this side of the arm has a tapered "ledge" as well. Undoubtedly, this tapered ledge fits the whole bushing. When you start cranking your wrench with the press tool, the bushing will gradually compress and make its way into the hole.
I put a schematic to show the tapered "ledge" that I am referring to here (marked in red).

Even if the bushing goes in at an angle at first, you can easily adjust it by hand and continue the insertion process. There is leeway for you to align the bushing in the first ~3/8" of the distance.

[EDIT]: Can you post some pictures of your attempt so it is clear to us what goes on when you try to insert the bushing?
 

Attachments

· Registered
2008 E300 4Matic
Joined
·
223 Posts
Discussion Starter · #27 ·
I’ve completely removed the LCA from the car so I have have a good visual. Hoping round two will be more successful
I wish you had taken pictures when removing the control arm and posted on a new thread for all of us to learn!

Also, since the control arm is out, why don't you take it to a shop to have them compress the bushing? I hear they can charge something around $20-$25.
 

· Registered
2008 E300 4Matic
Joined
·
223 Posts
Discussion Starter · #30 ·
I'm telling you, its a piece of cake, IF you don't have the alignment bolt on the front bushing, which then requires the sway bar to be removed.
I believe in my suspension knock thread, I have photo's of part of removal for tools used anyway. EDIT: https://www.benzworld.org/forums/w2...ension-steering-knock-driving-me-crazy-4.html post #36 on how to disconnect lower ball joint, then you just remove the LCA bolts and remove, thats it.
Hi ps2cho,
I went through your whole suspension knock thread. A lot of work done for that nasty clunk. Definitely torquing the bushings' bolts while the car was in the air was a mistake. Good luck with the rest of the installation and let's know how it comes out.
 

· Registered
2008 E300 4Matic
Joined
·
223 Posts
Discussion Starter · #34 ·
ps2cho, inserting the bushing in my case requried a lot of fanessing. I did not do it properly on the driver's side, but it went perfecting well on the passenger side after I had gained experience.
Nevertheless, the cluncking sound is gone even on the driver's side. I do think that the wear on the driver's side bushing will be a lot quicker, so I am planning to re-do this side in a year or so.

It is good to know that using clamps worked nicely for you.

Have you checked my post (https://www.benzworld.org/forums/17759540-post21.html) that was directed to you? In the video, the sway bar link nut clearly shows loose coupling with the sway bar even after I had torqued it to specs. This was because I did not believe re-using the bolt and nut would be a problem. You *cannot* re-use the same nut and bolt for the sway bar links. MB doesn't joke about self locking/tightening nuts.
 

· Registered
2008 E300 4Matic
Joined
·
223 Posts
Discussion Starter · #43 ·
Waiting fir a missing strut bushing and hopefully can get it pressed in on Thursday

Bushing, look a little tired after 15 years

Found a small cut on endlink boot, also the joint is very loose compared to the passenger side.

Hopefully all this will take care of the awful moaning, creaking and clicking noise.
Don't forget to order new self-locking bolts and nuts for sway bar end links, bushings, etc.

Sway bar end link bolt: https://www.fcpeuro.com/products/me...link-bolt-front-e350-e500-e550-mer-0159909201
Sway bar end link nut: https://www.ecstuning.com/b-genuine-mercedes-benz-parts/nut-priced-each/913023012002/
Left and right hex head bolt: https://www.eeuroparts.com/Parts/78245/Control-Arm-Bolt-Front-Lower-308765014012/
Left and right hex head bolt: https://www.ecstuning.com/b-genuine-mercedes-benz-parts/bolt-priced-each/308765014023/
Nut for tapping screw: https://www.eeuroparts.com/Parts/78247/Control-Arm-Lock-Nut-Front-Lower-2029900851/
I cannot find the part numbers for the bolt and nut holding the outer bushing to the shock absorber, sorry.

If you don't want to go the new self-locking nuts/bolts route, I suggest you check on the forum for the use of a thread locker. Mercedes made those bolts and nuts non-reusable, unfortunately. Once loosened, they won't be as tight the next time you try to tighten them.
https://www.benzworld.org/forums/17753306-post5.html
 
1 - 20 of 60 Posts
This is an older thread, you may not receive a response, and could be reviving an old thread. Please consider creating a new thread.
Top