Mercedes-Benz Forum banner

Dreaded evaporator replacement

13K views 30 replies 7 participants last post by  martins595  
#1 ·
I finally decided to bite the bullet and undertake the replacement of my evaporator on my 600. On top of the evaporator replacement I will also replace all seals, expansion valve and dryer in order to recommissioned the ac.

I am also checking sensors to ensure they are ok.

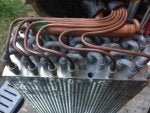
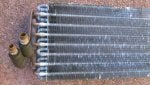
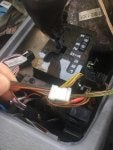
This is the current state of the job which is about 4 hours in
 

Attachments

#3 ·
I will inspect / test the heater core, if it looks at all corroded I will replace it. I have no desire to repeat this job.

I will come up with a list which is likely to include all the small bulbs which are hard to get to while access is good.
 
#5 ·
If I might make one small suggestion. Pull your front carpets completely out. You have nothing left holding in your passenger carpet, and you probably only have the nuts for the accelerator pedal holding in your driver's carpet. That way you won't be fighting them every time you try to do something in the center tunnel area. They come out remarkably easy.
 
#7 ·
Hi, thanks I did end up pulling them after the picture was taken.

I did 30 minutes last night to try and remove the HVAC unit. Got very close with it pulled back. Got to get some wiring out the way.

I am kicking myself for not pulling the gear leaver back to 2 position. It is currently in P, does anyone know how to move this manually as I tried with the key but it is remaining in lockout.

I think it might be remaining in lockout as the sensor round the key barrel has been disconnected?

Hopefully over the weekend I will get a chance to completely remove the HVAC and start the removal of the evaporator
 
#12 ·
I got my local dealership to supply me the RHD part number and then I cross referenced with suppliers. I ended up buying a trucktec part for under ÂŁ100 delivered.

I can 100% verify the part is good once I have the HVAC apart. From an initial look it looks ok and the supplier did check reg / fitment.

Part number is 02.59.049. quoted as replacing 140 830 2158 and 140 830 2258
 
#13 ·
The original evap cores are stepped, I think all new cores are not, so on one end you need a filler piece. There is a new part available, no idea what the part number is tho, I used various bit of plastic & high grade foam & quality adhesive and made a DIY version. If your replacement core is stepped, no need tho.
 
#14 ·
So good and bad news

The Trucktec part sent must be a LHD part. It will not fit a RHD. That’s the bad news.

The good news is - on inspection and pressure testing the original evaporator core is fine. My car is the last of the W140’s being an 98 build and sold in 99. The evaporator core is primed for protection at one end and the end with the expansion valve which is not coated looks in good condition. I will post a picture of the evaporator later however I assume Mercedes have rectified the corrosion problem from earlier years by protecting the evaporator with primer when I compare this to pictures of earlier cores which were not painted.

I have mixed feelings about this not finding the evaporator to be faulty, however it’s only taken 5 hours to remove completely which was a lot quicker than expected. I at least don’t have the issue of tracking down a new part and I can do some preventative maintenance by priming the end which is bare metal.

I will replace the expansion valve and dryer to overhaul the AC. The hissing from behind the dash is a bit of a mystery, it could have been a leak at the expansion valve sounding like the evaporator core.

I can at least now check all pipe work when I put it back together.

Picture of the HVAC yesterday before pulling the evaporator.
 

Attachments

#17 ·
nice avatar!

Not sure how the old evap was tested, but I think a new evap will last longer than the original part even if the original part is not leaking. The vemo unit is not painted like the original Behr, but is all aluminum construction, not copper & aluminum as per the original. Paint was all cracked on the original anyway.
 
#23 · (Edited)
I can tell from that pic above that the evap has been leaking.

These pics of mine don't say much as the core have been out in the weather. Clues of a leak on the core were not obvious but the enclosure had signs of oily residue making its way to the RHS drain. The AC guy pointed out subtle traces of oily/green patches on one end of the core. (The way the photos are, it look much much more obvious than in the flesh). The leak I had would take 3+ months to dump most of the gas.

Change your evap.
 

Attachments

#24 ·
I was looking for the oily residue on the hvac casing and evaporator but didn’t find anything.

It turns out my leak seems to be either the rear evaporator or the connection leading to the rear evaporator as it does not hold vacuum.

So far I have tested the main evaporator, condenser and compressor which all check out ok at this stage. The rear evaporator as tested from the engine bay which obviously includes the supply line seems to be the problem.

So next stage is to trace exactly where, replace whatever is causing the leak, put the system back together and, vacuum test it and if that goes well put some charge into it and see what happens.

I will do all this before re-installing the dash just in case.


I recommissioned my W124 ac 2 years ago which turned out to be one rubber o ring as the main culprit. In the process I put a new condenser, dryer and sensors on it and it’s been working well ever since
 
#25 ·
Cool. Was trying to manipulate you into changing the evap hehe. I didn't know your car has rear AC as well. The PO of my 600 SEL, Trevor, removed all the rear AC system out of it, and no wonder why.
 
#26 ·
Some time has passed due to other commitments but over the last few days I have been able to test the system for leaks. I narrowed the leak down to the large bore pipe which takes the cooled refrigerant to the rear evaporator.

So I pulled the first section of the pipe which goes under the wheel arch as the other part of the pipe runs mainly in the car. Low and behold a number of suspect areas of corrosion which must be pinholed. The leak was very small.

New part ordered from MB at ÂŁ80 which is not too bad. I am pretty confident that is the culprit. Part arrives next week which gives me some time to put the dash back in but keep the centre console out
 

Attachments

#27 ·
Having replaced both pipes that feed the rear evaporator I can confirm that the ac is now holding pressure for the first time since I bought the car which is about 5 years.

I also got a chance to repair one of the flap servos in the HVAC when I had it out and have tested all the flaps - they are all operating properly. So the question will be how good the rest of the system is and how long it will last. The condenser and ac pump are original but look ok condition so hopefully they will last a few years yet

I am very happy just to have proper climate control working finally
 
#29 ·
So I am busy putting the interior back together and have a question about an electrical plug which I can’t find a home for.

I have not labelled it so I suspect it is not used on my car. Does anyone know what the white plug should fit?

It is on the same harness for the electric windows
 

Attachments