Mercedes-Benz Forum banner

W211 Tail light removal

35K views 13 replies 12 participants last post by  Ray R  
#1 ·
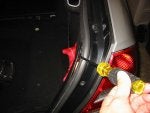
Anybody know how to remove the right side tail light on a W211? A few days ago there was a large bug buzzing around my interior that I couldn't persuade to leave. When I stopped seeing that bugger I thought he was gone but he found his way into the tail light housing and expired clawing at the clear lens around the turn signal.

Now I know it is a pain to remove the lens and you wouldn't even notice the carcass unless you were looking at the lens, but it bugs the crap out of me cuz I know its there.

If I ever find out how to post a picture of its remains staring out from behind the clear lens I am sure most people who see it will say its not worth the bother to remove the lens just to get rid of a dead bug, but little things like that bug me.
 
#2 ·
MB probably does not consider changing light bulbs an owner task for the W211. I recently removed the left side taillight. It's not difficult, but, this project will probably take you an hour or so.

You have to remove the plastic trim along the rear edge of the trunk opening. It is held in with a few plastic fasteners. There are two parts to the fastener. Pry the center out with a small screwdriver. Make sure you protect the trim from being scratched by the screwdriver. Then each top corner is held in with a concealed clip on the inside. Before removing this trim piece you need to disconnect the cable for the bulbs on both sides.

You need to remove the side trunk liner to gain access to the taillight. It is held in with some push pin type connectors and a few screws (holding the net clips in place). The right side is different from the left. I recall that it was necessary to remove the upper cover over the spare tire before removing the side panel You may be able to just pry the rear edge of this liner away to gain access to the five 8mm nuts holding the taillight in place. There are four on the back and one on the side. You will hace to remove the "bulb support" in order to get to your dead bug.

Hope this helps.
 
#3 ·
I remember hearing somebody saying the right (passenger) side is blocked by some kind of air tank, probably for airmatic or dynamic seats. If you have this air tank you will need to remove it to get to the light.

The whole process is a real pain in the ass. The MB engineers decided common people shouldn't replace a lightbulb so they designed it as dealer service repair. :(
 
#5 ·
Hey i had the same thing,,a huge dead grasshopper had found his way in there and then died trying to escape lol,,,i thought,,,no big deal,,i hate seeing him in there and will just take him out,,errrrrrrrrrrrrrrrrrrr,,,MB could have made this a much easier task!!!!!!!,,,many swear words later he was out,,,,but im not sure how many dissasemblies these cheap plastic fasteners can take??????
 
#7 ·
Trouble in access to Tail Light

Hi,

I am trying to get access to Tail Lights for their replacement with 07 Style.
When I tried to remove the plastic trim in the rear end of the trunk I could not pry the center part out with a screw driver. The center part seems to be strongly held with 2 side fasteners? (please see my pictures). The side top corner fasteners are easily loosened as you see.
Can someone give me further instruction on how to remove the center part?

Thank you.
 

Attachments

#11 ·
i have the same problem :( only i got a rolly polly stuck in my left one... a very odd bug to be in your car in the first place lol im going to take it out today since i came across this thread :thumbsup:
 
#13 ·
A Clarification:

Tools needed:
star #20
small flat screwdriver.
8 mm - if you need to replace the box itself.

The process:
1. On the plastic bar there are 6 latches: 2 on each side and two as appear in the Red marks of bs79's picture. First pull out the inner part of them, and only then take them out.
2. Then the plastic bar can be loosen.
3. Take out the lights plugs on both ends.
4. To have better access to the left tail lights unit, take off two round latches similar to the 6 mentioned before on the upper left side of the carpet near the hinge, and two 20 star screws on the bottom.
5. The lights box is attached by 5 nuts of 8mm.
6. The electric board is attached to the plastic box with 3 star #20 screws.