Mercedes-Benz Forum banner

Rear power window/motor DIY

137K views 168 replies 41 participants last post by  Kgingo  
#1 ·
To investigate problems with a W209 rear power window failing to operate correctly, there are a number of drawings in the WIS that cover the steps required. These are included below.

This is the sequence:

1. Removal of the side panels to inspect the glass & motor
2. Removal of the rear side window (glass)
3. Removal of the rear side window (regulator)
4. Removal of the power window motor.

Note: As I have not done this procedure myself, I have no idea where the pitfalls are!
 

Attachments

#2 · (Edited)
I want to thank keyhole for posting the WIS's for replacing the rear window regulator on the W209. I was able to save $400+ in labor to the mechanic :bowdown::bowdown:

The procedures outlined in the WIS's are pretty much exactly how it goes. Use each WIS in the order keyhole has them posted. The one thing I didn't see in there (and maybe I just missed it--which would have saved me some frustration had I seen it :eek:) is that in the coupe, in order to remove the lower side panel, it is necessary to remove the C-pillar trim panel by removing the SRS badge and accessing the Torx screw underneath. Once that's out, the panel just unclips, the lower panel will be free to move and you have access to the innards.

I had replaced a couple of regulators in the past in other cars, so I was shocked at how much this part cost (found it on partsgeek for $440+) :eek: So, I was needless to say happy to avoid paying my friendly neighborhood dealership another $400+ to do the job. It took me about 2 hours to tear it all down and an additional 2 hours to put everything back together. If I ever have to do it again (God please no), I'm sure I can do it quicker :thumbsup:
 
#141 ·
I want to thank keyhole for posting the WIS's for replacing the rear window regulator on the W209. I was able to save $400+ in labor to the mechanic :bowdown::bowdown:

The procedures outlined in the WIS's are pretty much exactly how it goes. Use each WIS in the order keyhole has them posted. The one thing I didn't see in there (and maybe I just missed it--which would have saved me some frustration had I seen it :eek:) is that in the coupe, in order to remove the lower side panel, it is necessary to remove the C-pillar trim panel by removing the SRS badge and accessing the Torx screw underneath. Once that's out, the panel just unclips, the lower panel will be free to move and you have access to the innards.

I had replaced a couple of regulators in the past in other cars, so I was shocked at how much this part cost (found it on partsgeek for $440+) :eek: So, I was needless to say happy to avoid paying my friendly neighborhood dealership another $400+ to do the job. It took me about 2 hours to tear it all down and an additional 2 hours to put everything back together. If I ever have to do it again (God please no), I'm sure I can do it quicker ?
Hi,
Do you know where I can find instructions on how to restring the cables on the regulator bracket? I purchased to repair kit, and I'm having a hard time putting it back together.
 
#3 ·
Just curious, what was wrong with the regulator? I had a failure of one on the C240 and it was just the plastic clip at the bottom of the glass (a common failure). I fixed it with a small bolt and nut.
 
#4 ·
3D Puzzle

I have a 2005 CLK320 coupe, my rear driver-side window 'klunked' when opening the door and the window dropped an inch and froze there. Following Keyhole's excellent posts I was able to remove the bad regulator (a plastic block connecting the 2 ends of the lift cable snapped and jammed the unit). PartsGeek and the Mercedes on-line parts sites both had units at $385. Things to be aware of during this process - 1)if your window is not fully closed the bolts on the lower window will not line up with the access holes on the inner panel & you'll need an offset wrench, 2)before you install the new unit set the adjustment bolt at the bottom of the unit (the one accessed under the ext trim) to the same depth as the old one or the window won't seat properly when closed, 3) remove the battery cable to reset the window memory so the new unit will be able to close fully. There's no way you'd be able to attempt this without Keyhole's posts - lot's of 'hidden' bolts/releases, take your time and you can do this yourself without too much aggravation.:thumbsup:
 
#5 ·
remove the battery cable to reset the window memory so the new unit will be able to close fully.
Instead of doing that, why not just pull the fuse - #32 for left rear, #33 for right rear.
 
#9 ·
Here we go. I always felt that the cabrio was harder to work on than the coupe. These procedures convince me that I am right! :)

I have included 2 additional drawings that might be required. There are also further WIS drawings to 'adjust' the glass - but changing the regulator should not require that.

1. remove/install cabrio rear seats & backrests.
2. remove/install cabrio rear side panelling
3. remove/install W209 seat belt extender
4. remove/install cabrio rear side window (glass)

continued...
 

Attachments

#157 ·
Here we go. I always felt that the cabrio was harder to work on than the coupe. These procedures convince me that I am right! :)

I have included 2 additional drawings that might be required. There are also further WIS drawings to 'adjust' the glass - but changing the regulator should not require that.

1. remove/install cabrio rear seats & backrests.
2. remove/install cabrio rear side panelling
3. remove/install W209 seat belt extender
4. remove/install cabrio rear side window (glass)

continued...
My car is a 2005 CLK 500 Cabriolet. I followed the instructions to remove/install cabrio rear seats and back rests. However, Even after loosening the 4 bolts at the bottom of the seat back, the seat backs will not come loose at the top in the center. I’ve tried pulling them straight up and also tried pulling them forward. The bottom and far right and left sides are loose. It feels like they are bolted in higher up on the seat back...did I miss something? Have others had similar problem?
 
#14 ·
As you will have read, the MB method is to remove the glass completely. However, many members have discovered that sometimes they can short-cut the official procedures, and save themselves a lot of work. In this case, I am not sure what you can do there, but I'm sure that you will figure it out.

Also some of the WIS procedures may appear to over-lap each other, so if something appears unneccesary, ignore it. :)
 
#17 ·
I have similar problem with a 2007 CLK350 in the rear passange window. The windows goes up/down about half way, it clicks and stops. The stop position is below the port holes alignment with the screws that release/hold the glass. The window does no go up, I have tried to pull it up, without too much force. It will not yield.
It would seem this is the regulator, which would make it the second unit in this car, same window. It was replaced about 3.5 years ago at a dealer cost of $1500. I call the manager and he informed me that this part is a 'consumable'. As the saying goes shame on you once and on me twice. Hence my wanting to take this on.

Thanks so much for your previous posts keyhole, hope you can provide me some guidance.
 
#18 ·
azbenz

Assuming that you have a coupe (not stated above), I guess that you have already removed the side cover and are using drawing: Remove/install rear side window (AR67.30-p-4000Q), and the glass is preventing you from removing the screws (#4) in step 6.

Just a suggestion - but try going to the drawing for Remove/install power window motor, and remove the motor. That may release the window lift mechanism (regulator) which might allow the glass to be moved.
 
#19 ·
Thank you all for this informative thread downloaded and printed all the .pdf, procedures and illustrations. My 03 W209 CLK55 coupe left rear window went down and will not come back up. Can hear some clanking noise when the up button is pressed. Pulled the fuses to reset, did not resolve the issue. Removed the upper portion of the interior and left rear bottom seat (I probably did not have to remove the seat but I did not want to damage it during the repair).
1. Do you need to remove the lower portion of the interior panel? You probably know from my question I have not removed the regulator yet. Plan to remove the regulator within the next two days.
2. Have plastic trim removal tools to pry the exterior trim strip? Do you remove the whole piece or just the rear portion? Is this an adjustment or is this attached to the body?
3. Researched used regulators at $210.00 + free shipping to MB Superstore at $408.00 + $27.00 shipping. Wanted replacement cost in the event I can not repair the regulator. Any information you can supply is greatly appreciated, want to have as much information as possible to make the repair as smooth and uneventful as possible.
Thank you for your assistance!
 
#20 ·
1. Do you need to remove the lower portion of the interior panel? You probably know from my question I have not removed the regulator yet. Plan to remove the regulator within the next two days.
I think that you do. This was pointed out by member g8rdmd29 in post #2 . He also removed the C pillar trim to unclip the lower panel, but the procedure in the drawing for removing side panel in rear (first pdf on post #1 ):

Step 13 says: remove rear seat side padding AR91.12-p-1710p. Attached below.
Step 14 says: unclip lower side paneling. That route might be easier than removing the C pillar trim, with the airbag issues.

2. Have plastic trim removal tools to pry the exterior trim strip? Do you remove the whole piece or just the rear portion? Is this an adjustment or is this attached to the body?
No. Don't do that!

I cannot find the WIS instruction for removing the external trim strip under the rear side window. However I had to replace the trim strip on my driver's door a while back, (urban vandals who left the bracket on the door) so I have an idea how it fits. There are several moveable fixings on the strip that go into the door holes, and are then moved sideways to lock into position.

When you open the door, on the side edge face you can see a screw that holds a plastic bracket. If that is removed, the strip can be slid sideways & removed from the holes in the doors. If you try to prise the strip away you will break the fixings and possibly damage the panel.

Now the rear strip (and the front strip on the fender) have no visible holding brackets, so I have to assume that you carefully slide the entire trim strip sideways (not just the shiny part which does not come off) until it clears the fixings. Note the holes shape on the door.
 

Attachments

#21 ·
Hello Keyhole and all,
I have removed the regulator and order a new one. The problem was the soft plastic piece that anchors the cables broke at the bottom. After inspecting closely for the broken piece at the bottom of the window well and could not find at all. So maybe it is was not new after all as the broken portion had grease on it (it should have been completely clean). At any rate it is a bit tricky to remove the top window panel to remove the regulator. I made the mistake of removing the window as instructed. But since the window was only partially up, this was quite difficult and time consuming. It is a lot easier to lower the window completely, remove the top plate, this will allow for your arm and hand to go where the window bolts are located.
I wish I had time to make this plastic piece myself, from a thick piece of lexan plastic. The dimensions are a bit tight, but not too bad as there is about 0.5cm of travel for the cable adjust. I had no trouble rewinding the cable back to motor.
The new regulator + motor was ordered will post when completed.
 
#22 ·
I made the mistake of removing the window as instructed. But since the window was only partially up, this was quite difficult and time consuming. It is a lot easier to lower the window completely, remove the top plate, this will allow for your arm and hand to go where the window bolts are located.
I did wonder (in post #14 ) if totally removing the glass was overkill.

Thanks for pointing this out for future readers. :)
 
#23 ·
CLK350 back window

Hello Keyhole,
Thanks so much for your posts, it may this repair possible. Many many thanks.

So, I received the new part today. The part was already set with the correct stop distance, so I did not need to do any adjustment.

All is back now and back to normal. Putting all back was fairly trivial.

So... was it worth the time. The dealer wanted $1700 after tax and an independent shop 1100 (650 for regulator and 350 labor + 10% tax in AZ).

To this a resounding YES, it is not about money but what I learned, plus it cost me $450 plus overnight of $2, so this should pay for taking my wife out to dinner.

The other item learn is that this brand new part will fail in a few years. The reason, is the use of soft plastic to anchor the cables. Plus this particular window is fairly tight at top.

Too bad I have rewarded MB with a purchase of a E350 4x4 last year ... This would have been a deal braker to me.

When this breaks again (and it will), I will post the CNC file so any shop can make the replacement :eek:) as this repair should have cost $10 (at most)
 
#24 ·
Keyhole
Is it possible for you to post WIS:
AR91.12-P-1710P Remove Side Upholstery
AR68.30-P-4490Q Remove paneling C-pillar

Received the new left rear regulator (huskerparts.com $380.25+11.45 shipping) but have still not removed the defective regulator.

Removed the C-pillar panel but having difficulty removing side upholstery. Not sure how much force I should apply to the side upholstery, trying to be careful to not damage or destroy the tabs and fittings by forcing anything. It appears the lower panel needs to be removed to unclip the power window switch.

Without your assistance this repair would be a whole lot ore difficult.
 
#25 ·
Keyhole
Is it possible for you to post WIS:
I'm not Keyhole, but...

AR91.12-P-1710P Remove Side Upholstery
http://benzbits.com/w209/RemoveBackSeatSIdePanel.pdf

AR68.30-P-4490Q Remove paneling C-pillar
http://benzbits.com/w209/RemoveCPillarTrim.pdf

Removed the C-pillar panel but having difficulty removing side upholstery. Not sure how much force I should apply to the side upholstery, trying to be careful to not damage or destroy the tabs and fittings by forcing anything. It appears the lower panel needs to be removed to unclip the power window switch.
Once you remove the bolt on the bottom of the side cushion panel, you have to push (or pull) up on it. It has a hook that clips into a slot in the hat shelf.
 
#28 ·
Thank you to everyone that contributed to this thread! Without your assistance replacing the left rear window regulator would have been more difficult, more expensive and more time consuming. This forum is a wealth of knowledge and information.

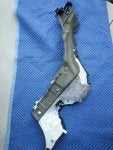
I have completed the installation of the window regulator with only one additional three prong plastic trim panel clip required. Removing the regulator is not difficult if the information provided in this whole thread is followed. The hardest parts of the procedure was removing the interior trim panels and exterior quarter panel trim (the hidden fasteners, knowing where and how to pull). Having the correct information makes all the difference. Pulling on a part that you are unsure how to remove can result in damage, additional expense and more time to complete the repair. This post includes details the factory repair instructions do not include, hopefully anyone replacing the rear window regulator following the previously post repair instructions + these tips will make the task much easier.

1. C-pillar Trim Panel Removal.
a) Remove the SRS logo cover, this cover has two "L" shaped prongs one on each end of the oblong emblem. Use a plastic trim removal tool to gently pop the end of the cover out. The fastener under the logo cover can then be removed.

b) The top part of the trim panel (next to the window) has two tabs that are secured to the body with spring clips, gently pull the trim panel down and away from the back glass. (The spring clips may stay on the trim panel plastic tabs when you remove the trim panel, it is easier for installation to put the spring clips back on the metal body tabs. You can feel and hear the spring clips seat when the plastic trim panel tabs are inserted into the spring clips).

c) The back end of the trim panel has two more tabs that hook under the package tray panel, gently pull toward the front and up to remove.

2. Upper Rear Trim Panel Removal.
a) The rear upper trim panel SRS badge is removed the same way the C-pillar SRS badge is removed.

b) The upper trim panel is released by pulling the latch mechanism toward the front. The latch secures the upper trim panel to the lower trim. The release mechanism has "L" shaped connectors that hook into companion "L" shapes molded into the upper trim panel. Be careful, the latch only has about 10mm of travel and made of plastic, with a small piece of stiff wire, form a small "J" hook approximately 8mm. The end of the latch is located under the forward edge of the trim panels at the part line, between the upper and lower trim panels. Insert the wire "J" hook into the eyelet of the latch and gently pull the latch mechanism toward the front of the car, remember only 10mm of travel. (The latch mechanism cannot be purchased separately if damaged it is part of the lower trim panel (left: 209 690 79 25 7F53; $390.00, right: 209 690 80 25 7F53; $424.00). I know this because I have a copy of the collision repair parts for CLK 2003-09 with MSRP prices, it is very handy being able to identify parts and the factory part numbers (anyone interested PM me). The upper trim panel can now be removed.

3. Lower Trim Panel Removal.
a) The lower trim panel removal requires the removal of the lower seat cushion for which ever side you are repairing. The lower seat cushion removal is pretty straight forward. Word of caution be gentle removing the plastic covers that cover the seat bolts (front lower edge of the seat bottom).

b) The lower upholstery cushion is anchored with a tab inside (next to the seat) on the top and a fastener on the outside bottom (next to the lower trim panel). The bottom fastener is located next to the lower trim panel and hard to locate because it is covered with a piece of upholstery fabric. Once the fastener is removed, pull the upholstery up and toward the front.

c) Carefully remove the electronic key remote antenna wire from the lower trim panel cushion (the antenna wire is in a slot in the top of the lower trim panel foam), make sure it is out of the way while removing the lower trim panel (use a piece of tape to keep it safe).

d) Now the lower trim panel can be removed, there are 5 three prong plastic clips (Clip, Trim Panel 0069884378) that secure the lower trim panel to the body (if you gently finesse the clips out of the holes hopefully they will not break, however plastic becomes brittle with age so they may break in spite of how careful you are). Start at the upper rear, gently pull the panel toward the inside of the car away from the body. The next 3 clips are in the middle section and the last clip is located at the front bottom (near the floor at the back edge of the door jamb).

e) Lift the lower trim panel section and carefully remove the connector for the power window switch. The lower trim panel is now free to be removed.

4. Exterior Quarter Panel Trim Removal.
a) I used painter's tape and masked the body about 75mm wide around the whole quarter panel trim (to keep from scratching or marring the paint).

b) Use a plastic trim removal tool, starting from the front alternating top then bottom, slip the trim removal tool under the edge of the quarter panel trim and finesse the plastic trim clips to separate from the quarter panel. Work gently, the quarter panel trim has 4 two part plastic clips (fastener side - 0019887681; Clip, Moulding (3 sided) - 0119882878; Clip, Upper - 2099880078; Clip, Lower - 2099880178) one part attaches to the quarter panel trim panel and the other is inserted into the quarter panel holes. My experience was the body quarter panel clips came out of the holes in the quarter panel the plastic clips stayed connected.

c) Remove the piece of tape that covers the lower window regulator attachment/adjustment point through the quarter panel.

These are the little details I experienced and may be intuitive to others, the main point is to move slowly, hope you find the tips useful.
 

Attachments

#31 · (Edited)
Additional tips and information regarding Rear Window Fine Adjustments:

1. The W209 rear windows electronically do not fully close until the front windows are fully closed and sealed.

a) Leave the three bolts securing the window to the regulator loose enough to move the glass but tight enough to hold any glass adjustment.

b) With the door open (front door window down) and the rear window up to within 5mm of making contact with the upper rubber seals, adjust the lower window regulator torx adjustment screw (through the exterior quarter panel).

c) The exterior attachment/adjustment serves two purposes, it secures the bottom of the regulator to the body and provides fine adjustment (alignment in the rubber channel) of the window left and right. The attachment securing nut is 13mm and the adjustment screw (external torx head) has a nylon insert to maintain the adjustment.

d) The securing nut must be loose enough to make the fine window adjustments required to line up the window with the rubber channel. You can see the window move left and right (viewing from front looking toward the rear) as you turn the torx head screw. After centering the window in the channel close the front left door.

e) Use the switch to raise the glass to the highest (up) position. With the palm of your hands (one inside and one outside) push the glass up at the front to fully seat the glass in the rubber window channel, tighten the front bolt in the glass a little to hold this adjustment. Enter the rear seat from the passenger side (to not affect the window position and adjustment, re: working on left rear window). Push the rear of the window up from the bottom to fully seat the glass in the window channel. Tighten the rear window bolt to hold this adjustment. (Note: You will see the glass is now positioned above the rubber stops on the regulator and the securing window bolts are centered in the holes in the body, after fine window glass adjustments.)

f) Open and close the front door to view the operation of the front and rear windows to ensure both front and rear windows are fully seating and sealing aganist the seals for the final programmed automatic window adjustments. The rear window should be fully seated into the rubber window channel and the front edge should be parallel (from top to bottom) and fully sealed to the vertical rubber strip. Adjust and repeat these steps as required to obtain the best fit. If you have followed these steps, your initial efforts should achieve the desired results.

g) Tighten the 13mm securing nut through the exterior quarter panel without moving the torx adjusting screw. This is a little difficult because the hole in the quarter panel is small and you must hold the torx screw from rotating (changing the right and left window alignment in the rubber window channel) as you tighten the 13mm nut (Longnose adjustable pliers work well).

h) Cycle the rear window up and down to verify fit and alignment.

i) Drive the car to ensure no wind noise from any misalignment and to ensure the rear window operates properly at speed. I was very surprised how effective the MB sound deadening and noise cancellation is. Considerable road noise was experienced with the interior panels, several plugs and sound deadening insulation removed to replace the window regulator. Note: it is extremely important to replace all plugs and sound deadening insulation to maintain a quiet noise free interior.

j) Torque the window bolts that secure the window to the regulator to 9Nm, prior to reinstalling the interior and exterior panels.

Hope these tips are useful.
 
#32 ·
Can't open soft top, rear window wont go down

Hi all,my soft top wont open , I assume it's because the rear left window doesn't go down (it only goes down about an inch). I followed the instruction from other members(thanks everyone for their time and effort) here but right now I'm stuck.I can't ,for life of me ,find where the window regulator is.I've attached picture where I'm currently stuck wit my diy project.If anyone can point me in the right direction I would really appreciate it.Also, i can get used window regulator from 2005 clk coupe, will it fit?My apologies for bad english, it's not my first language.
Ed
 

Attachments

#33 · (Edited)
Before you proceed, have you tried resetting the window circuit?

You are almost there.

- Look at the diagrams attached in post #9 it shows where the bolts are for the window and the window regulator.

- The window must be removed before the regulator can be removed.

The part numbers are the same for the coupe and the convertible left rear window regulator MB part #2096700103 .
Chevrolet GMC Cadillac BMW Mercedes Benz Parts and Accessories
BODY HARDWARE / QUARTER PANEL / GLASS / Regulator
2096700103 - Regulator CONVERTIBLE Left Online Price $380.25 + $11.25 ground FedEx


- Something to consider, buying this specific part USED it will be as old as your car and possibly older. The plastic part fails due to usage and age, plastic becomes brittle with age. The parts that usually fail on the window regulator seem to be the plastic trolley parts where the up/down cables are connected on the window regulator, at least that was the part that failed on my regulator and I have only replaced this once in 12 years.

The regulator itself is powdercoated and built to last as long as the chassis. Everything on the failed regulator was in good order, except for the broken plastic trolley connection piece. If the trolley piece had been made from aluminum with nylon or Teflon or Delrin slides the trolley would not have failed. It is upsetting that such a small piece on the window regulator cannot be replaced separately when everything else is functioning. The window motor also part of the window regulator assembly was also in good working condition.

Hope this helps, Good Luck!
 
#35 · (Edited)
First have you removed the bolts from the track that secures the window to the regulator. You can only remove the window bolts when the bolts are lined up in the body openings, as shown in the diagram attached in post# 9.

- You should be able to push the window down, place the palm of your right hand in the middle on the outside of the glass and your left palm in the middle on the inside of the glass firmly grasp the window glass and push down. The window should move smoothly down in the track. You will be pushing against the motor gear but, it should move smoothly. I have a coupe so I had to push the window down as it was the only option to remove the window.

- Only push the window down enough to pull the window up and inside the car toward the inside of the car, to remove the glass. Now you can remove the bolts that secure the window regulator.

Let me know if you need further assistance.