Mercedes-Benz Forum banner

PSE - Removal, Refit and Check

272K views 166 replies 70 participants last post by  nikob14  
#1 · (Edited)
PSE - Removal, Refit and Check and Turn over as required

The PSE(A-37) has a vacumn pump to operate the door, boot and petrol filler locks.
It also controls the alarm (if fitted) and the interior light timer, door unlock crash sensor
Plus rear demister relay and ARA control model if fitted.
It comunicates with the DAS thru the CAN from the MFC unit.

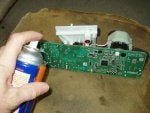
I just took mine out to check for moisture. I sprayed laquer over pcb and drilled a couple of 1.5mm holes in base as it can hold water there if it should get in. Water can overflow from blocked drains or faulty rubber boot edge seal.
(Also see post No 7 where I turned unit over ;))

1. remove floor liner
2. remove spare wheel (if fitted)
3. remove jack and holder (pullup at rear)
4. pull out foam box from bottom and remove by folding top back
5. unclip vac pipes (I marked to ident. This is important)
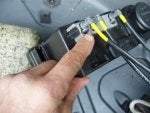
6. unclip 2 wiring loom plugs
7. using a small flat screwdriver to push detents remove base by lifting it as you go around.
8. remove small torx screws (3)
9. let unit drop into your hand
10. inspect for water damage or corrosion (mine was OK)
11. clean if required using nylon toothbrush.
12. spray on coating to seal pcb ( I also sprayed wd40 into connectors)
13. put unit back into housing. Ensure vac tubes line up with top holes
14. replace torx
15. ensure motor stand offs are alighned with base holes and refit base plate
16. refit cable connectors
refit vac lines
17. slip into foam box NOTE: some people have wrapped a plastic bag around whole lot here. I choose not to as moisture "may" get trapped in bag?
18. manouver foam box back into its recess (bugger of a job, mine tore
19. replace jack holder and jack
20 replace wheel or box if fitted
21. replace floor covering and run hand along top of rear edge to reseat under lip.

Good luck

Bazzle
 

Attachments

#129 ·
This post is really directed at Bazzle as I just wanted to say an enormous THANK YOU for really helpful information you have posted on the PSE problem on the R170 SLK. I had the symptoms that others have described, doors not unlocking, alarm going off at random etc.

My PSE was dripping wet but thankfully not corroded. A thorough dry out with a hair dryer, some PCB spray and all seems to work again. Everything that is apart form the interior (dome) light, this insists on staying on. As it is (according to other posts) also controlled by the PSE I guess there is a bit of damage that even with an eye glass I can't see. Maybe a short between the pins under the one of the two mufti-pin connectors (most likely the white one) but I am very nervous about de-soldering the socket on a dual layer, surface mount PCB to find out. Might make things worse.

I bought some 4/6mm pipe from a local aquarium shop to lengthen the yellow pipes and have thus managed to mount the PSE back in the car upside down as suggested.

So thank you again Bazzle, thanks to you I now have a working car and have not had to pay out a small fortune for a new PSE...brilliant. :thumbsup:

PS: if you happen to know which plug/pin controls the interior/dome light, well that would be the icing on the cake.

Kind regards

John UK based SLK 230 1999
 
#7 · (Edited)
Turning PSE upside down to reduce water damage.

You can trun your early PSE unit upside down like the later models. NO wiring loom req even though MB sells one?
Just need to lengthen VAC lines (yellow) 300mm (1 foot)
I used 6mm nylon pneumatic hose. The yellow line just pushes into it, (spit on it 1st and wiggle in about 1/2" or so.
Foam box fits on after unit held back in place.
Mark which hole you unplugged each line from before removal and cutting.
Not sure re post 2000 as loom is slightly diff due to no rear fuse box??

Bazzle
 

Attachments

#38 ·
Does this mean 2001+ are already upside down?

You can trun your early PSE unit upside down like the later models. NO wiring loom req even though MB sells one?
Just need to lengthen VAC lines (yellow) 300mm (1 foot)
I used 6mm nylon pneumatic hose. The yellow line just pushes into it, (spit on it 1st and wiggle in about 1/2" or so.
Foam box fits on after unit held back in place.
Mark which hole you unplugged each line from before removal and cutting.
Not sure re post 2000 as loom is slightly diff due to no rear fuse box??

Bazzle
Or can 2001+ model's PSE's be turned upside down without extensions?

Why is there not a recall if this is a problem waiting to happen on all R170's?
 
#8 ·
Great job Bazzle. Did you remember to use a soldering iron to burn some holes in the bottom of the foam coffin so the drain holes you put in the PSE housing have a place to drain through?

I did this about two years ago and have never had a problem with it.
 
#9 · (Edited)
n5160u said:
Great job Bazzle. Did you remember to use a soldering iron to burn some holes in the bottom of the foam coffin so the drain holes you put in the PSE housing have a place to drain through?

I did this about two years ago and have never had a problem with it.

Cant remember.

Next time I am going to extend Vac lines with plastic tubing and try to turn unit over.
Done see post 7 above

Bazzle
 
#10 ·
Bazel: I have been checking up in local stores what it awayable when it comes to the conformal coating. I have found two different types, and want to check with you what kind you used so I don't make a mistake :)

1, a spray that will keep the parts from rust/moisture, and cleans the circuits, but is not hardened.
2, the same thing, only that when this dries it gets getting hard and like a film/coating lying over the board. That will protect against water/moisture forever.

I think number two is the one that is sounds best to use? Or is there any issues related to cover the board?

Question is, soft or hard.
 
#13 ·
Got my car back from the dealership today after a PSE pump fix. I looked at the pump and apparently part of the fix now is to wrap the pump in a clear bag. I know this was discussed on other threads and it was stated that this could cause condensation to build up, but I guess MB doesn't care.

Should I go ahead and put a small hole in the bottom of the sealed bag or not?

I tried to pull out the unit to inspect the wiring and make sure they had performed the loop addition with a longer harness, but the bag was sealed and I didn't want to mess with newly completed work. According to the service print-out they did perform this harness extension/swap, but not sure what good that will do if the bottom "drain" holes on the pump are running right into a sealed bag. :rolleyes:
 
#14 ·
If all the wires and hoses exit at the bottom of the bag you will be OK. The water that gets into the car will run down the cables and hoses and if the cables extend below the bag and turn up towards it, than the lowest point is the wires and hoses and the water will drip off from the lowest point where it loops back up as opposed to the original version where the hoses entered the pump from the top and allowed the water to fill the pump housing.
 
#16 ·
n5160u said:
If all the wires and hoses exit at the bottom of the bag you will be OK.
From what I can see, the entire pump and foam shield are covered, and the only opening is with wiring at the very top of the unit, which has tape/adhesive sealing the bag around the wiring bundle.

The TSB has them add the loop in wiring that allows for the "lowest point" drip that you mention, but it appears that if this loop does now exist, it's inside the sealed bag (which does me no good). I'll have to take a closer look at this mess when I get the chance, but as I mentioned in the above post what I don't want to happen is the removal of the unit to result in me screwing up the sealant fix Mercedes has just performed (even if it's relying on a sealed bag to keep the unit dry).
 
#17 ·
My understanding of the fix was to lengthen the lines so the unit could be mounted upside-down. That way the wires and pnuematic lines are coming out below the pump, and the circuit board is at the highest point. If they lengthened the lines but mounted the pump in the same orientation as it was, I think they did it wrong. As I recall, someone with a newer SLK (2004 maybe) checked and his came from the factory with the pump in the upside-down position.
 
#22 ·
I had my PSE replaced a few years ago I was told to wrap it in a strong plastic bag another tip is to wrap tape or fix a grommet on all down wires/pipes to stop the water tracking down into the PSE which is the fault in the first place which was rectified by turning the PSE upside down in the later models. When I got my R171 the first thing I checked was the position of the PSE its not the same.

gary
 
#23 ·
homealone said:
I had my PSE replaced a few years ago I was told to wrap it in a strong plastic bag another tip is to wrap tape or fix a grommet on all down wires/pipes to stop the water tracking down into the PSE which is the fault in the first place which was rectified by turning the PSE upside down in the later models. When I got my R171 the first thing I checked was the position of the PSE its not the same.

gary
1st page updated to show how to turn PSE over :D

Bazzle
 
#24 ·
The PSE in my GF's 98 slk230 had enough length to allow me to disconnect the vacuum lines and invert the PSE unit and re attach the vacuum lines without extending them them via the rubber slip hoe method.It is semi tight but no kinks or sharp bends.

But to be noted, my issue is/was with water coming down the lines as the foam had a damp spot and the bottom of the PSE literally had a small amount of water in it.Minimal damage to the board and WD40 and rags cleaned it up for the most part...BUT here in lies my true problem from the water.My white harness is the one to make the alarm go screwy.Inside the harness is the damage that caused my particular issue.I have cleaned it as best i can without literally pulling each pin and cleaning the light green corrosion off two pins....If it re-occurs i will put some dielectric grease on it...that in itself would have solved 99% of our issues.

One hint when putting the PSE assembly back together.The vaccum tubs can be a bit stubborn to line up correctly..I took the WD40 red tube and slid it in the pse vacuum head and then assembled the top portion of the unit...made it simple.

On a side note about the bag idea from MB....no way would I suggest encapsulating a hot/cold item in a plastic bag.When there is a hot/cold(as in this case electric) part it WILL create some amount of condensation.It will not need any water from outside as it will pull the mositure out of the air in the bag when it cools....where is that water going to go?..No where.
The simple fix to a working PSE is to just flip that PSE upside down and put the foam back on it.Sealing up the PSE or the Foam in a plastic bag seems like a problem waiting to happen.:thumbsup:

This is really easier than it looks...:thumbsup:
 
#25 ·
PSE

Just had my first experience with my PSE and I did the same thing taking it out and using contact cleaner to dry the boards. Got it back in and everything was good. Drove it during the day and later I took it for a drive using the master lock key instead of the switchblade one. Now if I try to use the switchblade key it give me an start error message but does start without a problem using the master. I did have two occassions that afternoon when the alarm went off for now reason. Any ideas?:confused:
 
#26 ·
Bazzle, as usual, your step by step helped out a great deal.
5 hours ofter a car wash the alarm started to go off. A quick check of the PSE showed signs of water and corrosion. After drying it out and cleaning the corrosion off, all is well in the world. I'll pull it out again this next weekend to track down the actual problem with the water. I keep the traps clean but who knows what's deep down in the pipes.
Thanks to all for their posts!
Mark