Mercedes-Benz Forum banner

ML500 Rear Brake replacement. Pics attached

24K views 23 replies 13 participants last post by  theweis  
#1 ·
I replaced my rear brakes with Mintex pads and Brembo rotors. Here are the pics of rear brake mechanism that are missing in Pete's web site. (Pete, feel free to use them on your site if you wish to. Your page motivated me to do brakes myself.)
Notes:
1. My 2002 ML500 has 4 wear sensors on all four wheels. Luckily I checked before removing brakes and picked one sensor from local parts store.

2. Brake pistons can be pushed back with pad spreader, C-clamp or the easiest is following.
If you are replacing rotors and pads both you do not have to worry about scratching old ones. So insert two big flat screw drivers between pads and rotor on both sides and twist them together. If you twist one side alone other side piston will pop out. Also if the both pistons are all the way in flush with caliper body, you are good to insert both side pads effortlessly.

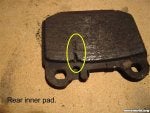
3. Rear wear sensors are connected to the outer pads. Both of my inner L & R pads were worn beyond sensor activation point.

4. Front caliper bolts are 21mm. Rear Caliper Bolts 17mm.

5. My brake fluid level was slightly below low mark on reservoir. Once all pads were replaced level came back to high mark. So I did not have to add fluid nor spill.

I am not a qualified mechanic. All of above are my observations and I assume no liability for any or all problems you might encounter following these notes.
 

Attachments

#6 ·
RE: Both rear wheels have the parking brake configuration shown.

Darkmann - 10/28/2004 1:09 PM

I'll like to know a couple of things, however:
1) How is the parking brake cable adjusted?
2) Where does one put jack stands under the truck?
Darkmann,

Please check bottom of Pete's brake page for adjustment procedure. Arrow marked adjuster in above picture is the star wheel he is reffering to. It can be reached through lug hole when the rotor is mounted.

http://www.petefagerlin.com/ML/brakes.htm

There is a different procedure to adjust cable tension I saw somewhere online. I did not follow that though.

These pictures will answer the jack stands question. I used ML jack and a another. I always like to have a back-up [:D].
 

Attachments

#8 ·
I know this is probably old, but I have noticed something really strange with all the DIY pictures of changing rotors. Does anyone sees that the bolt/screw? that sticks out behind the rotor that holds the wheel isn't there? Well they aren't in the pictures of DIY forum. How do we remove that before taking the rotor apart? Do we need to remove it?

Thanks
 
#9 ·
em17henry - 3/19/2006 12:21 PM

I know this is probably old, but I have noticed something really strange with all the DIY pictures of changing rotors. Does anyone sees that the bolt/screw? that sticks out behind the rotor that holds the wheel isn't there? Well they aren't in the pictures of DIY forum. How do we remove that before taking the rotor apart? Do we need to remove it?
I assume you mean that the five lugs that hold the tire are missing? If so, it’s a simple explanation. The ML (like most German cars) uses lug “bolts� instead of lug “nuts�. When you remove the lugs to take the tire off, you are removing a bolt, not a nut on a stud.
 
#11 ·
pleubner - 3/21/2006 3:00 PM

Rodney,

You implying he has never takent he tire off?
pleubner - 3/21/2006 3:00 PM

Rodney,

You implying he has never takent he tire off?
Well, that's the only thing I could figure from the question. He asked about the “bolt/screw? that sticks out behind the rotor that holds the wheel isn't there�. I just assumed the possibility that he had not yet had reason to remove a tire from his ML.
 
#12 ·
When changing rotors, even pads, change the brake fluid as it is hydroscopic and absorbs moisture over time lowering the boiling point = earlier brake fade or worse (no brakes or corroded brake lines). Good DOT brake fluid is cheap and using something like the Motive Power Bleeder makes a complete brake fluid flush a snap.

http://thedynoshop.net/power_bleeder.htm
 

Attachments

#13 ·
jangr320 - 3/21/2006 11:19 PM

When changing rotors, even pads, change the brake fluid as it is hydroscopic and absorbs moisture over time lowering the boiling point = earlier brake fade or worse (no brakes or corroded brake lines). Good DOT brake fluid is cheap and using something like the Motive Power Bleeder makes a complete brake fluid flush a snap.
Unfortunately, the ML does not use “Good DOT brake fluid� that is “cheap�. It requires “DOT 4+� fluid that meets the Blatt 331.0 spec (260°C equilibrium boiling point, 180°C wet boiling point). I believe that “DOT 4+� is some sort of MBZ trade name and is not an official DOT specification. Check Wolfgang’s info on various brake fluids:
http://www.whnet.com/4x4/brakefluid.html
I went with ATE Super Blue (which is the same as ATE Typ 200 with a blue tint). The color change made it easy to see when I had evacuated all the old fluid.
 
#14 ·
em17henry - 3/19/2006 1:21 PM

I know this is probably old, but I have noticed something really strange with all the DIY pictures of changing rotors. Does anyone sees that the bolt/screw? that sticks out behind the rotor that holds the wheel isn't there? Well they aren't in the pictures of DIY forum. How do we remove that before taking the rotor apart? Do we need to remove it?

Thanks
Lug Bolts are the only missing thing in those pictures. If you want I have more pics taken on that brake job.
 

Attachments

#15 ·
rudeney - 3/22/2006 1:38 PM


Unfortunately, the ML does not use “Good DOT brake fluid� that is “cheap�. It requires “DOT 4+� fluid that meets the Blatt 331.0 spec (260°C equilibrium boiling point, 180°C wet boiling point). I believe that “DOT 4+� is some sort of MBZ trade name and is not an official DOT specification. Check Wolfgang’s info on various brake fluids:
http://www.whnet.com/4x4/brakefluid.html
I went with ATE Super Blue (which is the same as ATE Typ 200 with a blue tint). The color change made it easy to see when I had evacuated all the old fluid.
Oops, that's what I meant by "good DOT" fluid - I use ATE Super Blue too - it's pretty cheap at $11/L which was more than enough to flush the entire system with my Motive PB in the ML. I change the brake fluid on my Porshes every year, more if I do track time and the Power Bleeder makes it an easy 1 man job.
 
#16 ·
Quick question sam_ml500,
How did you remove 2 "roll pins" from the front tires as described in step #6 from http://www.petefagerlin.com/ML/brakes.htm

I found it pretty hard to remove those pins after pounding and pounding through like a maniac at those pins!!!... any tricks?

My direction of pounding was from the outside (facing the rotor) towards the inside... Was I doing anything wrong? ...one thing for sure... rust was everywhere...

Just to let you know, I did change my front & rear brake pads last year 2005 July and now was determined to change rotors... it seems pretty easy from instructions, ..but man... them rotors are hard to remove!!!...

Thanks
 
#18 ·
wannaln - 3/28/2006 3:28 AM

Quick question sam_ml500,
How did you remove 2 "roll pins" from the front tires as described in step #6 from http://www.petefagerlin.com/ML/brakes.htm

I found it pretty hard to remove those pins after pounding and pounding through like a maniac at those pins!!!... any tricks?

My direction of pounding was from the outside (facing the rotor) towards the inside... Was I doing anything wrong? ...one thing for sure... rust was everywhere...

Just to let you know, I did change my front & rear brake pads last year 2005 July and now was determined to change rotors... it seems pretty easy from instructions, ..but man... them rotors are hard to remove!!!...

Thanks
I did not have to remove those slugs (pins), the rotors need to be bashed from the back (i.e. towards you) at 90 degree intervals round the cirumference with a five pound hammer and they will come off, it is rust holding them.

I put a small amount of copper grease on the back of the rotor before assembling in the hope they will be easier to remove the next time.
 
#19 ·
Thanks sam_ml500 & marcelc,
I will try buying this tool and try again to remove those rotors. Hopefully Sears or Home Depot will have this tool.

But, marcelc is suggesting that we don't have to remove those roll pins, ...is this true for ML 430 MY2000? ...because it seems like marcelc has ML270 MY2002(UK Model)...

Thanks & appreciated,

WANNALN
 
#20 ·
Quick question,

Replacing my rear rotors and pads tonight. If i need to spread the pads (will probably use two screwdrivers), do I need to open any valves? or just the Brake fluid reservoir cap?

Is it even necessary to spread the pads? Or should they just come right off? Or would they not go on the new rotors as easily?

Thanks!!
 
#21 ·
Just unscrew the cap on the brake reservoir. The pads may be a little tight against the rotor, but they whole caliper should wiggle off with the pads after you undo the two bolts holding it in place. Be careful not to damage the rotor unless you are replacing them.

You will need to push the pistons back in using a C-Clamp so that the new pads will fit. When you do this, push them back in slowly so as not to damage the system.

There are other posts on this forum which actually detail the whole procedure. Here is a video that shows how to replace the ML's front pads (the back ones are even easier).

 
#22 ·
You will probably have to open them up a bit with new rotors.
Loosening the cap should work. I always bleed after a brake job so I open the bleeders.
You won't have to push them that far in.
If the brake fluid is approaching two years old you may want to get all out of way at
once and get new fluid in the system. Your calipers and seals will thank you.