Mercedes-Benz Forum banner
21 - 33 of 33 Posts
I hear you, Boca. Luckily we have a terrific local guy who will recover both the A pillars for less than the dealer cost for one. OK, I'm not using alcantra. Busted!
 
Hello,

Thanks to the helpful pictures and information on this and a couple of other threads, I successfully removed both of the A-pillar covers on my 2002 ML320 this past weekend, and re-glued the fabric on the covers in the spots where it was either loose, "bubbling", or had come unglued. I thought I would share the results of my efforts and the information I learned or made a note of during the process, to help others who might want to attempt this fix.

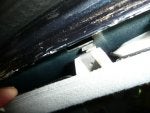
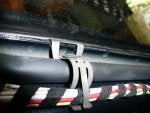
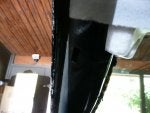
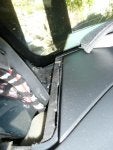
1) Both A-pillar covers were fairly easy to remove. Using my fingers, starting at the top edge of each cover and underneath the rubber gasket/seal for the front doors, I was able to pull each cover off at a point approximately 1-2 inches down from the top of each cover. The covers on my 2002 ML320 were held on at the top by one metal "mushroom"-type clip oriented perpendicular to the windshield (i.e.,facing you as you sit in the driver's or passenger's seat), and by a different type of clip that attaches to the metal part of the A-pillar at a point that is parallel to the windshield and located in the same relative location on the A-pillar as the "mushroom" clip. Each cover came off using a moderate, but firm, pulling action. First, I pulled towards me to disengage the "mushroom"-type clip, and then pulled parallel to the windshield to disengage the other clip. After pulling out the top edge and disengaging both clips on each cover, I had to pull the covers up and out to detach the bottom edges where they join the dash.

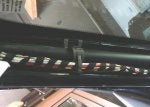
2) The fabric on both of the A-pillar covers had become loose in spots, or completely detached in others. Upon closer inspection, I determined that the fabric had come unglued from the foam backing.

3) Using Elmer's spray Craft Bond glue, I was able to re-attach the fabric to the foam backing without having the glue "bleed through" the fabric and ruin it. Following the directions on the can for achieving a permanent bond, I used the smallest amount of glue that I possibly could. DO NOT OVERSPRAY--I used 2-3 short burst sprays of 1 second each. However, I still made sure that I sprayed in each area where the fabric had become unglued. I sprayed the foam backing part only, and then attached the fabric, being sure to smooth out all wrinkles as I attached. I did not spray any glue directly on the fabric--just on the foam backing.

4) After I let the covers dry for 1 hour, I reattached them. I am very satisfied with the results.

Thanks to everyone who has previously posted on this topic! :thumbsup:
 
Repaired my A Pillar Trim

The cloth covering on my A pillars was coming lose (2002 ML320) and it was stained, too. So glueing back the stained fabric wasn't an option. I tried covering one with that "carbon" sticky covering sold in auto stores but because of the curves of the plastic trim, I wasn't ever able to get it to attach where it looked good.

Plan B: I pulled the cloth covering off the trim piece and spray painted the bare plastic with flat black spray paint. It has a "felt" look to it because of the old glue holding on to cloth. But other than that, it looks fine to me. I asked for an honest opinion on the looks from a friend of mine who's a "car guy" and he said it looked great.

Thought I would share that before you run down to the Benz dealer and empty your checking account ordering two new trim pieces. Try it. If you don't like the looks, then run down to the Benz dealer.

I might have gone with a light gray paint, if I had it to do over. But the black is fine. Matches the dash. I took some pictures with the intent of posting them here for illustration, but they all show the pillar trim as "flat black" - no detail.

To remove the pillar trim, grab it at the top and pull down towards the center console arm rest - this is the angle you want. Use slow and steady pressure and the clips at the top will pop free. No need to pull the rubber door seal loose. I bent one of the clips removing the left side, but straightened it with a pair of needle-nose pliers and it holds fine. To reinstall, just reverse the removal order - start at the bottom with the tabs in the dash, and use your fingers to put the door seal on top of the edge of the trim as you work it back up. Align the clip and press it into the retaining hole. Easy.
 
Another option for A pillars with failing/unglued covering is to take them to a local auto uphostery shop and have them recovered. Mine were failing as Teutonic describes. Local shop I use does a lot of work for the local MB dealership. They recovered the pillars in very MB fabric for $40. They look terrific.
 
A Pillar Fabric Repair

Like many ML320 or ML350 owners the fabric on the A pillar comes loose (inside car on each side of the windshield). Over the last couple of years I tried to get the pillar covers off twice but was afraid that I was going to break them.

Since the fabric was over half way off of each pillar I decide that it really didn't make a difference if I broke them because I would probably buy new ones.

After successfully removing them (as explained in many post and see summary below) I decide to try fabric tape. When we bought curtains from Ikea they come with a role of white, mesh fabric tape. You use this tape along with a hot iron to make a seam at the bottom of the curtain. I'm sure you can buy fabric tape at Michaels, JoAnnes, Hobby Lobby or other craft stores.

I cut the tape going the long ways into 1/4 wide strips. I was afraid the tape may "bleed" through the fabric so I wanted to keep this to a minimum which would only show along the windshield side of the cover.

Apply the tape to the side of the a pillar cover that would sit closest to the windshield, stretched the fabric towards that edge and use an iron to adhere the edge of the fabric to the cover. I worked in small section about 2 inches long (2 inch long pieces of tape, 1/4 wide). Take your time and stretch the fabric as you make your way down the cover. It worked amazing.

I then slowly ran the iron over the entire pillar with the thought that if any adhesive from the manufactured remained on the cover that it would adhere the rest of the fabric (away from the edge where I used the fabric tape). It appeared to tighten the fabric a little which made it look even better.

So far, I'm very pleased. It looks great.

Summary to remove A pillars: ONLY 2 Clips to worry about.

- Using the drivers side A pillar in this example.
- Remove rubber weatherstrip around door just in the area where the A pillar is located.
- Starting about 2 inches down from the top, on the side that would be against the rubber weatherstripping, pull down on the A pillar until you can see the metal clip. It's attached to white plastic on the back of the cover.
- Using needle nose pliers grab the metal clip and pull it out of the car frame. The clip will remain attached to the cover. Since you aren't pulling on the cover, rather you are pulling on the metal clip you can pull hard and it will not break.
- Now work on the inside of the cover that is against the windshield.
- Pull the cover towards the center of your car and using a flashlight you'll see the 2nd clip. It is about 3-4 inches down from the top against the windshield side of the cover.
- NOTE: I wasn't able to reach this clip with pliers or a screw driver.
- Pull the cover with a snapping motion towards the center of the car or towards the center of your dash. In a parallel direction with your windshield.
- The back of the cover has another white piece of plastic that is part of the actual cover, it slides into the clip. The clip is basically just grabbing a hold of the cover as you would with a pair of pliers.
- Most of the cover is now removed except for the bottom that sits against the dash.
- You then need to pull towards the driver seat to remove the rest of the cover which sits in four cutouts in the dash. They aren't tabs so don't worry about breaking them, just pull hard towards you as you are sitting in the drivers seat or towards the roof and it will come out.

Putting the cover back on is even easier. Work backwards from how you removed it. Place the bottom of the cover back in the four cutouts in the dash. Snap the cover into the 2nd clip (near the windshield) then snap the cover back into the 1st clip that is near the rubber weatherstripping.
 
So once again Benzworld helps out. I just did the pillers in the 1999 ml320. I have attached pictures. Start with: open door, remove door seal..pull down..from corner area at piller top. Two clips hold the piller in place. 1st is small as seen by pulling now exposed edge of piller away from body. Tricky clip. note pictures. If clip slides off plastic holder section on piller, tape it to the body..do not let it fall into the piller..did that myself. Second clip is larger and at the glass edge. Pull away and out with force. Note the plastic tab on the piller pictures and clip. It is really held tight. Piller will rotate down toward dash..note tabs at the piller bottom along the dash. I used 3m contact cement..77 spray can. worked very well. light coat on piller and then the fabric..wait about 1 min at 80 room temp..smooth fabric from good edge(where it is still attached well) to the bad edge (mostly the edge which goes along the glass). Re install in reverse order...bottom tabs into dash, line up big clip with plastic edge..push in ..line up small clip..push in ...push door seal back into place...this may need a small bit of door seal/cement to keep the seal in place..depends on age of seal. 20 min if all goes well. finish up with a cold one.
 

Attachments

I know this is a old thread but my question is is the pillar trim in the 02 the same as 99 shown in this thread? Havin a hell of a time breaking loose along the glass!!! Thanks


Smokie
 
OK !!! I got it off ! Wow that puppy was tight. I was really afraid to really yank on the thing thought I might break it and then I would be up s**t creek! I just pulled and wiggled it at the same time and it poped off . Could not believe only 2 clips held it that tight. Both clips were almost at the top of the trim piece! Took some Elmers contact cement and glued the cloth cover back on! Next up the radio install as soon as some parts arrive! Thanks all!

Smokie
 
be careful not to break the bracket holding the pillar. when i was installing my illuminated sills i eventually broke one (well, that was dead easy to be honest). can't remember what you pull first and how, but get your self a spare bracket from the dealer b4 you consider taking it off :D
I have that happened to me as well did you fix the bracket or did you ordered a piece? I can't find a part number.
Thanks
 
.... I can't find a part number.
Thanks
Please complete your BW registration profile so members may better assist you.
Goto your ===> user CP profile====> click on your icon----> click on Account Settings----> goto Account Details----> add vehicle details---->
ADD your make model YEAR into your Profile ----> click save.

MBEpc.net
 
21 - 33 of 33 Posts