
Can someone please assist me on this PLEASE

Smith007
2 posts
·
Joined 2007
Ml320 drive shaft support replacement
After searching the entire internet on how to tackle a broken Ml320 drive shaft support replacement, I decided to attempt it. Boy, this could be fun if you like wrenching.
For the faint hearted, pay a shop or call MBenz to pick it up let them split their knuckles for your big bucks.
Tools needed
A very good jack.
4 Axle stands
Allen key
16mm Socket
Good 12" handle Socket wrench.
8mm socket plus applicable elbow extension.
(You are better off purchasing an Air ratchet - $29.99 from Advance auto parts.
One air compressor, $90.00. Air Connectors and hose $20.00. You're still saving money because you'll have these tools for future use and overall cost of the project is still less than your dealership will charge. Note you still need the strong wrench to loosen the 2 rusty bolts holding the obscured darn stupid Benz contraption)
Start by jacking vehicle up.
The ML is a full time 4wd heavy vehicle; so all 4 wheels must be free off the ground. I only jacked up the 2 rear but that wasted a lot of my time - I repeat, all 4 wheels must be free (Use 4 strong reliable axle stands. Your life could be at stake if you cut corners. Be CAREFUL not CAREFOOL)
Now that all wheels are off the ground, get yourself a mat, and crawl under the truck. You'll cause at how much space Benz left their techs here.
This is a high velocity joint assy you are dealing with so Note how tight all bolts are and remember to tighten them back accordingly when done.
1. With the right Allen key, loosen and remove all the intermediate shaft (or Mid-shaft) attachments to the transfer case Drive. (This is where you’ll start appreciating having all the wheels off ground.)
2. With the 8mm socket plus applicable elbow extension, loosen the 4 bolts holding the U joint assy to free the prop shaft.
3. With a little more space gained, push the intermediate shaft out of the way, and use the 16mm wrench to loosen those 2 rusty bolts - This is where the pain is. It is hard to maneuver, you can only make about 2/3 turn each time. The bolts don't come off easy; if they do, you are in huge luck. Use copious rust freeing liquid e.g. "liquid wrench" (Start making wet from previous night. Do realize you might break the bolts if you work it too much in it's -hard to loosen state-. This is where the air ratchet comes in. Spray the bolt, loosen it, when it gets tight spray it again and tighten back. Spray from the bottom and loosen again repeat this several times until the air ratchet completely drives it out (You could do this for days if you don’t have an air tool -trust me on that one if you live in snow salt ridden area like here in RI, New England.)
Once this 2 nightmare bolts are out, maneuver entire mid-shaft and driveshaft support out via right side of vehicle.
Ha-ha you are now 3/4 through
Avoid wrong assembly; observe the direction of things.
Loosen the center bolt holding the U joint end to the intermediate shaft. (Use the air ratchet as a vice might be necessary if doing it by hand)
Spray some "liquid wrench" on the center the intermediate shaft to penetrate the spline. Also spray the bearing seating on the shaft rod (Take a break and let things soak)
Remove the old messed up support from the intermediate shaft (this may be another challenge if you don't have the right puller (I had to hammer mine out but be careful not to hammer the threaded area or the less thick area or the main shaft itself. Hammer the thicker lower end.
Hammer a flat head screw driver to drive out the bearing - Again tap on the bearing carefully, avoid the spline rod.
Clean the mess put the new unit in - right direction- You need to maintain proper symmetrical force on the bearing. Push in as far as you can. Put the washer and bolt back and air ratchet back in. The bolt will push the bearing back in place.
Replace assy back in vehicle just the way it came out.
Assemble the U joint back FIRST. Ensure the dust caps on the U joint seat correctly if not, you'll crack them and open a new can of frustrating worms.
Now put those 2 lousy bolts back
Install the 6 Allen head bolts back last.
Tighten all bolts accordingly.
Wallah -----------------------------YOU ARE DONE------------------------------
How much money will you save? Only you can tell.
I got my part for $88.00 from eBay and was thoroughly satisfied
Except you are like me or other curious guys out there, I'll advice you to let the pros handle this one.
Good luck guys
150 posts
·
Joined 2004
Hey thanks for the detailed write up! Since my left wrist is still broken, I can't do this myself - so it's off to a local MB service shop - they quoted me 4 hrs labor and $300 for the parts, so now it's onto eBay and online for that MB kit "Carrier Bearing Kit" 163 410 00 10.
79 posts
·
Joined 2009
I needed to replace this drive shaft support - it became loose and gave me a lot of trouble vibrating whole truck!
I removed 6 allen key bolts, 4 8mm bolts and when I came to those two 16 mm bolts holding support thing - it became a nightmare! I called AAA and towed truck to my friend-mechanic.
It took him 4 + hours to remove bolts, disconnect shaft and put everything back!
REAL NIGHTMARE!
If you don't have necessary tools, don't even try. Not worth. I paid him $250 + $70 I spent to buy support thing.
270 posts
·
Joined 2006
A Gearwrench with a flex head (or similar--I'm not plugging a particular brand) is extremely helpful for those 2 nasty bolts. The thin, tipped head with micro-ratcheting is just what you need. And if you buy the set, you'll be all ready for those nuts on top of the rear struts...
All together now--no clearance, little "swing" room, back and forth about 400 times! Seriously, it's not my favorite job, but it's not that bad. However, mine was pretty free of rust. A creeper also helps, and there's pretty good clearance for one.
All together now--no clearance, little "swing" room, back and forth about 400 times! Seriously, it's not my favorite job, but it's not that bad. However, mine was pretty free of rust. A creeper also helps, and there's pretty good clearance for one.
79 posts
·
Joined 2009
Yes rocketman4321!
I used it and my mechanic used Gearwrench with a flex head. keep it in mind, the truck is 1998. Never left New England and those two bolts were nasty. But they did not end the nightmare. Mechanic used some kind of press to detach the shaft from ... whatever you call it. 5 tons pressure and and it took a while!
Well. I'm glad it's over now.
Smith007
Discussion starter
43 posts
·
Joined 2006
Thank you Richie Lawmn VERY cool right up!!!
Accept my apology I forgot about this post, as i was under so much Psi at the time - but i did the job myself and i wish i had taken pictures, however, i was so nervous doing sth like this for the first time ML 320 2002 I just plugeed away at it slowly unlike the Hare
Yes you are correct on the hanging bearing I only had one of the nuts @#$@!@# me silly I think 2.5 hrs later I had the @#~@#$ out AND you need a lot height (wooden blocks maybe) and at least 2 Jacks for the "drive shaft " to clear the back of the vehicle and the ground - well the way I did it at least
Would I do it again:
If I was wealthy maybe not, however, I come form humble origins and can't afford someone to do so I will have to do it again when the time arrives
Ps NB I good tip is to paint a red, yellow .... etc nicely visible line down the centre of the entire lenghth (that means the ENTIRE drive shaft including any bolts bearings etc. Therefore nothing will be out of balance as you will replace all the shaft components in the original way
102 posts
·
Joined 2004
I had this done last year.... and now I need another one!!!!!!!!!!!!!!! I'm going to do it myself....I have heard of an HD bearing? is there any truth to this? any other tips or tools anyone else would like to add...
102 posts
·
Joined 2004
I had it done by a friend who is a mechanic and works on MBs... I think he put in a poor quality part... I'm still not sure untill I crack it open....
do you know of an HD bearing for this application? I have seen a few car part sites claiming a HD bearing... just curious
do you know of an HD bearing for this application? I have seen a few car part sites claiming a HD bearing... just curious
17,942 posts
·
Joined 2006
There is only one support bearing. I have never heard of a HD version. My only suggestion to you is purchase the kit from M/B (163 410 00 10). If you are doing it yourself make sure you mark everything .
Attachments
-
86.4 KB Views: 2,650
-
 19.4 KB Views: 12,637
102 posts
·
Joined 2004
will do...most people advise putting the truck on all four jack stands...is that for clearance of the axle during removal/install or do the wheels need to be free to rotate... just curious
17,942 posts
·
Joined 2006
More for clearance than anything else. If you mark the flanges on either end of the drive shaft then it should go back with no problem.
133 posts
·
Joined 2007
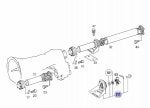
In case you find hard to unbolt the mounting screws/bolts as #3 in the OP and #47 in 43sqd's diagram, a little heat will help. I used a small propane torch from below for a few seconds and made unbolting really easy. Just be careful not to overheat and protect any wires in the area.
102 posts
·
Joined 2004
Good Tip!!! It did come off a year ago when I had it replaced ..so I'm hoping it will come off with ease....saturday will be the big day.. I'll post results...
thank you for all your help and input! unlike other forumns people on here are helpful.
thank you for all your help and input! unlike other forumns people on here are helpful.
231 posts
·
Joined 2008
Is there a specific procedure to line the drive shaft up after reinstallation, there is a fair amount of play in the holes. I have replaced many center bearings on other vehicles, and last year on my ML, now it seams I will have to replace again, as its starting to make noise, so as its only a year old, I wonder if there was a problem with my installation....
17,942 posts
·
Joined 2006
Mark the flanges on either end of the drive shaft before removal, then draw a center line on the drive shaft once it's off as per the instructions.
Attachments
-
86.4 KB Views: 1,980
32 posts
·
Joined 2007
I just did this procedure tonight and it wasn't all that bad. They were right though about those 2 bolts that hold on the center support, but after shooting a Mapp gas flame up into the holes from underneath they came out extremely easily!
Good luck to everyone else that tries the removal.
Good luck to everyone else that tries the removal.
156 posts
·
Joined 2010
:surrender:I am shopping around for this drive shaft centre support and there are different brands on the market.
Can someone help based on their experience for the best from the following:
1-Hamburg Tech $90
2-NSK Bearing $90
3-APA/URO $90
4-Febi Bilstein $160
Thanks
Can someone help based on their experience for the best from the following:
1-Hamburg Tech $90
2-NSK Bearing $90
3-APA/URO $90
4-Febi Bilstein $160
Thanks
245 posts
·
Joined 2009
So the question is why did MB put an extra joint in this shaft thus requiring a center bearing? Seems pointless to me.

32 posts
·
Joined 2007
To benzml350,
The day I finished replacing that center support I was talking to my girlfriend (of course she could care less) and I asked the same question.......why not just make it one big solid drive shaft?
Before anyone responds to give me an explanation as to why it cannot be a solid shaft because of clearances or some engineering reference, it was a rhetorical question!
18,065 posts
·
Joined 2008
Two piece drive shaft is not something specific to ML or Mercedes. All safety minded manufacturers use that design. In horrific crash two piece drive shaft allows vehicle to buckle.
2 posts
·
Joined 2005
I did this repair over the weekend and have several comments.
In general, all of the advice is very good, especially the suggestion to use liberal amounts of "liquid wrench". Soak the UV joint just behind the support bearing and of course those 2 16mm SOB's which hold the bearing in place. A little heat from a propane torch is also a good idea. I applied it from the bottom through the holes in the frame cross member, that plus the liquid wrench should do it. Mine had only been there for 18 months but it was still hard to remove.
The suggestion to dispense with removing the whole driveshaft is a good one. The 4 bolts on the rear axle differential are terrible and I sheared one off. They are supposed to be torqued at only 50nM, so I do not understand what was the problem. I will get this drilled out and replaced. I was too scared to continue with the other three.
Don't hesitate, get the Gearwrench 16mm tool, flexible head was not necessary, Sears has it for less than $20.
Removing the clamp nuts is a royal pain, even with a vise, forget it. Take the shaft with the bearing to the local garage and it is off in 5 seconds with a air ratchet gun. No vise was needed. Put the bearing and UV joint end on with a tap from a rubber hammer so you can get the washer and clamp nut on. Then the rachet the nut on to drive the everything into place. I torqued the nuts to 150nM with a small vise, no problem.
Get a 2 arm puller to remove the UV joint end, piece of cake, then the bearing, no problem. You are aware of all the comments for marking the alignment, include both parts of the UV joint mentioned above.
Mark the position of the bearing mounting bracket on the frame cross member. There is a lot of play and you must get the bearing lined up right. Grease or Antiseize those bolts for the next time.
Good luck
2 posts
·
Joined 2005
ML320 Center Support Bearing - OEM supplier info
Last bits of information:
I ended up installing a Hamburg-Technic part #1703-18711. It looked very good, was stamped Germany, and I have every indication it was high quality. The only problem I had was with the U joint clamps. The new ones supplied did not fit, so I used the old ones.
The old bearing was installed by the dealer and it was a Spicier unit. The bracket was stampled #233031, but that is the number for the bracket only. The assembed unit is part # 212244-1X, see page 8 in the attached doc. Spicer is also stamped on the U joint end piece on the intermediate shaft, so it seems a safe bet Spicier was the OEM supplier.
All in all, not a very tough project.
Attachments
-
1 MB Views: 1,846
15 posts
·
Joined 2007
I installed a Hamburg-Technic bearing just over a year ago. Already it is time to replace it. It is, however, about 1/3 the cost of "genuine Mercedes".I ended up installing a Hamburg-Technic part #1703-18711. It looked very good, was stamped Germany, and I have every indication it was high quality.
Dana Spicer Driveshaft Division was indeed the OEM driveshaft supplier for the W163.... it seems a safe bet Spicier was the OEM supplier...
26 posts
·
Joined 2011
The 16mm bolts holding the carrier are locktited so heat would be a very good idea.
The aluminum heat shields under the truck are very sharp and well positioned to removed unneeded spare pieces of flesh. Well, if you don't leave a little blood behind it's not really a maintenece job, right?
The aluminum heat shields under the truck are very sharp and well positioned to removed unneeded spare pieces of flesh. Well, if you don't leave a little blood behind it's not really a maintenece job, right?
Smith007
Discussion starter
43 posts
·
Joined 2006
I completed my second Drive shaft support bearing on my car 2 weeks ago.
The second time ever was a breeze. Mind you I started at 11pm finished at 4:15 am up at
6:00 am for work,
My small input:
Purchase all new bolts before you start
Purchase paint marker
When working alone as I did - vehicle on 4 jack stands - in order to hold Dshaft in place so as to torque the bolts: It helps to get a short bar to lock the rear of the drive shaft through the those half moon holes on the back Dshaft against the body
Don't forget the 2 leaver puller
What I am still confused about is that the two holes for the two bolts on the base plate / housing on the bearing is large or oversized so u can mess up alignment when installing so perhaps you should mark the a line on the old base or mounting plate where it meets the body and its corners were it hangs over the body so as to assist in aligning on the new one
Ps mine was so bad it was missing balls within the bearing
25,532 posts
·
Joined 2005
One addendum.
Over time members have found that using the Spicer mad support bearing is the way to go.
They can be had on Amazon for a bargain or the dealer for about double Amazon's price. In most cases they should last as long as the one the truck was built with.
Using a part made by URO, Febi, Hamburg Technic and others will yield a much shorter lifespan of this bearing.
353 posts
·
Joined 2009
I've mentioned it before and I will mention it again. If money is an issue just reuse your old carrier and swap in a new bearing. I installed an SKF 6006-2RS1 bearing into mine. It took about 5 minutes to tap out the old bearing and insert the new one (I used a large socket and gently tapped the retaining rings out). At a cost of about $30 it's a money saver. Just make sure the rubber housing is still in good shape. Mine was at 14 years of age.
Deep groove ball bearings, single row
These are top quality bearings, so you know what is going into the support is going to last.
Deep groove ball bearings, single row
These are top quality bearings, so you know what is going into the support is going to last.
1,598 posts
·
Joined 2011
I had my center support bearing and mount changed the other day. The rubber in the housing was not in good shape and could not be reused. Luckily I had purchased the Spicer part for replacement. It was so tough for the tech to remove the driveshaft bolts behind the mount (could not fit an air ratchet in the space) and the hardware was on so tight that he had to use a torch to be able to loosen them up. Nothing else, including liberal amounts of WD40, worked.
-
?
-
?
-
?
-
?
-
?
-
?
-
?
-
?
-
?
-
?
-
?
-
?
-
?
-
?
-
?
-
?
-
?
-
?
-
?
-
?
- posts
- 7.8M
- members
- 747K
- Since
- 1999
BenzWorld.org forum is one of the largest Mercedes-Benz owner websites offering the most comprehensive collection of Mercedes-Benz information anywhere in the world. The site includes MB Forums, News, Galleries, Publications, Classifieds, Events and much more!


