Mercedes-Benz Forum banner

Headlight removal for wiring replacement

48K views 53 replies 21 participants last post by  ParkingMeater  
#1 ·
Hi all
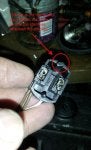
I needed to replace the biodegradable wiring on the inside of my headlight assembly - both sides - major cracking and lots of exposed copper wire - and one city light socket that just disintegrated.
I have a wagon with the self leveling system so the reservoir sits behind the drivers headlight and makes it almost impossible to get to anything. I also have big hands :grin

I decided to pull the bumper and remove the lights - Now that I have done it I cant believe how easy it is to remove. Literally 20 minutes to bumper off (note the one missed trick in the pdf) and another 10 to get both headlights out.
The full write up is in the attached pdf but here are some pics - Also I am seldom on the forum at the moment so if you have questions send me a pm too.
cheers
Barri
 

Attachments

#3 ·
Not to make too fine a point, but it's not necessary to completely remove the bumper cover. Just moving it forward by 3 inches will provide ample space to remove and reinstall the lights. It makes for an easier reinstallation of the cover.

I upgraded my headlights a year ago and the following are some pictures of the process.

Gurmail
 

Attachments

#5 ·
I have spent some time researching the biodegradable wire issue and it apparently does NOT affect 2001 models or anything newer. Stopped sometime in the mid-late 90's.

Anyone else with a 210 have wiring problems like the pics above?
 
#49 ·
I have spent some time researching the biodegradable wire issue and it apparently does NOT affect 2001 models or anything newer. Stopped sometime in the mid-late 90's.

Anyone else with a 210 have wiring problems like the pics above?
I own a 2001 e430 and it has the very same issue of wiring in the headlight assembly disintegrating. I am considering replacing the headlight assembly with Hella assemblies offered through Parts Geek.com at $89.73/assembly. Looks like a reasonable way to address the issue.
 
#6 ·
My wife's 98 has disintegrating insulation, but only the leads to the headlights. The rest of the car seems ok. I bought the replacement part from the dealer (2108200013), but have not installed it as my temporary application of insulating tape is still holding up.

Wiring in this specific area is a known problem.
 
#8 ·
Nugent x2
seems just to be a problem with the headlight wiring only and is a known problem. Probably heat related breakdown?
the rest of the wiring harness throughout the car is fine. this is just a headlight problem
cheers
Barri
 
#9 ·
I'm fairly certain that the biodegradeable wiring issue is specific to the M104/M119/M120 engines (W124, W140, R129). I had to deal with it on my '95 S420, but I understand the post '95 models (facelift cars) had been built with better wiring.

As for the headlight wiring, I have stock Xenon lights in my E430 and no signs of deterioration, even here in the desert. Odd problem to be sure.
 
#10 ·
My 2002 E320 has the same degrading wiring insulation problem too. All the wires in the harness connectors for the headlamps assemblies driver & passenger side. My mechanic the moment i mentioned it said that he has seen his fair share of the problem. Have to rebuild/repair the harnesses as they start shorting out fuses and bulbs.
Wish you could post or pass on tips on how the bumper cover is released. Could not figure out how to remove/release mine as yet and it makes for a easier repair if, as the headlamps remove much easier with the clearance.
 
#11 ·
Have a look at the PDF in my first post - it has a link to a youtube video on how to remove the bumper. the only part not covered is once the bumper is loose it can be wriggled off the mounting pin (picture in the pdf).
It really is easy to remove the bumper though - much easier than I thought.
cheers
Barri
 
#13 ·
My '98 has this problem to the point that one of my driving ( not headlight ) lights passenger side will not light and I get the defective headlight message whenever the light switch is activated. Very aggravating. I did purchase some small gauge shrink tubing to use as insulation replacement. Not started yet. What have others done to repair the wiring?
 
#17 · (Edited)
Okay so today was the day to tackle the replacement harness event.Started to remove the bumper , but soon discovered I could remove the headlight bucked assy's without doing so. Installed the new harness and tested it before reassembly. Same symptom as before no passenger side small inboard light and no tiny bulb ( can't remember what it is called)in headlight bucket. Got out the voltmeter and tested supply side. Dead at the source. Crap. At a loss and am guessing switch or somewhere in the harness??????

Wondering if there is a separate fuse for that circuit and if so where it is located ?????
 
#14 ·
The high heat from the bulbs in the headlight enclosure and possibly because I live in warm a climate makes this a situation for most Mercedes Benz owners I know in my area. I was able to take out the wiring harnesses and pull them through the housing as the plug pops out with all the wires. Just have to know how to reroute them back when finished. I bought electrical wire and made a new harness. After I found out they are available online through eBay for a reasonable cost. About $15 each side. Compared to my time used and cost of purchasing material from Home Depot might be the better route to go.
 
#16 ·
USPS just delivered passenger side harness. While searching for this harness I saw that passenger side replacement harnesses were popular and readily available, but driver's side not so much if at all. Is there something unique about passengers side that creates this disintegration and the driver's side does not?

Does removal of the front bumper shroud/cover/nosepiece make this procedure much easier and worthwhile to do so? If so then I would want to replace the driver's side at the same time. Is it necessary to remove the front shroud?
 
#18 ·
There is no separate fuse but possibly combined with one of the "right" side light fuses that you can check at the driver side dash side fuse panel.

There is a dedicated wire in the harness for that light that goes all the way to the illumination control module (behind the light control knob). This wire may be open or shorted somewhere. Does the High beam and low beam work on that side ? Only the little bulb that is not working ?
 
#19 ·
Yes High beam low beams both work. Inboard parking light passenger side does not. Replaced harness, checked every fuse and replaced one that was not blown but looked burnt. Now still no light but nag screen does not indicate lamp failure.
 
#20 ·
The light is supplied power by the light module but make sure there is ground return path. The light's ground wire is supposed to be connected to the HI and LO Beam bulbs' ground. They work, have you checked the harness for the city light is properly grounded ?
 
#22 ·
The light module is the illumination control module (ICM) in its proper name. It is behind the headlight knob.

Brown wire is not the + wire. It is the ground wire. The power to the small bulb (city light, parking light, whatever you call it is supposed to be gray/red wire. White wire is supposed to be power for the high beam and grey wire is supposed to be for the low beam

Do you have HID lights ? or halogen ?
 
#24 ·
Factory original can be standard (halogen) or bi-Xenon. Any way assuming you have the halogen lights attached is the diagram for the external lights. The right headlight is E2 and the inner light is e3 so you will be looking at E2e3. The wire for the low beams (e2) is Yellow color not Grey for the halogen light version.
 

Attachments

#25 ·
I have this same issue with my 2001 E430 with the xenon lights. The insulation of the wires inside the headlights are disintegrating. I see that there is part # 2108200013, but I think that is just for a halogen headlight. Is rewiring something that could be successfully done for the xenon harness without replacing the entire assembly? (As recommended by the dealer to the tune of over 1K without labor).
 
#26 ·
Should be able to without a problem. The only wire that can't be replaced is the thick black wire going to the red harness that locks into the back of the light. Don't forget to check the parking lights too. They also suffer from the insulation falling off.
 
#27 ·
I have a 1999 W210 with Xenon lights and have the same problem. I took both Headlamps out and plugged the Left 1 into the right plugs and visa versa. the problem stayed on the right hand side, so I knew it was not on the headlamp. The headlamp switch has the fuse box for the lights as part of the switch. The fuses are behind the side cover on the dashboard. After much searching on the web I found a wiring diagram. I then pulled the switch out, using a piece of wire which I pushed into the pin on the headlamp plug which should power the lamp I used a multi-meter to establish continuity and confirm which pin the wire is connected to on which plug on the headlight switch. I then turned the headlamp switch on and tested for continuity between the power point on the switch and the pin which is supposed to feed the light thats not working. I did a similar thing with other pins and established that light switch is faulty. I managed to find a replacement unit at a scrap yard (also heard them called breakers yard). I now need to confirm that there are no shorts in the harness before I plug the new switch and blow that one up. Will let you know if I find anything else
 
#28 ·
Hello:

I can relate our w210 wagon had same "disintegrating" wire insulation leading to internal shorting of headlamp circuit. I tried mending with electrical tape but that was a short lived fix.

I found it simpler to just replace / upgrade to the "Depo" brand Projector Beam Headlight units for approx $160 / pair.

My decision was easy as our w210 had yellowed beyond recovery standard (non projector) oem headlamps.

I did a pretty complete thread with pictures back then (2015?) and someone posted it in the 'sticky' area.

Or search my posts from 3 years ago. I did that one & also adding Xenon aftermarket bulbs to it, also.

Hope this may help some - David in East Texas
 
#29 ·
2001 E320.
I have the same problem.
As I read this, I am left with the idea that the harness can be removed without taking the light apart.
Is this correct?
Thanks,
Joe
 
#30 ·
main harness terminates at the headlight via this ganged socket/plug. internally,
there are a half dozen wires which feed the city light, turn signal, high and low bulbs

(photo is of a Depo headlight but OE is basically the same)
 

Attachments

#31 ·
Thanks raymond-.
I am really concerned about how to remove the old wiring inside the unit and replace it with a new harness.
I did not see anything about getting inside the unit.
My unit looks like the attached.
Is there a way to open it up?
 

Attachments

#32 ·
i'm not sure if I'm understanding you because the round cover on the left and
also on the right are access hatches to the low and high beam areas. you
simply spin them off/on. perhaps you mean something else which I've failed
to interpret properly
 

Attachments

#33 ·
Thanks Raymond-.
After I remove the access hatches, how do I remove the harness?
I looked inside and I can see the wires running across and out of sight.
Do I just pull?

I think it would be easy to change a bulb but I want to change the whole inside harness.
All rotten!!

Joe
 
#35 ·
Joe:

Did you find a source for the headlamp internal harness ? I may be wrong but I don't think there is one. That's why I said in post #28 that it might be easier to just replace the entire assembly.

MB used biodegradable wire insulation (dumb 'Al Gore' move, eh ?) and they all did that, especially inside housing where temps were high due to light wattage.

Anyhow, BEFORE you try to yank internal harness, see if you can find a replacement.

I did try to use high grade electrical tape on my main lamp wires, but you couldn't get all the way inside to get all the wires & so it would just short out further inside.

If you look thru my posts from 2014 or 2015 you'll find the long ones on installing the DEPO Projector Beam headlamps - better on road lighting AND new internal wiring is taken care of.

Cheers - David in East Texas
 
#34 ·
ah...i understand now. unfortunately, your options are to do a partial wiring
replacement which means you would use dexterity and cut off as much of the
inside wires as possible, yet leaving you enough to splice in replacement wiring.

since the housing is fused together, you aren't really able to gain full access
without first removing as much of the rubber parts as you can, then bake
the housing in an oven to soften the butyl sealant (temperature sensitive
paste) which seals the outer clear lens to the gray housing. this requires
care and intermediate effort.

once the large, clear outer lens is removed, you can carefully and systematically
remove the inner reflector parts which then allows more access to the wiring.

I've not experienced deteriorating wiring harness in my family's many w210s
so I cannot advise from experience. I only have knowledge that this occurs
but thought it was more likely the harness leading in from the car's main
engine harness up to the headlight housing...that is, outside the headlight
assembly.

I did experience decomposition with the city light bulb socket but the wiring
remained in decent health so I only had to replace that single wire/socket
and it was relatively easy to access since the OE headlight utilized the large
panel hatch instead of the smaller round ones like you have. by comparison
mine was like a huge garage door and thus, much more room to maneuver
my hands and soldering pen.
 
#36 ·
i had a thought of another option if you did not want to open up the case: use
3m skotchloc and cut off as much of the old wire as possible. you can then use
silicone tape or heat shrink tubing to cover any bare sections and to eliminate
the potential for shorts.