Hi all,
I just replaced both the front and the back flex disc's today and prior to doing it I hunted around to get a DIY for R129's but never did find any - (Maybe I did not look hard enough). I replaced them because they had hairline cracks near where the bolts attach and I did not want to take any chances. Both my front and back had cracks so I did them both. I was not noticing any noise or clunks or vibrations - but upon close inspection I could see the cracks and cracks are bad!
In any event here are some tips that you may find useful. I may forget stuff so if anyone wants to chime in - please do.
OK first - watch this video - it was great at warming me up to the idea. https://youtu.be/4yCxhyTlysw
Then you can read this DIY from Pelican - but all the stuff about dropping the exhaust - well I did not need to - and this is for W210's anyway - but useful - Pelican Technical Article: Mercedes Benz - Flex Disc Replacement
Both the video and the tech doc pretty much summarizes all that you need to know about the basics regarding removal and installation.
Eric's helpful suggestoins (not particularly in order),
1) Take pictures as you disassemble so that you can see how it goes back together.
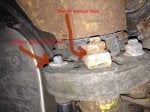
2) Get a welder's marker or pastel to mark the driveshaft and the corresponding point on the differential or transmission. So that when you put it back together it is lined up. Because before you took it apart it probably was nicely balanced and you want that to stay that way when you put it back (see image below).
3) It is tight in there so getting an impact in there to undo the bolts is tricky. What I found useful was a 19 mm wrench on one side and a 19 mm socket on the other end using a break bar to loosen the bolt. Then you can slide in there with an air ratchet and take it apart.
4) Wear some protective eye-ware - yeah I know they fog up - but trust me you will get stuff in your eyes.
5) If you are doing this without a hoist and doing this with jack stands then make sure you have enough clearance. Unless you have some crazy high ramps - that is not going to do it - you need room to move around and loosen stuff.
6) Once it is off the ground make sure the car is in neutral and make sure you have at least one rear wheel off the ground. If you are doing the rear flex disc you need to have the back end up high.
7) When you have your replacement flex disc - be sure to check to see what the bolts and nuts are configured as - the ones I took off were 19 mm bolt, 19 mm nut. The ones I put on were OEM from Pelican Parts (Febi-Blistein) and the bolt head was a 60 Torx and the nuts were 18 mm.
8) Make sure when you put it back together that you use the washer on the side that is attaching to the disc. So to back up a bit let me explain - the default we are use to is - you have a Bolt, it slides through something and then you put on a washer, and then your nut. But with flex disc's if the bolt head is making direct contact with the disc then it needs a washer and the corresponding nut when attached does not have a washer - (see image below). So before everything is tightened just check that the washers are always touching the rubber.
9) When taking out the rear flex disc you may think you have to drop the exhaust - not really - just loosen up one side of the heat shield and the corresponding exhaust hanger and just bend it down ever so slightly - just a bit - you don't need much maybe a half an inch max.
10) If you don't already - invest in having a prybar with a screw driver handle - that is all you need to gently remove the disc from the driveshaft.
11) Give yourself 4 hours to do the job - that is plenty of time - and if you are doing just one disc then 2 hours is enough time. I went out and bought some tools I did not have and fussed around with my jack stands for longer than I needed too and was done in under 4 hours.
12) When removing the front flex disk you are going to need to remove the transmission mount - don't worry it is not that hard. What you need to do is to use your floor jack and jack just a little bit under the transmission to take the pressure off the mount. The mount comes off with four bolt that hod the mount to the subframe/frame and then two bolts that hold the mount to the transmission. That is the trickiest part of doing the from flex disc - don't be discouraged - you can do it") .
.
13) When you are torquing the bolts back on the flex disc - torque to 50 foot pounds. Work your way around and double check. The discs have a metal sleeve that seats into the drive-shaft and diff or transmission - so making sure everything is nicely seated and properly torqued lets you sleep at night.
It is a rewarding job to do and if you set aside time and have a nice level place to jack up your car and put it on jack stands you can do it.
If anyone has any other tips or suggestions please chime in. If you have any questions I will try and answer them and if I was doing something wrong - please correct me.
Cheers,
Eric
I just replaced both the front and the back flex disc's today and prior to doing it I hunted around to get a DIY for R129's but never did find any - (Maybe I did not look hard enough). I replaced them because they had hairline cracks near where the bolts attach and I did not want to take any chances. Both my front and back had cracks so I did them both. I was not noticing any noise or clunks or vibrations - but upon close inspection I could see the cracks and cracks are bad!
In any event here are some tips that you may find useful. I may forget stuff so if anyone wants to chime in - please do.
OK first - watch this video - it was great at warming me up to the idea. https://youtu.be/4yCxhyTlysw
Then you can read this DIY from Pelican - but all the stuff about dropping the exhaust - well I did not need to - and this is for W210's anyway - but useful - Pelican Technical Article: Mercedes Benz - Flex Disc Replacement
Both the video and the tech doc pretty much summarizes all that you need to know about the basics regarding removal and installation.
Eric's helpful suggestoins (not particularly in order),
1) Take pictures as you disassemble so that you can see how it goes back together.
2) Get a welder's marker or pastel to mark the driveshaft and the corresponding point on the differential or transmission. So that when you put it back together it is lined up. Because before you took it apart it probably was nicely balanced and you want that to stay that way when you put it back (see image below).
3) It is tight in there so getting an impact in there to undo the bolts is tricky. What I found useful was a 19 mm wrench on one side and a 19 mm socket on the other end using a break bar to loosen the bolt. Then you can slide in there with an air ratchet and take it apart.
4) Wear some protective eye-ware - yeah I know they fog up - but trust me you will get stuff in your eyes.
5) If you are doing this without a hoist and doing this with jack stands then make sure you have enough clearance. Unless you have some crazy high ramps - that is not going to do it - you need room to move around and loosen stuff.
6) Once it is off the ground make sure the car is in neutral and make sure you have at least one rear wheel off the ground. If you are doing the rear flex disc you need to have the back end up high.
7) When you have your replacement flex disc - be sure to check to see what the bolts and nuts are configured as - the ones I took off were 19 mm bolt, 19 mm nut. The ones I put on were OEM from Pelican Parts (Febi-Blistein) and the bolt head was a 60 Torx and the nuts were 18 mm.
8) Make sure when you put it back together that you use the washer on the side that is attaching to the disc. So to back up a bit let me explain - the default we are use to is - you have a Bolt, it slides through something and then you put on a washer, and then your nut. But with flex disc's if the bolt head is making direct contact with the disc then it needs a washer and the corresponding nut when attached does not have a washer - (see image below). So before everything is tightened just check that the washers are always touching the rubber.
9) When taking out the rear flex disc you may think you have to drop the exhaust - not really - just loosen up one side of the heat shield and the corresponding exhaust hanger and just bend it down ever so slightly - just a bit - you don't need much maybe a half an inch max.
10) If you don't already - invest in having a prybar with a screw driver handle - that is all you need to gently remove the disc from the driveshaft.
11) Give yourself 4 hours to do the job - that is plenty of time - and if you are doing just one disc then 2 hours is enough time. I went out and bought some tools I did not have and fussed around with my jack stands for longer than I needed too and was done in under 4 hours.
12) When removing the front flex disk you are going to need to remove the transmission mount - don't worry it is not that hard. What you need to do is to use your floor jack and jack just a little bit under the transmission to take the pressure off the mount. The mount comes off with four bolt that hod the mount to the subframe/frame and then two bolts that hold the mount to the transmission. That is the trickiest part of doing the from flex disc - don't be discouraged - you can do it
.13) When you are torquing the bolts back on the flex disc - torque to 50 foot pounds. Work your way around and double check. The discs have a metal sleeve that seats into the drive-shaft and diff or transmission - so making sure everything is nicely seated and properly torqued lets you sleep at night.
It is a rewarding job to do and if you set aside time and have a nice level place to jack up your car and put it on jack stands you can do it.
If anyone has any other tips or suggestions please chime in. If you have any questions I will try and answer them and if I was doing something wrong - please correct me.
Cheers,
Eric