Mercedes-Benz Forum banner

DIY - Fuel pump remove & install

217K views 60 replies 31 participants last post by  khomer2  
#1 · (Edited)
DIY - Fuel Pump, Remove & Install

INSTRUCTIONS FOR REPLACING THE FUEL PUMP

1) Remove flaps of the rear seats. See the first picture for location of access site.
2) Remove rear seat bottom covers. There are no screws, just tabs. Releasing the tabs is the most challenging step. You can easily brake the tabs. See detailed instructions in pdf about this. See picture for under surface of the cover.
3) Unscrew rear seats. There are two hex nuts and several torx bolts. Disconnect the SRS cables; one for each seat.
4) First, remove 40% seat (rear passenger side) from the car.
5) 60% seat is very heavy. Just slide it to the location of 40% seat so that you can work on the driver side.
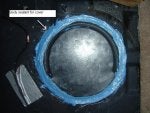
6) Fold the floor mat (driver side corner) and you will see the a round cap covering the access hole. Cap is attached to the body by sealant only.
7) Remove the seal and lift the cap. You will see top of the fuel pump. Take a picture to document the alignment of the pump connections. See picture
8) Unplug the cable which is power line to the pump.
9) Start engine and wait 5-10 seconds until engine runs out of fuel and stalls.
10) Disconnect the fuel lines. Push the line, press the tabs on each side with your fingers and remove it.
Caution: The fuel line in the center (feeding line) is still pressurized from the fuel filter which stores almost 1/2 quart of remaining fuel. Collect the fuel into a cup immediately after disconnecting the line. Fuel will come from the line, not from the pump. There will be some fuel spill, so place towels around. This will minimize inhalation of the fuel vapor.
11) Turn the locking ring of the pump counterclockwise and remove it.
12) Lift the fuel pump. It won't come straight up because of the fuel sensor floating arm and secondary intake line (tail-like extension tube). Tilting and turning will be enough.
Caution: There is some fuel inside the pump reservoir (the bottom pan). Tilting the pump more than 45 degrees may cause fuel spill.
Caution: Be careful not to drop anything inside the tank at this point.
13) Carefully insert the new fuel pump. Check the alignment of the fuel lines and make sure it is same as the original.
Caution: Wrong alignment of the pump may prevent fuel sensor floating arm to be lifted completely when the tank is full. Therefore the fuel gauge will never show full tank.
14) Make sure that the rubber gasket has a tight fit between the pump and the tank. Otherwise it may cause a leak when tank is full.
15) Put the the locking ring over the pump and draw a line with a pen (mark initial position).
16) Turn the locking ring clockwise for at least 360 degrees (one full turn). If you have the specific MB tool to remove&install the locking ring, the specification is 65Nm. If you don't have the specific tool, make sure it is tight enough or one full turn. Otherwise it may cause a leak when tank is full.
17) Snap the fuel lines in place. Refer to the picture to confirm the feed line which plugs into the center. Plug-in the power cable.
18) Start the engine.
19) Use body sealant to seal the cap. See picture
20) Install everything in reverse order. Do not forget to connect the SRS cable. Use Loctite for the seat nuts and bolts (40 Nm).

Warning:
- There is risk of explosion by fuel igniting and risk of poisoning by inhaling vapor, eye or skin contact with fuel.
- In order to minimize fuel spill, have minimum amount of fuel in the tank during the procedure.
 

Attachments

#2 · (Edited)
The procedure lacks detail how to install the gasket. I put the pump in with the gasket on it and the tank rim folded it, what wasn't visible till I fill her up.
Finally I installed it with gasket slided over the float arm, then when float was inside the tank, I put the gasket in the hole and than put the pump all the way in.
Some members reported being able to remove the pump with folding the seats and not removing them.
 
#3 ·
Yes, you can put the gasket to the tank first and then slide the pump inside. However, there is the risk of pushing the gasket into the tank so take your time if you prefer this. If I get into the slightest details, it might be confusing more than being helpful. I thought most forum members here should be able to judge positioning of a gasket.

I tried folding seats forward but they would not stay. Those forum members never posted how to do this. Besides I don't think there will be enough space to work. So I decided to remove 40% seat out and slide the 60% sideways.
 
#5 ·
Excellent post Merzatt!. thanks
 
  • Like
Reactions: normanbigfish
#6 ·
Excellent DIY:thumbsup:. Hopefully I will never have to change mine but with 120K on the ODO it could happen at any moment. This needs to be bookmarked for everyone to use. Again, thanks for the write up and the pictures. You make it seem like not such a big deal. Too bad you haven't done a write up on the fuel filter retrofit:(.
 
#7 · (Edited)
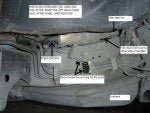
I didn't have to do fuel lines upgrade. But, it shouldn't be too difficult to upgrade the fuel filter and lines together with the fuel pump, as long as you have skinny hands to reach the filter as seen in the picture, it is a bit hiding behind the body.

Most people report trouble with disconnecting the fuel lines. If you cannot do it by hands, you can buy Klann Fuel Line Pliers Mercedes M-Class online for $59
163 589 00 37 00
.

Once you opened the access cover to the fuel pump, feel free to do the upgrade by looking at the diagram and actual picture from my car below. Remember that the feed line is pressurized with fuel. Expect some fuel leak if you are disconnecting this end first.

Remember to start the engine and check the system for leaks when you are done. Hope this was helpful.
 

Attachments

#17 ·
There are many low cost online stores e.g. AutohausAZ or your dealer if you can afford. If you did not change the filter more than 60k miles, I recommend doing it at the same time because it is so much easier to remove the filter. If last 6 digits of VIN number is less than 265965, you will need an upgraded filter and fuel lines.
 
#16 ·
yep good post, this is exactly how the (indy) dealer did mine when I first bought it and discovered it leaked when full.

A point to note though...
With mine the problem was the lock-ring, it had gone very slightly oval in shape, so wasn't sealing properly even with a new gasket. So had to get a new lock ring as well.
 
#20 ·
Hello all,

I am a new member who acquired a '99 ML430 from his parents who drove it to church & on vacations.

125k miles in March. So I purchased torx tools for whatever might develop before leaving Memphis (back to Atlanta a few months ago), when I noticed fuel pump relay problems/burn out.

I followed instructions for replacing the fuel pump exactly, and still will not crank. Motor turns over fine, just not receiving fuel it appears.
Had a final stall while motor was idling at a traffic light. Previously experienced hesitation also, but relays pushed me to do the fuel pump replacement.

I'm clueless (more so) now.
 
#21 · (Edited)
Okay.

Before leaving on a test ride, we found that the relay was not making contact on the board. When my buddy applied pressure to relay toward front of truck, it started right up.

We also found after testing the old pump that it was working fine, so I have a used pump for sale if anyone interested. I will ebay it otherwise (guaranteed to work).

So, my issue is the relay panel and why/how the fuel pump relay is not making proper contact AND getting hot enough to melt/distort the area where the fuel pump relay plugs in.

When we returned from test ride she died & refused to turn over. But this time she started up when the MAF was disconnected. I wanted to get it up my hill and behind the gate.

What is up with this vehicle?

Thanks for ANY suggestions.
 
#22 ·
You solved it in your other post. Replace or repair of the fuse panel should make it all good.
As for the overheating to avoid another meltdown at the relay socket two things to
consider. Is the e-box fan working?

Some pumps although they appear to work develop wiring faults. There are old threads
with melted wiring in the pump and they were older pumps. After seeing the pictures
I was amazed they would work at all. If that is going on it will increase impedance to
the wiring at the relay thus causing more heat than the socket can handle.
If the wiring looks good on your used pump the that is not the issue, but a pump that
is wearing out can also draw more power and mess up electrical things. It is really just
a guess as far as the old pump goes.
I doubt the new one will cause issues with the relay and a working e-box fan.
 
#23 ·
Hello members :)

My truck at 169K seems to need a new fuel pump & filter.
At the dealership the fuel pump goes for $440.
On the Internet I found fuel pump part # A 163 470 35 94 made by MEYLE that goes for $191.06
The question is, has anyone tried to use MEYLE fuel pumps ? any good/bad experiences ? any recommendation ?

Thanks.
 
#26 ·
Just a quick update...
Meyle fuel pump seems to be good so far no issues that I had before the change.

My truck started fine after the change of fuel pump, filter and updated new fuel lines following an issue whereby the truck would die on idle, had no power on an incline and pushing accelerator down for more gas caused the rpms to fall... actually after all these symptoms it decided to not start at all one day. I guess the fuel pump was dead completely ...LOL

We will see how it holds... now at 170K miles and still running great :)
 
#27 ·
Thanks so much for the information everybody has provided. I spent Sunday replacing the fuel sender, lines and updated filter and so far so good. Only issue I have is the fuel gauge seems to be dropping faster than usual. I figured the quarter tank mark is about 80 miles traveled so I should be at 3/4 left. Right now I'm about at the 2/3 mark with 80 miles traveled.

I might try the remove #5 fuse trick to see if I have to reset something. Any sugguestions?

Thanks
 
#28 ·
About to embark on fuel pump change on my 1999 ML430

Hi all,

I am experiencing the inaccurate fuel gauge symptoms on my 1999 ML430 and figure it is probably the sender going bad. It will go to empty on a full tank, go from full to 3/4 full in a few mins of driving, .... Opened up the access panel and see I have the original pump unit (A163 470 10 94).

I see if I want to replace the pump I have to replace the fuel lines and filter. My question is are there more fuel lines than before and if so where do any new ones run to/from? Or are they just updated lines that run between existing connections? What I am worried about is that I have to feed a new line to somewhere I can't access. Live in an apartment bldg so no good way to lift the truck, ... Have to be able to do whatever I need to do from within the truck, under the hood, ...

Can anyone explain a bit more about the fuel line upgrade part? The rest is pretty well documented in the threads, just need to clarify this before I get into something I can't do.

thx

XBM
 
#29 · (Edited)
Hi all,

I am experiencing the inaccurate fuel gauge symptoms on my 1999 ML430 and figure it is probably the sender going bad. It will go to empty on a full tank, go from full to 3/4 full in a few mins of driving, .... Opened up the access panel and see I have the original pump unit (A163 470 10 94).

I see if I want to replace the pump I have to replace the fuel lines and filter. My question is are there more fuel lines than before and if so where do any new ones run to/from? Or are they just updated lines that run between existing connections? What I am worried about is that I have to feed a new line to somewhere I can't access. Live in an apartment bldg so no good way to lift the truck, ... Have to be able to do whatever I need to do from within the truck, under the hood, ...

Can anyone explain a bit more about the fuel line upgrade part? The rest is pretty well documented in the threads, just need to clarify this before I get into something I can't do.
thx

XBM
If your filter/fuel lines do not look the highlighted area then you must purchase and install the three fuel lines in the pdf. If it does look like it then you only need a filter.
 

Attachments

#30 ·
Thanks...I already know I have the old pump and therefore not the new fuel lines. My question was really whether there are additional lines to be run and where to. In the meantime I found an archive from Wolfgang's old site and found the info about this. Looks like I will have to jack up the truck, remove the rear driver's side tire and wheel well access panel to get to the filter to replace it...looks like that is where the lines go so assuming I can find a good place to work on it, I tihnk I am good to go.

thx

XBM
 
#32 ·
I bought the upgraded filter and the three lines. Im having trouble installing the Fuel Feed Line (A-163-470-28-64). This line will not plug onto the fuel pump.

My fuel pump has a small opening for the Fuel Return Line and a big opening for the Fuel Feed Line. The fuel return line connects fine, but the fuel feed line will not connect.

Upon visual inspection both of the lines look identical. When I looked at my old filter and lines there is a visual difference in size. The old lines fit onto my fuel pump with no problems.

I have called my local Mercedes dealership this morning and spoke to the parts, service, and left a message with the head service manager.

**I have to the end of the lines with the BLACK locking tabs connected to the fuel filter and the YELLOW locking tabs attempting to connect to my fuel pump. Is this correct or reversed?**

Any help guys?
 
#34 ·
Im sorry I should have been clearer. The lines themselves do not look identical. However, the yellow clip side that goes to the fuel pump look identical in size.

The smaller fuel return line plugs into the fuel pump easily. The fuel feed line does not plug into fuel pump as easily. I tried pushing down with a bit more force and it still wont plug.