Mercedes-Benz Forum banner
21 - 40 of 51 Posts
Discussion starter · #22 · (Edited)
Brake Booster / Bremsgeraet ATE T51 rebuild. This is how I did it.

Hello

Perhaps this will help someone else out there as there seems to be a lack of information.

The Ate T51 brake booster was used on heaps of Mercedes cars from the 1960s up to the 1980s and perhaps even later?
Some use a single piston / diaphragm boost and other use a tandem or double piston type. The mercedes fintail service manual calls the tandem booster T51 / 200.


This follows my other thread regarding the brake booster as seen here:

http://www.benzworld.org/forums/general-mercedes-benz/2753073-brake-booster-what-wrong-when-leaks.html

I decided to rebuilt the booster because they are quite expensive new and also used. The used ones seem I looked at come straight off wrecked cars and the condition was questionable.


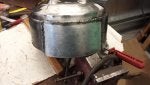
My bosster was completely rusted out underneath. From the top it still looked great and it still worked (actually boosted) when braking !!

First I opened it by placing it in a vice with the front down. I clamped it in the vice by the 2 threaded studs for the mastercylinder. I put nuts on them.
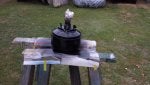
I used a 2 or 3" webbing tie-down strap and wrapped it around the booster main body. This was tied to 1 yard a 2" pipe. I used it such that the strap would tigten itself more when I levered the pipe. Same principle as an oil filter wrench just muych bigger.
It was tough and I needed a lot of force but eventually the booster hald turned enough to unlock the crimps and it popped off. Please ignore all the mis infotramtion out there about a a killer strong spring in there. The spring is similar to a bed spring and the booster will pop open no more than 5-6". Keep it in mind anyway.
Next I removed the inside bits.
The 26mm nut on the front piston should be undone for this but I could not get it loose at this stage because everything was turning and it would have ripped the diapragms.
I popped everything out carefully in one lot. The chamber divider also needs to be turned so it can pass through the crimps at the front.
Next I repaired the housing by cutting out the rusted section and fabricating replacement parts from 2mm (80mils?) galvanised steel I had left over from a trailer floor I recently replaced. That took me a whole afternoon as the rear membrance seat is part of it and was tricky to get right. I made the section out of 3 separate parts and tacked them in place. Once it all looked good, I welded everything in place being careful not to put too much heat into anything. I used my mig welder and sheet metal welding techniques.
After this, I painted the inside with a really thin runny paint and thinner (turps in this case) mix. That was to find and also seal off any pin priock holes left by the welding I had 3 tiny pin holes.

I also had to make 4 new crimps in my replacement section. I did this by making tiny slots with a really thin cutting disk in the dremel tool and then forming the crimps by htiing them in with a rounded drift (a ground off bolt) and hammer.

Then I painted the inside properly with the same paint.
More in the next part...
 

Attachments

No need for a new thread. I merged the threads. Members asked for photos and you posted them. Thank you for that.

The new thread is just a continuation of your first thread. So they were merged to keep everything in one contiguous thread about dealing with the ATE boosters and your great work fixing your booster.
 
Discussion starter · #24 ·
Part 2

I post this for completeness. At this stage, there does not seem much interest...

I proceeded to disassemble the inside bits and cleaned all the rust flakes and dust, dried grease and varnish like brake fluid off everything.
I was careful not do get any solvents on the rubber parts.
 

Attachments

Discussion starter · #25 · (Edited)
Part 3:

I also disassembled the servo valve and found it full of rusty dust as as well.

I cleaned the reaction disc assembly as well.

When all that was done, everything looked pretty good and I proceeded with re-assembly.
I used red rubber grease sparingly on some of the surfaces and on the seals.


It went together quite well.

To close is, I used my shop press and a second bottle jack.
I pressed the booster closed slowly until the front part snapped over the crimps and was pack in place behind them.
I took a bit of coaxing and pressing in different places.


I test the booster after fitting a master cylinder.

The first test was done by sucking on the inlet with my mouth.

It leaked !!

I discovered that it leaked where the crimps are and the front and rear join.
Unfortunately that was a result of years of rusting causing pitting in the rubber diaphragm seat and also the patch I welded in could have been a teensy bit wider that the original or my crimps were a tiny bit different.

I don't know but basically the old settled diaphragm would not expand enough under the crimped pressure to seal 100%.

I remedied this by running a tiny bit silicone sealer where it leaked.

It was then 100% airtight and when sucking it, it would hold vacuum for a very long time. Possoibly indefinitely. As good as a new one.

Thereafter, I connected it to my shop vacuum cleaner.

I tested the servo operation by carefully and slowly pushing the rear actuator on.
If you do this, be careful not to crack the bakelite part. Keep the actuator centred.

The booster worked correctly in that the servo followed my manual operation nicely.

After this, I painted the booster with etch primer and then black paint.

Another project done!!


New diaphragms and maybe seals would have been nice but were not necessary.

I emailed Ate about replacement parts but so far have not received a reply.


The booster operates beautifully and unless one of the diaphragms fails in the future, it will last a very long time.

Would I do it again?
Yes.
:grin

Regards
Bernt
 

Attachments

I am impressed with the work.
Having roots in Poland, where mechanics still work for less than $10/hr I have seen lot of things restored, where they would never made economical sense in higher wage country, but that is beyond believe.
For the record - rebuild is replacing worn parts with new parts in the unit.
Your job is a patch, but hopefully will give you few more years of service.
 
Impressive work! I decided to restore my ATE T51 unit and I'm seriusly struggling to get a replacement 6 inch diaphragm. Any hints? Lockheed produces almost exactly the same ones, but they're different size.
 
Part 3:

I also disassembled the servo valve and found it full of rusty dust as as well.

I cleaned the reaction disc assembly as well.

When all that was done, everything looked pretty good and I proceeded with re-assembly.
I used red rubber grease sparingly on some of the surfaces and on the seals.


It went together quite well.

To close is, I used my shop press and a second bottle jack.
I pressed the booster closed slowly until the front part snapped over the crimps and was pack in place behind them.
I took a bit of coaxing and pressing in different places.


I test the booster after fitting a master cylinder.

The first test was done by sucking on the inlet with my mouth.

It leaked !!

I discovered that it leaked where the crimps are and the front and rear join.
Unfortunately that was a result of years of rusting causing pitting in the rubber diaphragm seat and also the patch I welded in could have been a teensy bit wider that the original or my crimps were a tiny bit different.

I don't know but basically the old settled diaphragm would not expand enough under the crimped pressure to seal 100%.

I remedied this by running a tiny bit silicone sealer where it leaked.

It was then 100% airtight and when sucking it, it would hold vacuum for a very long time. Possoibly indefinitely. As good as a new one.

Thereafter, I connected it to my shop vacuum cleaner.

I tested the servo operation by carefully and slowly pushing the rear actuator on.
If you do this, be careful not to crack the bakelite part. Keep the actuator centred.

The booster worked correctly in that the servo followed my manual operation nicely.

After this, I painted the booster with etch primer and then black paint.

Another project done!!


New diaphragms and maybe seals would have been nice but were not necessary.

I emailed Ate about replacement parts but so far have not received a reply.


The booster operates beautifully and unless one of the diaphragms fails in the future, it will last a very long time.

Would I do it again?
Yes.
:grin

Regards
Bernt
Bernt, thanks very much for posting this, it was really helpful for me.

In my case (also T51/200 as on an M108 280SE), my booster could hold the vacuum, but had the hissing problem when engaging the brake pedal. It loses vacuum only while depressing the brake pedal.

I disassembled the booster, except for the servo valve part, and renewed some seals and o-rings, but it still has the same problem.

My question: how do you disassemble the inner valves / servo valve / poppet assembly? Do you just pull very hard on the brake pedal mounting piece?

Thanks
Ludi
 
I would recommend that if your mastercylinder leaked into the booster, to remove the booster and drain the brakefluid and then also wash it out with water and again drain it and let it dry.
Regards
Bernt
I would recommend that if your mastercylinder leaked into the booster, to remove the booster and drain the brakefluid and then also wash it out with water and again drain it and let it dry.
Is there a 4 year echo in here???
 
Discussion starter · #31 · (Edited)
Well, hello.
Thanks for the heads up and it is very encouraging that some others find my post helpful.
My booster is srill operational some yeas later.

@Groonie Ludi
No, you dissasemble that by removing a u shaped clip. See my pictures.
At the moment I cannot recall the details as this was now some years ago.
Certainly nothing can just be pulled apart. Have another look at a functional diagram of that booster. I seem to remember tge clip may be inside something or hidden.
Sorry.
Why not add here once you figured it out?

Regards
Bernt

Edit: See my 2 pictures showing tge valve.
Pry the mastercylinder finger and flange off. There is then a small hidden section of bakelite, see picture. Remove tgat. The u clip is under there. I think.
I think you may need to push in the pedal rod against its spring to expose the other end wirh the clip.
 
Thanks very much for your reply, Bernt

I could not understand from your pictures where the u-clip came from. I understand what you say about the hidden section of bakelite. Please see my attached picture. Is it the section that I indicated with the red arrow that I have to remove? I did try to twist and pull it, but it didn't come off yet. I just want to be careful not to break anything.

Certainly I will post my experiences when I get it fixed.

Regards
Ludi
 

Attachments

Thanks very much for your reply, Bernt

I could not understand from your pictures where the u-clip came from. I understand what you say about the hidden section of bakelite. Please see my attached picture. Is it the section that I indicated with the red arrow that I have to remove? I did try to twist and pull it, but it didn't come off yet. I just want to be careful not to break anything.

Certainly I will post my experiences when I get it fixed.

Regards
Ludi
Wait, I got it! I did not initially understand where the section of bakelite must come out, but then saw it. I could remove that with a jeweler screwdriver and then by pressing the plunger in and pulling with a magnet, I could get the u-clip out.

I attach a few pictures to show the details.

Now to fix it :)

Thanks again
 

Attachments

Discussion starter · #34 ·
Wait, I got it! I did not initially understand where the section of bakelite must come out, but then saw it. I could remove that with a jeweler screwdriver and then by pressing the plunger in and pulling with a magnet, I could get the u-clip out.

I attach a few pictures to show the details.

Now to fix it :)

Thanks again
Aha, yes, good going!
But now what is wrong with it? Full of rust or what?
I still suspect your diaphragm as that would be the 99% obvious cause.
I am waiting in suspense!

Regards
Bernt
 
Aha, yes, good going!
But now what is wrong with it? Full of rust or what?
I still suspect your diaphragm as that would be the 99% obvious cause.
I am waiting in suspense!

Regards
Bernt
The diaphragm looks fine. I could not see any cracks or tears. I will work on this valve during the week. My suspicion is that it does not close the one port when the pedal is depressed. Both ports vent to the atmosphere and that is why I lose all the vacuum in the booster when the pedal is depressed.

But I could be wrong.

Regards
 
The o-ring between the master cylinder and the booster can leak and give odd symptoms, but I don't remember if the symptoms the OP describes and the one's I recall match.
 
The o-ring between the master cylinder and the booster can leak and give odd symptoms, but I don't remember if the symptoms the OP describes and the one's I recall match.
Thanks for the thought. In my case I did replace that o-ring and I also removed the master cylinder and plugged the hole completely to check for vacuum leaks. My booster holds the vacuum very well until the brake pedal is depressed. Then I get the hissing sound and engine revs going up.

The way I understand the mechanism, when the pedal is depressed, only the rear vacuum cylinder should open up to the atmosphere. The valve is supposed to seal the front part so that it always keeps its vacuum. In my case this sealing does not work and I lose the front vacuum as well. I believe the valve that I have now disassembled should open one port and close the other at the same time.
I know, as Bernt said, the most common cause of this symptom is a torn membrane, but my membrane looks good.
Swapping in a known good brake booster might help identify if the source of the fault is in the brake booster or its attachment to the master cylinder. I've seen used ones for as little as $50 though its not clear if the diaphragm is intact or not since they are typically not photographed dismantled. Probably better to go to the local pick-a-part with Mercedes in inventory and get one that holds vacuum without having the bother of returning a worn-out part to eBay.
 
Swapping in a known good brake booster might help identify if the source of the fault is in the brake booster or its attachment to the master cylinder. I've seen used ones for as little as $50 though its not clear if the diaphragm is intact or not since they are typically not photographed dismantled. Probably better to go to the local pick-a-part with Mercedes in inventory and get one that holds vacuum without having the bother of returning a worn-out part to eBay.
Thanks for the ideas. In my area the parts are very scarce. I'll try to work on this poppet assembly and see if I get a fix.
 
Just to keep you updated, I am still working on this booster. I managed to break it the other way round, such that it pulls the brake pedal to the floor with great force as soon as the engine starts. So I think I fixed that valve too well :). I will open it up again. It must have something to do with the poppet valve.
Cheers
 
21 - 40 of 51 Posts