I had this wrote up and posted at another site of my Radiator replacement.
Things You Need:
Transmission filter and pan gasket (might as well tackle this, too)
Transmission Dipstick tool (available on ebay for about $20)
Power Steering Fluid
5 quarts MB Transmission Fluid spec 236.14
1 gallon MB coolant (about $15 at the dealer)
1 upper hose and 1 lower hose (unless yours is already new)
Optional: 1 serpentine belt
TAKE OFF NEGATIVE CABLE ON THE BATTERY!!
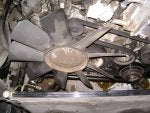
(Pic 1)
1. I started by removing the headlights and the cross member. This will require you to tether the hood up unless you have a later model with hood struts. You will note I have the cross member laid to the side, since it has the hood release cable on it.
(Pic 2)
2. Afterwards, I removed the electric fan assembly. Not a big task. Just unplug, take out the two clips held on by torx bolts and it lifts right out. You'll also need to unsnap the leatherette covers that shield the coolant lines and the other side.
3. I then got under the radiator and removed the 10mm bolts that held on the shroud. I lifted the shroud and set it back towards the fan.
4. Then, you can remove lower hose to drain coolant in a pan. After coolant is drained, you can remove the transmission lines. You must have the shroud out of the way to get the top one.
5. Then you need to remove and plug the top power steering hose and then remove and plug the lower PS hose.
6. Remove the remaining coolant hoses (reservoir hose and top hose)
(Pic 3)
7. In this pic, you'll notice the radiator GONE. We removed the 2 torx bolts that held on the cooling condenser for the A/C. You have to be very careful, here. You don't want to crimp any lines. Also, there is a plastic clip that holds the radiator and the A/C cooler together that needs to be unfastened on the engine side of the radiator that you'll need to remove the A/C cooler. We broke ours but the new radiator didn't require it. You also have to remove the clamp that holds the dryer canister to the radiator. It takes the smallest torx socket available. Once the clamp is removed, this gives you a little room to lift it up and away from the radiator. You have to work on it a bit because it's tricky. 2 people is a help.
8. After all lines are loose, lift the radiator out. It unsnaps from 2 bumpers at the bottom. My brother and I got on each side and encouraged it a bit.
(Pic 4)
9. Notice a better shot of the radiator gone. I lifted the shroud out of the way to gain better access to the top and bottom hose. Trust me, it's much easier to put them on now than after you've replaced everything. Once hoses are fitted, replace shroud over the fan.
10. We prepared the new Valeo OEM radiator by removing the old bumpers off the top and putting them on the new one. We made sure all fittings were okay. We then eased the radiator into place and slid it into the bumpers. If you remember the order in which you removed it, then you should have no trouble reverse ordering the installation.
11. After radiator was in place, we replaced ALL lines before installing the shroud back to it. Remember, we left the shroud shoved back towards the fan.
(Pic 5)
12. Once all lines and hoses were attached, we replaced the cross member, then the electric fan assembly. Do not forget to fasten the dryer canister back into place with the clamp.
13. Replace headlamps and then fill with coolant by using the reservoir. We pumped out the air after it was nearly full by squeezing the lower and upper hoses. It took a while, but we managed to get all air out.
14. We then filled the power steering reservoir.
15. Don't forget to turn the wheel all the way to left and all the way to right WITHOUT THE CAR RUNNING, several times, to get the air out of the power steering system. If you plugged the hoses as I instructed, you should have minimized any air bubbles.
16. We then warmed up the car to check appropriate fluid levels. YOU WILL NEED TO USE YOUR TRANSMISSION FLUID DIPSTICK to get the appropriate level on your transmission fluid. In my particular case, I used this opportunity to change the transmission fluid and filter.
Happy driving!
Things You Need:
Transmission filter and pan gasket (might as well tackle this, too)
Transmission Dipstick tool (available on ebay for about $20)
Power Steering Fluid
5 quarts MB Transmission Fluid spec 236.14
1 gallon MB coolant (about $15 at the dealer)
1 upper hose and 1 lower hose (unless yours is already new)
Optional: 1 serpentine belt
TAKE OFF NEGATIVE CABLE ON THE BATTERY!!
(Pic 1)
1. I started by removing the headlights and the cross member. This will require you to tether the hood up unless you have a later model with hood struts. You will note I have the cross member laid to the side, since it has the hood release cable on it.
(Pic 2)
2. Afterwards, I removed the electric fan assembly. Not a big task. Just unplug, take out the two clips held on by torx bolts and it lifts right out. You'll also need to unsnap the leatherette covers that shield the coolant lines and the other side.
3. I then got under the radiator and removed the 10mm bolts that held on the shroud. I lifted the shroud and set it back towards the fan.
4. Then, you can remove lower hose to drain coolant in a pan. After coolant is drained, you can remove the transmission lines. You must have the shroud out of the way to get the top one.
5. Then you need to remove and plug the top power steering hose and then remove and plug the lower PS hose.
6. Remove the remaining coolant hoses (reservoir hose and top hose)
(Pic 3)
7. In this pic, you'll notice the radiator GONE. We removed the 2 torx bolts that held on the cooling condenser for the A/C. You have to be very careful, here. You don't want to crimp any lines. Also, there is a plastic clip that holds the radiator and the A/C cooler together that needs to be unfastened on the engine side of the radiator that you'll need to remove the A/C cooler. We broke ours but the new radiator didn't require it. You also have to remove the clamp that holds the dryer canister to the radiator. It takes the smallest torx socket available. Once the clamp is removed, this gives you a little room to lift it up and away from the radiator. You have to work on it a bit because it's tricky. 2 people is a help.
8. After all lines are loose, lift the radiator out. It unsnaps from 2 bumpers at the bottom. My brother and I got on each side and encouraged it a bit.
(Pic 4)
9. Notice a better shot of the radiator gone. I lifted the shroud out of the way to gain better access to the top and bottom hose. Trust me, it's much easier to put them on now than after you've replaced everything. Once hoses are fitted, replace shroud over the fan.
10. We prepared the new Valeo OEM radiator by removing the old bumpers off the top and putting them on the new one. We made sure all fittings were okay. We then eased the radiator into place and slid it into the bumpers. If you remember the order in which you removed it, then you should have no trouble reverse ordering the installation.
11. After radiator was in place, we replaced ALL lines before installing the shroud back to it. Remember, we left the shroud shoved back towards the fan.
(Pic 5)
12. Once all lines and hoses were attached, we replaced the cross member, then the electric fan assembly. Do not forget to fasten the dryer canister back into place with the clamp.
13. Replace headlamps and then fill with coolant by using the reservoir. We pumped out the air after it was nearly full by squeezing the lower and upper hoses. It took a while, but we managed to get all air out.
14. We then filled the power steering reservoir.
15. Don't forget to turn the wheel all the way to left and all the way to right WITHOUT THE CAR RUNNING, several times, to get the air out of the power steering system. If you plugged the hoses as I instructed, you should have minimized any air bubbles.
16. We then warmed up the car to check appropriate fluid levels. YOU WILL NEED TO USE YOUR TRANSMISSION FLUID DIPSTICK to get the appropriate level on your transmission fluid. In my particular case, I used this opportunity to change the transmission fluid and filter.
Happy driving!