Mercedes-Benz Forum banner

ML 320 Fan Clutch Repair

63K views 38 replies 16 participants last post by  Mokac  
#1 · (Edited by Moderator)
Hello All,

I hope everyone is happy and well. I thought I'd share my experiences of repairing the Fan Clutch on both my ML320 trucks: one 1998 build and the other 2000.

In traffic I had started to notice temperatures creeping up and around the 95C mark and thought this was a little too high. On inspection I discovered a couple of issues:
  1. The Fan clutch
  2. The coolant expansion tank (for another thread)

The fan clutch was not operating correctly, one could tell by any number of markers:

  1. The fan would spin for several/many seconds after the engine stopped
  2. The fan could be spun with very little resistance by hand
  3. The fan could be stopped with a rolled up newspaper with the car at operating temperature

A replacement fan clutch assembly form the dealer was several hundred dollars, but there were replacement clutch assmblies on ebay which one could buy quite well around $60-100. Anyway it was a weekend and I wanted to do something about the fan clutch now.

I read the few fan clutch repair threads and webpages that dealt with refilling the fan clutch with new oil. As it turns out (or so the story goes) Toyota had sold some vehicles whose fan clutch had no oil inside them due to a manufacturing fault and so was forced to repair these vehicles, by refilling them with oil at their dealerships. This meant that they had to maintain inventory of the oil. It was a Toyota part 08816-10001 and was a 10,000 CSt oil- silicone oil I believe. So off to the dealership on Saturday I went and paid my $10 for 18 ml of oil.

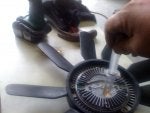
All the repair threads I've seen deal with removing the copper coloured bimetallic strip on the fan clutch to get access to the tiny actuating piston, which once removed gives you access to a tiny 3mm diameter filling hole.

I attempted this, but found it was difficult to cleanly remove the clips holding on the bimetallic strip and also to heat and cool and also spin the fan in order to drip feed oil in the tiny hole to attempt to fill the fan. I did remove the clips and eventually attempt this method, but is was very slow and to my mind ineffective.

I decided to try something completely different by modifying the fan clutch to provide a filling hole for the oil to make the process FAR simpler and serviceable in the future.

The following posts show this in photos.

Best
JA
 
#2 · (Edited)
1. Remove the Fan clutch assembly from the car using a 36mm wrench (thanks Dennis for my custom 36mm wrench and lending a hand for this repair) and a long/strong screwdriver. Looking at the engine from the front, turn the fan clutch nut ANTIclockwise whilst using the long screwdriver to stop the water pump pulley from rotating.
 

Attachments

#3 · (Edited)
2. With the fan clutch asssembly on a flat work surface and held or supported so that it doesn't rock, drill an approx. 4mm hole in fan clutch housing in the position shown. We don't want a ton of swarf inside the fan clutch so drill a little and then blow/vac out the hole as often as possible. For the last part of the hole you could hold the fan upside down with one hand a drill with the other so that any swarf falls out. The wall thickness is probably about 1.5mm in the area. Drilling in this location accesses the main reservoir in the fan clutch. Later we will fit a fine thread metal screw with nylon sealing washer to seal this hole.

The pictures that follow show the bimetallic (copper coloured) strip, clips, actuating piston and sealing grommet removed. THIS IS NOT NECCESSARY. The only reason they are shown removed is that I attempted the repair procedure described earlier - forget it.

Yes I know that that the extra mass of the screw will create a tiny imbalance in the fan, but given the radius of gyration and typical manufacturing tolerances for the moulding and the fan centre I feel that this will not be insignificant.
 

Attachments

#7 ·
6. Inject all the oil.

Because I removed the bimetallic strip/piston etc I had to cover the centre hole with my finger otherwise the oil would spew out the centre hole. This is not necessary - do not remove the bimetallic srtrip etc..

My fan clutch took all the oil. It may or may not be overfilled, but it seems to work well and is not always jammed ON. If you wanted to be perfect about things you could partly fill the fan clutch and then fit it to the car for trial and refill as necessary. It's up to you. The full 18 ml dose worked for me as the existing oil in the fan clutch was doing very little by way of providing any viscous resistance and the 18ml dose was that required by Toyota to fill their fan clutch.
 

Attachments

#8 · (Edited)
7. Find a suitable SHORT fine thread metal screw and nylon sealing washer. You could also use a small flat washer to help press the nylon washer down further, but I used just a nylon washer with a nice broad screw head without any sign of a leak. If you didn't want the hassle of a screw and trying to fit it, you could also use a small piece of metal glued on with Silicone sealant carefully applied around the edges of, but not in the hole. Then wait several hours for curing. I wanted it now, so went for a screw which is also more serviceable.
 

Attachments

#9 · (Edited)
8. Fit the screw (the hard part in some ways). Whilst carefully aligning the screw so that it remains perpendicular to the hole screw in the screw using downward pressure allowing it to cut/form its own thread. My fingers are not shown guiding the screw for clarity of pic.
Before attempting this - try this on a piece of thin alumium with the same drill hole. You could of course tap the hole in the normal way if you have the appropriate tap for the screw thread. The fan clutch housing is very thin (some 1.5mm) and even tapping may prove difficult because of the limited clearance below the hole inside the fan clutch. It may not be possible to use an intermediate tap and you may have to use a bottoming tap. Anyway the message is practice first.
 

Attachments

#10 · (Edited)
9. Refit the fan clutch to the car and enjoy your new fully serviceable fan clutch assembly. I have read, I think here, that the fan clutch on these vehicles has a life of some 60-65,000 miles/km. So here is a way to save some $ with some DIY and regular refils. The fan clutch no longer runs on for several seconds after the engine is stopped and it does not seems to be creating lots of noise as if it's hard on all the time. Also the temp is nice and cool at around 80C !!!!

Remember - do not remove the bimetallic strip, clips, piston etc. This is unnecessary work for this repair.

Good Luck.

Best
JA
 

Attachments

#12 ·
Thanks for the detailed write-up! I will be performing this repair on my 1995 E300D this weekend. Is the repair still holding up for you? I ask because a lot of opponents of the repair route state that the oil will quickly leak out again. I like your method because it allows for the clutch to quickly be refilled in the future without having to remove the strip.
 
#15 ·
Hello GD,

Yes the repair is still holding well after over 6 months, with no signs of leakage etc on 2 vehicles: My wife's 1998 ML320 and my 2000 ML320. Give it a try, you've nothing to loose exept an already faulty fan clutch unit. The hardest part of the repair may be fitting the machine thread screw, without tapping a hole. You could try tapping the hole with a bottoming tap and carefully remove or vac out any swarf.

Good Luck

Best
JA
 
#17 ·
Hello Tingo,

I'm not sure if the ML430 uses the same thermo viscous fanclutch unit. If it does, then there is no issue. In any event, make sure you check that your fan clutch is indeed faulty by looking to see if it spins on well after the engine has stopped before bothering with any repair.

Also check for any obvious signs of damage or large leak.

Best
JA
 
#18 ·
Hi there, The clutch fan on my ML 430 is not working as it should as its rotation is the same whether the engine is hot or cold, with the engine off there is no resistance whatsoever when spining the fan by hand and last but not least, when the engine is switched off the fan spins for a bit before stopping. Just trying to aquire some of that silicone oil as the Toyota dealer in my part of the world (The caribbean) does not recognise the part number.
 
#26 ·
Wrong Part Number?


Please be advised I call three different Toyota dealerships in the Boston, MA area (all 3 are large high volume parts departments) and none of them have this part number listed in any fashion and none of them knew anything about any oil or other additive for a fan clutch.

Can you validate the number provided and let us know? If you have a Toyota dealership that recognizes this number and has the part in stock please tell us the name and location of the dealer and I can have my local dealer speak to them to get updated on how to order/stock this part in this region.
 
#27 ·
Hello Guys,

I can now confirm and will update the start of the thread (if I can still edit it), to indicate that the Toyota part number is 08816-10001, cost AUS $ 10.75, from Brighton Toyota in Victoria, Australia . The part number is from Toyota in Australia. It may vary in other countries.

Both my fan clutch units (1998 & 2000 ML320) are still doing fine.

Best
JA
 
#28 ·
thread resurrection!

I just went thru this procedure after noticing my temp gauge rise in stop & go traffic. I bought the 10000 cst silicon oil at the local hobby shop for $10. The repair took about 1 hour. I had to make a tool to hold the water pump from turning but it was easy. The fan is a lot lot stiffer when hot now and the temp gauge barely moves ! Great write up and it saved me $200 or so for a new fan clutch.

If this isn't sticky'd , why not?
 
#29 ·
Brilliant post by JA - thanks. :bowdown:

Thought I had a bad clutch after stop and go driving high temps on our E420. Confirmed by free spinning fan (engine off), and no rotation of fan when loosely secured with a small rubber band between blade tip and dipstick (engine at idle). The aux fan was working properly.

I used 10000 cst hobby shop oil from ebay (about 20 ml) on an M119 engine. It was a 59 ml bottle - used about 20 ml - rest is for a later refill! What a difference a small amount of oil makes. Used a dab of silicone caulk to seal the screw in place.

The fan hub removal tools were loaned free from Advanced Auto.

While I was at it with such a large access to the engine front, replaced the belt idler puller with an INA brand.
 
#30 ·
The best way I found was to go to eBay, buy a clutch for $30.00 and about 20 minutes of your time it can be replaced. There is enough room on the left side to remove the assembly . Auto zone has a universal clutch removal kit that you can rent for $27.00 and is fully refundable upon bringing it back.
You will notice the difference in temp. There is also a video on pelican parts that is Very informative and it's free. Can't go wrong.
 
#31 ·
i found video and this is was the part number for what looks to be the same thing but possible a USA part number 08816-03001


https://www.google.com/webhp?sourceid=chrome-instant&ion=1&espv=2&ie=UTF-8#q=08816-03001


and FYI I called one dealer here in ATL, GA and not in stock but 1 day shipment possible. But here is what i also found on this site:

OIL SILICON | Genuine Toyota | 08816-03001

Manufacturer: Toyota
Part Number: 08816-03001
Part: OIL SILICON
Replaces: 08810-00010, 08816-00010, 08816-03000, 88461-30010