Mercedes-Benz Forum banner

Fuel Guage & Fuel Sender Unit -- Unbelievable!!!

23K views 36 replies 11 participants last post by  N4HHE  
#1 ·
200 ML320 with 202K miles. My issue:

- Fuel guage has not worked for past few years.
- I simply reset the trip meter after every fill up.
- Wife is tired of that approach, so I need to fix it.
- After reading EVERY post, it appears there are four primary causes

1> Fuse 5 for cluster. Tried, did not work
2> Connector in rear driver side wheel well. Tried, did not work
3> Cluster. Haven't tried
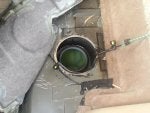
4> Fuel Sender Unit Corrosion. Took out the back seat, lifted carpet, removed pump cover. The pump was replaced last year. All appeared clean inside, but i removed the sender unit connector, cleaned the 4 silver pins (male) and cleaned the connector (female) with electrical parts cleaner. Waited 10 minutes for area to dry, used compressed air to make sure it was dry. Turned key to #2 position. Fuel guage lifted to 1/4 tank, wich was correct!!! :)

Put back fuel pump cover, replaced carpet and seat. Connected red wire below seat (not sure what this is?), patted self on back. Turned on car to drive into garage. The fule guage was pinned at E. Unbelievable!!! :eek: What could have changed? I didn't even touch the connector after it worked. Could the carpet be putting pressure on the wires surrounding the fuel pump and shorting them? What else could it be?

Does anyone have the readings I should expect from the four silver pins if I attach a meter?

BTW, the overhead trip computer constantly reads 496 miles left, so I'm assuming the issue is with the sending unit and not the cluster as the sending unit is feeding both.

Spartacus
 
#3 ·
I need to replace mine (maybe) it seems to be cleaning the contacts. Anyway while reading up on this I noticed that the wis docs and other stuff rather emphasize getting the orientation right or you can expect weirdness. I wonder if your float arm is off angle and/or jamming or pulling away from the sensor contacts?
 
#5 ·
The only way to fully check the fuel level is to remove the fuel sending unit itself and manually check it.

Remove the left rear wheel and access connector X18/3. Separate the connector and clean both ends, reattach and see of the level reading changes. If not……….

Remove the Fuel Pump Assy. from the fuel tank.

Connect thin wires to the pins where the Orange and Grey wires were once attached by the connector.

Connect probes of DVOM to the opposite ends of both wires and set the scale of the DVOM to read Ohms/resistance. Keeping the assy. straight and level as it would sit in the tank, note the Ohms reading. The arm will be in the down position which would indicate completely empty. Note the Ohms reading

Move the float arm upwards and hold there, note the Ohms reading (give it a chance to register). Do this at different stages and note readings to see if they change. If not………………….

Lightly clean the sweep arm grid with a pencil eraser and retest as above and see if there are now Ohms readings.

If there are still no Ohms readings or those which do not match the chart, replace the pump assy.
 

Attachments

#6 ·
Put a meter on the connector and fuel sender unit today. Got nothing. Then things got interesting. Knocked on the top of the fule pump with the back end of a screw driver. Suddenly gauge in cluster moved to 1/3 tank. Disconnected connector on pump, connected the meter and got a reading of ~130 ohms.

Turned car off, 60 minutes later, gauge doesn't work anymore.

So my question is, what am I dislodging by knocking the top of the pump? Does cleaning the sweep arm grid with a pencil eraser trick solve this issue, or is this more likely a mechanical issue with the float mechanism?

Also, Autohausaz has an OEM fuel pump for $394 and a Uro for $114. I could go through three Uro pumps for the price of one OEM. Is is ok to go with Uro for this part?
 
#13 ·
I'm trying to get into a pissing match with you, but who makes the MB branded part? Bosch? I wonder where they get them made??? All, vehicle manufacturers have vendors build most of their parts, they make very few parts in house anymore. I would be willing to bet, nearly every computer part or even electric part in there came from the far east somewhere... Would explain a lot :)

I read that MB was using a Honda transmission in some of these vehicles? Blasphemy!!!!
 
#14 ·
Be reminded you got to buy from a reputable source as well. I bought fuel pump that was advertised to be bosch, got it and it was not bosch.

I bitched so the guy refunded my money and let me keep it. So I actually installed it anyway. So far so good. But, it is kind of a pita job. I don't look forward to doing it again. But anything worth doing is worth doing twice, right? No not really.
 
#17 ·
Found the problem. Took out pump this weekend. See photo. Any thoughts on how to proceed? Could I solder a piece of coper to the upper contact or is the pump shot? Is there any way to simply buy the black piece so I don't have to replace the entire pump? The pump is only 14 months old, so a bit frustrating if it's shot.
 

Attachments

#19 ·
No, the solder joint you have circled is fine. The culprit is 1 inch right of your circle. The upper piece of metal touching the upper arc is simply gone. Note the difference between the picture you originally posted and mine. It looks like the thin piece of metal that rubs against the upper arc has broken off.

The black piece I'm referring to is the big black piece that has the two metal pieces that rub against the two arcs.

The pump was installed 18 months ago and is an OEM pump.
 
#20 ·
Yours is very premature failure for an OEM pump. I wonder what kind of gasoline you are using. The first picture posted here is the original pump from my car. It had the same exact problem; one pin was broken after 5 years of use. I found no way of fixing this at that time. I installed a new pump and has been working for 6 years now (knock on wood).

I would not recommend Uro parts brand, like the others said. It may not even fit correctly.
 
#22 ·
Actual OEM or one of those advertized as "OE fit" or some variation?

14 months is pretty quick to see a fatigue break on something that shouldn't see fatigue at all. Thats just a wiper so it shouldn't have any stress or force on it.
 
#24 ·
Yes, you're probably right. Not worth trying to solder, given it sits in fuel all day. It's true OEM assuming what autohaus az claims is OEM is truly OEM.

It looks like a design issue. The upper arc has steep ridges, while the lower arc is smooth. What happens is when the wiper rubs against the upper arc, it probably gets jammed on a ridge, bends backward and snaps off.

I've got two benz's (220 & 163) both over 200k miles. The 163 pump gets added to the list of OEM parts that are simply poorly designed. It joins the 163 window swith cluster, 163 crank shaft position sensor, 220 airmatic pump, 220 blower motor, 220 visor. I still love my MBs but without all of you, it would be too hard to maintain them. Thank you all!

New pump ordered, will install this weekend. I think there are DIY posts for the fuel pump, but if someone wants me to post a step by step with pics, let me know.

Sent from AutoGuide.com Free App
 
#26 ·
Wasn't going to but...

If you were to solder the arm it would be just as safe as the original. It doesn't matter if it is the repaired part or the original in the tank with the gas. If the danger was there for the risk of explosion then the original would not be there. The amount of power that goes through the sensors is next to nothing. The amount of power the fuel pump itself uses is probably a few hundred times that amount. You are talking milliwatts (x/1000 of a watt) verses 10's of watts for the pump itself.

The only problems you would see is if you ruined the temper or spring in the repaired arm. Then it might break off or not make proper contact. That would or should be your only concern is if it would function properly after.
 
#28 ·
The larger the gap the more the volts and the hotter the spark the more the amps. I believe the gap rule is 1000v per thou of gap. Thats a gap like a spark plug. Getting contact sparks ie shorting out the battery is a crap shoot on what it takes. So it can vary but the point was the sensor is low power and basically passive while the pump itself uses a butt load more power. Thats why the connectors for power are brought out of the tank. That way if they were to get loose they wouldn't do anything in a loud explody ruin your day kind of thing.
 
#30 ·
And if I ever find a C cell and a piece of wire in the fuel tank I'll be very worried.
 
#31 ·
Just to close this out:

1> Got a new OEM pump from Autohaus az. There was no doubt it was OEM. Mercedes Benz written all over the box. Ridiculous level of cardboard packing inside the box. It looked exactly the same as the pump that failed at 18 months due to a broken upper wiper arm. Let's hope this one fairs better.

2> It's worth noting one should be very careful when installing the pump. The pump drops into the tank at an awkward angle. If you don't do this right, you could put excess pressure on the float arm and damage the wipers. The float arm does need to be pulled about 4 inches lower than its normal arc of travel. Do this gently but quickly so the wipers can return to their normal position.

3> Also worth noting, you don't need to remove both back seats from the car. You simply need to unscrew the larger one and flip it up towards the driver seat. See pic.

4> Note how it's important to to pull the fuel lines to the side so you have an unobstructed path to reinstalling the pump. See pic

GMS
 

Attachments

#32 · (Edited)
Nice pictures. Thanks. I too had a bit of a hard time getting new pump into the tank. Frankly, I think a pump in tank is a crap unnecessary design. I am not an engineer or anything but there are plenty of examples out there of high/low pressure pumps not put in a gas tank. I told my wife I was not planning on changing it out again. She better plan on selling the care before it goes out next time. Although obviously it would be so much easier to do next time. But it is a lot of junk to fiddle with in the interior, and not so easy to get out without dripping gas inside. I guess if tank was virtually empty would be much better then even half full. No probably not cause the pump pulls it into the plastic reservoir and has a backflow to keep some in there.
 
#34 ·
Quit complaining about how difficult it is. Euro and Asian manufacturers make it simpler and safer to replace the pump. American manufacturers also have internal pumps but no access hole, so you have to drop the entire tank to replace the pump.

Try lowing a 150 lb. object full of kaboom. It's very scary.

And there is a way to lower the fuel level.
 

Attachments

#37 ·
It isn't really.

If the pump runs dry it will spin much faster, and wear out its bearings and brushes. But it won't overheat.

In ancient times manufacturers who spent less time making things foolproof would power the fuel pump any time the ignition switch was on. If tank was empty the pump would spin and wear itself out, not over heat.

These days the fuel pump will only run 15 to 30 seconds after the ignition is turned on, and only run full time when the engine is running. This has nothing to do with cooling.

It is important to know if you run out of fuel and after putting fuel in the tank the engine does not immediately start first try, that you must turn the car off and back on to get the fuel pump to run and try to reprime the lines. Wait until you hear the pump quit running before trying again. And again if it doesn't immediately start turn the car off and try again.
 
#36 ·
Just for the record, I had this exact failure on the original (2002) pump. I think it lasted about 7 years, but I've never had a car's sender unit fail, even on much older or crappier cars (e.g., late '70s GM). I'm sure others do fail, but Mercedes has a weak link here and they've let it persist for years.
The real issue is that the $50 ($20?) sender pot can't be replaced without bringing the $400 fuel pump along.