So this was the weekend. In the last several months, the car has started to sound and feel like a diesel -- vibration and low hum, especially at highway speeds. At 222K miles, there was no question what needed to be done.
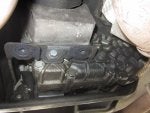
The transmission mount was first. It's a relatively easy change. I found that the factory mount has lost over 1/2" of height (see the pic below). There’s 6 bolts in the crossmember, 2 into the mount itself and 4 holding the mount to the frame rails. You’ll have to support the transmission during the change. Make sure you use a jack for that support. You’ll probably need to jack it up further to get the crossmember close enough to the frame rails to reattach it.
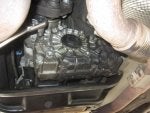
The engine mounts were next. The bottom bolts came out easily. I jacked the engine with a 2x4 scrap under the oil pan. For the right mount, the jack was at the passenger end of the pan. For the left, the opposite.
The right mount is close to the front of the block. I disconnected the negative terminal of the battery, but that was probably unnecessary. I know now why the 2WD members don't mind a mount change. After loosening the top bolt with a socket on a long extension, I jacked up the engine a little more to get clearance to remove the mount. While jiggling the top, the mount fell out backwards to the ground. Easy enough. The mount was about 1/2" shorter than the new one.
It's not been mentioned on any of the threads I've read, but the new mount seems best reattached at the top first. I tightened the top bolt enough to hold the tab in the slot and then gradually lowered the engine until the lower bolt could be started.
The trans and right mount went in in just over 2 1/2 hours. Then the fun began.
TonyC has some of this in another thread about the 4matic mounts. Thanks to him for getting me on the right track.
The important points and differences for the left mount (as opposed to a non-4matic) are as follows:
1. There’s a heat shield between the cat and the steering rack. Two small sheet metal screws hold this in place. Remove this to get space to work.
2. You MUST remove the left exhaust pipe from the manifold back to the next joint (which is a couple feet aft of the transmission). You do not need to undo the serpentine belt or do anyhting with the power steering pump or a/c compressor.
3. The O2 sensors can stay in the pipe. Unhook the electrical connectors. If you need to change the O2 sensors soon, this is an opportune time.
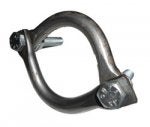
4. The exhaust has 2 bolts into the manifold, two in a bracket alongside the transmission, one in a clamp that hold the two sides together just before the joint with the rear pipes and two bolts in a compression clamp at the end of the pipe. I expected a lot of trouble and destruction getting the pipe off, but that was not the case. Only the bolts at the very back were too bad to reuse.
5. The top bolt on the engine mount is the tough one. It is back under the manifold, so there is no real room to get a good grip on a wrench. You will need Mr. Stubby. (a 5/8" or 16MM stubby ratchet wrench, preferably with a 72 point ratchet)(Once you've done this, you'll understand why it's MR. Stubby). After many many tries, I found that the best leverage to break the bolt loose was to put Mr. Stubby on the bolt and position it parallel to the front bumper. From the top, you'll see the open end of the wrench. You'll need all of the 3/8" extensions you have (probably close to 20"). Slide the extensions down, slanted toward the back of the car -- behind the half shaft -- to get your lever point. Put the extension into the open end of the wrench and pull toward the rear of the car. Once loose, the bolt can be ratcheted out of the mount. I didn’t, but you might leave the bolt in the bracket.
6. There’s also a heat shield that covers the top of the mount. It’s probably not necessary to remove it at all. Aside from the engine mount bolt, there’s another small bolt into the side of the engine block if you decide to take it out. The mount was down just over ½”. Mine wasn’t leaking any fluid and there didn’t seem to be any in there. Not sure which models do or don’t.
7. The old mount can be removed to the back and alongside the steering column. If you turn it so the bolt holes are parallel to the ground, it will come out with almost no persuasion. The space it comes through has an almost identical shape to the mount (could they have designed it that way?).
8. The new mount goes in just as easily through the same opening. I had moved the heat shield and had a bit of a time getting the shield and the bolt back into place. Maybe leaving the shield in place and the top bolt in the bracket will make it easier. Tighten the top bolt until the positioning tab is locked in, but don’t torque it down yet. That will also get the bottom of the mount lined up with the base. Mr. Stubby is great for getting this part done. It’s a little tough to know when the tab will hold in the slot above. If you can turn the mount at all, it’s out of the notch. Turn until the mount won’t go further, let it drop down and turn ¼” more and push up. If you’re in the notch, the free play in either direction will be minimal.
9. Let the engine down slowly and watch that the bottom of the mount is lining up with the base. An assistant could be a big help here unless you enjoy getting under the car and back out 2 or 3 times to check. When the mount is close enough for the bottom bolt to be screwed in, run it in as far as possible. The engine can then be lowered the rest of the way.
10. Torque the bottom and top bolts (Do the top as best as you can on the top. Not many torque wrenches getting in there).
11. Reassemble the exhaust. I was pleasantly surprised that mine went back together as well as it did. It’s tight and as quiet as it was before it was disassembled.
12. Hook up the battery, get off the ramps, etc. etc. Have a cold one and enjoy a test drive (not necessarily in that order).
I spent about 5 hours on the left mount and then about an hour Sunday morning reassembling the exhaust. That would be cut to less than 3 hours by cutting the time it took to get the top bolt loose and fooling around trying to get the mount out before finally realizing I had to remove the exhaust.
The car still has a little vibration, but is much smoother. Acceleration is crisper (I guess because the engine stays in place and puts the power to the wheels). The low frequency hum is gone at idle and at speed.
Thanks to the members who have contributed their experiences to this forum. I can tell you I wouldn't have attempted this without the help available on this board.
Pics -- 1. Transmission mounts -- old one is sinking
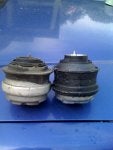
2. Right engine mounts -- collapsed
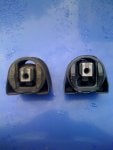
3. Left engine mounts -- collapsed. some cracks in the rubber rings
The transmission mount was first. It's a relatively easy change. I found that the factory mount has lost over 1/2" of height (see the pic below). There’s 6 bolts in the crossmember, 2 into the mount itself and 4 holding the mount to the frame rails. You’ll have to support the transmission during the change. Make sure you use a jack for that support. You’ll probably need to jack it up further to get the crossmember close enough to the frame rails to reattach it.
The engine mounts were next. The bottom bolts came out easily. I jacked the engine with a 2x4 scrap under the oil pan. For the right mount, the jack was at the passenger end of the pan. For the left, the opposite.
The right mount is close to the front of the block. I disconnected the negative terminal of the battery, but that was probably unnecessary. I know now why the 2WD members don't mind a mount change. After loosening the top bolt with a socket on a long extension, I jacked up the engine a little more to get clearance to remove the mount. While jiggling the top, the mount fell out backwards to the ground. Easy enough. The mount was about 1/2" shorter than the new one.
It's not been mentioned on any of the threads I've read, but the new mount seems best reattached at the top first. I tightened the top bolt enough to hold the tab in the slot and then gradually lowered the engine until the lower bolt could be started.
The trans and right mount went in in just over 2 1/2 hours. Then the fun began.
TonyC has some of this in another thread about the 4matic mounts. Thanks to him for getting me on the right track.
The important points and differences for the left mount (as opposed to a non-4matic) are as follows:
1. There’s a heat shield between the cat and the steering rack. Two small sheet metal screws hold this in place. Remove this to get space to work.
2. You MUST remove the left exhaust pipe from the manifold back to the next joint (which is a couple feet aft of the transmission). You do not need to undo the serpentine belt or do anyhting with the power steering pump or a/c compressor.
3. The O2 sensors can stay in the pipe. Unhook the electrical connectors. If you need to change the O2 sensors soon, this is an opportune time.
4. The exhaust has 2 bolts into the manifold, two in a bracket alongside the transmission, one in a clamp that hold the two sides together just before the joint with the rear pipes and two bolts in a compression clamp at the end of the pipe. I expected a lot of trouble and destruction getting the pipe off, but that was not the case. Only the bolts at the very back were too bad to reuse.
5. The top bolt on the engine mount is the tough one. It is back under the manifold, so there is no real room to get a good grip on a wrench. You will need Mr. Stubby. (a 5/8" or 16MM stubby ratchet wrench, preferably with a 72 point ratchet)(Once you've done this, you'll understand why it's MR. Stubby). After many many tries, I found that the best leverage to break the bolt loose was to put Mr. Stubby on the bolt and position it parallel to the front bumper. From the top, you'll see the open end of the wrench. You'll need all of the 3/8" extensions you have (probably close to 20"). Slide the extensions down, slanted toward the back of the car -- behind the half shaft -- to get your lever point. Put the extension into the open end of the wrench and pull toward the rear of the car. Once loose, the bolt can be ratcheted out of the mount. I didn’t, but you might leave the bolt in the bracket.
6. There’s also a heat shield that covers the top of the mount. It’s probably not necessary to remove it at all. Aside from the engine mount bolt, there’s another small bolt into the side of the engine block if you decide to take it out. The mount was down just over ½”. Mine wasn’t leaking any fluid and there didn’t seem to be any in there. Not sure which models do or don’t.
7. The old mount can be removed to the back and alongside the steering column. If you turn it so the bolt holes are parallel to the ground, it will come out with almost no persuasion. The space it comes through has an almost identical shape to the mount (could they have designed it that way?).
8. The new mount goes in just as easily through the same opening. I had moved the heat shield and had a bit of a time getting the shield and the bolt back into place. Maybe leaving the shield in place and the top bolt in the bracket will make it easier. Tighten the top bolt until the positioning tab is locked in, but don’t torque it down yet. That will also get the bottom of the mount lined up with the base. Mr. Stubby is great for getting this part done. It’s a little tough to know when the tab will hold in the slot above. If you can turn the mount at all, it’s out of the notch. Turn until the mount won’t go further, let it drop down and turn ¼” more and push up. If you’re in the notch, the free play in either direction will be minimal.
9. Let the engine down slowly and watch that the bottom of the mount is lining up with the base. An assistant could be a big help here unless you enjoy getting under the car and back out 2 or 3 times to check. When the mount is close enough for the bottom bolt to be screwed in, run it in as far as possible. The engine can then be lowered the rest of the way.
10. Torque the bottom and top bolts (Do the top as best as you can on the top. Not many torque wrenches getting in there).
11. Reassemble the exhaust. I was pleasantly surprised that mine went back together as well as it did. It’s tight and as quiet as it was before it was disassembled.
12. Hook up the battery, get off the ramps, etc. etc. Have a cold one and enjoy a test drive (not necessarily in that order).
I spent about 5 hours on the left mount and then about an hour Sunday morning reassembling the exhaust. That would be cut to less than 3 hours by cutting the time it took to get the top bolt loose and fooling around trying to get the mount out before finally realizing I had to remove the exhaust.
The car still has a little vibration, but is much smoother. Acceleration is crisper (I guess because the engine stays in place and puts the power to the wheels). The low frequency hum is gone at idle and at speed.
Thanks to the members who have contributed their experiences to this forum. I can tell you I wouldn't have attempted this without the help available on this board.
Pics -- 1. Transmission mounts -- old one is sinking
2. Right engine mounts -- collapsed
3. Left engine mounts -- collapsed. some cracks in the rubber rings


")