Mercedes-Benz Forum banner

4Matic CV boot replacement PICTORIAL

77K views 96 replies 21 participants last post by  tom2turbobenz  
#1 ·
I read a lot from members having torn boots or bad CV joints on 4Matics and usually they have a dilemma of spending $1300 for new axle at dealer or install questionable rebuilds, or China-made axle.
I've been driving VW in the past, where the same UV joints are used for at least 30 years, so had my cut in replacing those, but recently I was preparing 4M for my brother and when one boot was torn and took me well over 1hr to clean the mess, the other was 12 years old still holding. Brother is not mechanically-inclined so I preemptively replaced the outer boot for him.
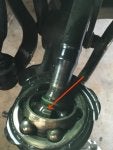
Inner boots are like rear axle boots - they can last 20 and 30 year so no worry about them for now.
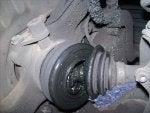
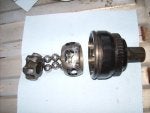
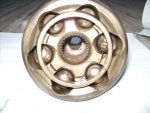
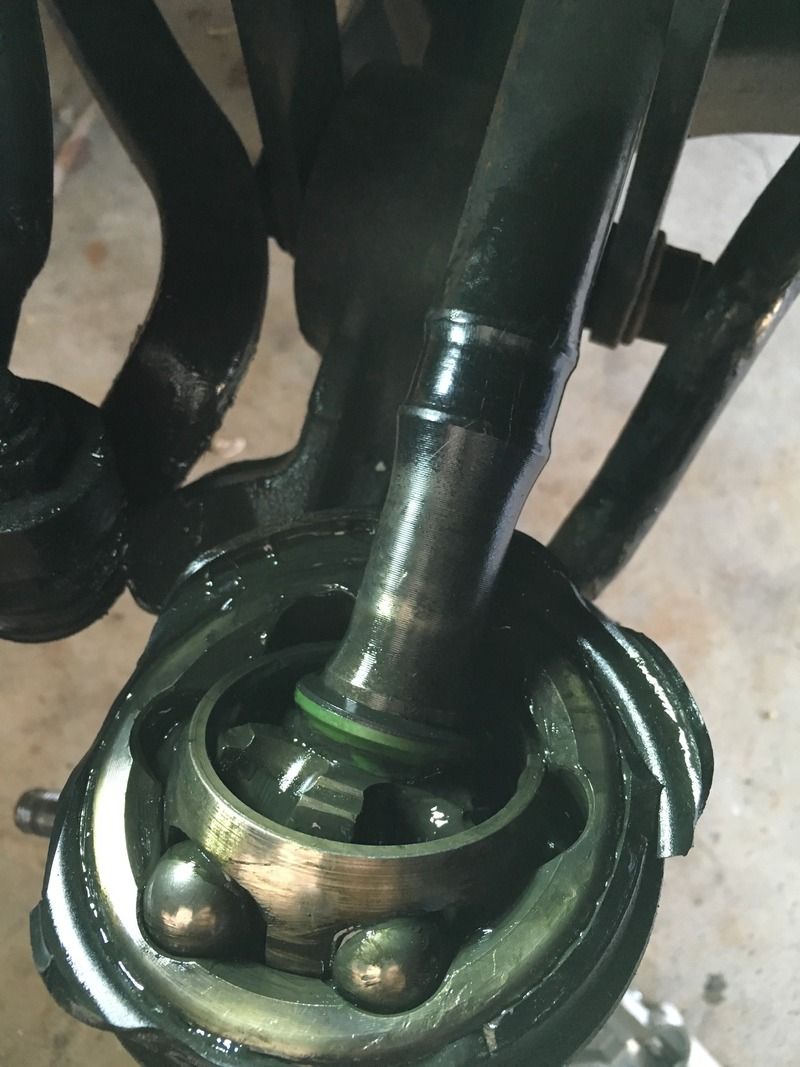
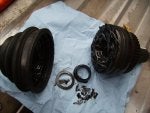
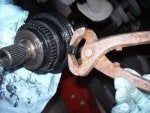
They say a picture is worth 1000 words, so let the pictures do the talking.
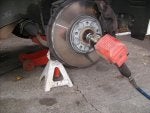
The 3 needed sockets are 17 mm for wheels, 22mm for ball joint and 27mm for CV joint bolt.
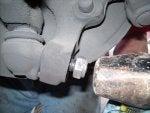
Feel free to ask questions if the pictures are not clear.
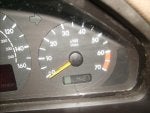
I bought a boot set for $22 and the few minutes (see the clock) spend on preventive replacement every 10 or so years can sure save you lot of hassle down the road. Joints last for decades, but they don't like torn boots and elements replacing the grease.
 

Attachments

#4 ·
Brother fly here on Thursday to pick up the wagon, so than we will celebrate :)
To expand the subject, some pictures from the first joint that had broken boot. Since we did not know how long it was driven with broken boot, I took it apart and clean for the inspection. The joint comes apart like school mechanical puzzle. You tilt the cage and pull a ball at the time.
Look at the mess in the fender well.
 

Attachments

#5 ·
What to inspect - balls have to have luster finish. Any sign of wear means getting new joint,
the basket needs to be check for crack (rare defect, but it happen to me on 4Matic)
The center "spider" and bell housing needs to be check for signs of wear. On the bell, about 1/2 way down the groves you see marking where the balls work most of the time. I run my finger over them and they are were perfectly smooth, so this is just marking.
Would you feel any wear out grove in this point - get a new joint.
 

Attachments

#11 ·
Nice write-up .......... easier than I would have thought. I replaced both my axels a while back with the chinese units ....... for the cost of the aftermarket I'm not sure if fixing an old one is worth it.

Time will tell ....... I did keep the old OE just in case ..... I will say that the aftermarket units looked quite nice
 
#12 ·
Good job Kajtek. :thumbsup:

To me this is the most critical maintenance item and always keep checking these 4M rubber boots. Fortunately I have a good mechanic that does it for a very reasonable fee. Have never had to replace anything else but the rubber boots.

Thanks for the pictures also. :thumbsup:

Cheers
 
#14 ·
I am diesel guy Karl. The 4Matic wagon goes to my brother- close to you in Seattle mountains, therefore 4M.
I always loved wagons and now seeing how nice and cheap they can be bought - am thinking about getting one for extra vehicle for my business. Have to work that with my wife as money is tight. Too bad I can't buy one with diesel.
2 bigger sockets on the picture are Chinese BTW. Bought them 30 years ago in Poland and the mostly used 17 mm broke in those years, but rest work well.
 
#15 ·
Your Pics are great and make this job look easy. But, I have some questions.

I need to replace or repair the front axles on my 2001 4m wagon, and was considering a diy. But after looking at the job with the wheels off, I assumed that I would have to remove the shocks and springs, which I am not capable of. I have two aftermarket (FEQ) axles on hand as well as a boot kit. My local benz mechanic (not dealer) would replace the right axle but not the left. He claims the aftermarket left axles don't fit. He would rebuild the left axle. He wants 1 1/2 days to do the job and I assume that will cost me over $1k. This brings me to my questions.

From the pictures, it looks like you removed the wheel assembly, rotor and caliper intact from the lower control arm. And then somehow you slid the axle out through the fork in the shock. I didn't think there was enough room?

Did you separate the shock from the lower control arm and leave it connected at the upper shock mount? Is this safe?

Ball Joints? You separated the ball joint mount to the lower control arm which looks simple. Is the upper connection easy as well? If I get this far, should I go ahead and replace the ball joints as well?

I would like to do this job myself in my garage, but being my only car I don't want to get to far into it and find that I can't complete it due to special tools or unexpected parts. This has happened before on another vehicle and I had to have it towed to my Benz shop to complete the job.

Thanks,
 
#17 ·
I just wanted to add this post to help others that need the whole axle out.

The spring compressor I got (Autozone) was too thick to fit, I had to angle the top (triangle) and just sit the bottom there (circle) -it's not the proper way and could be very dangerous, but I only needed a couple centimeters.

The lower arm does go down more, but very hard to push. Since I'm not He-Man, I used this a lever (parallelogram) so I can use my foot to lower the arm while using both hands to maneuver the axle out.

If you have proper spring compressor, maybe you might not even need to lower the lower control arm too much?

I put it all back together, drove for a couple of miles just to check. I did not get any clicking sound before when making a turn, just a clunking sound going to drive from reverse (u-turn). Maybe because the axle was not locked-in to the transmission (I didn't need to use a flat head to get axle out - I pulled not too hard, realized after putting the new one that there is no gap between the inner part of the axle and the transmission, where as before, there was)? So far, that clunk has disappeared. Yay!
 

Attachments

#18 ·
I had whole axle out without dealing with spring.
The difference is that wynn had rare CV joint with longer shaft and nut on it, while mine was shorter with bolt going into the shaft.
The longer assembly require more disassembly and takes longer than 30 minutes on short one.
 
#19 ·
does it matter what order and orientation do the balls go back into the basket? i.e. should it all be assembled back to the original setup or can the balls and and the basket go back in any order/position?

I thought that I would add that my rein outer cv boot lasted 1 year and 11 months. :/
 
#20 · (Edited)
CV joints are perfectly symmetrical so is the basket so you can assemble them any way you want only paying attention to insert center spider in right direction.
Old school mechanics would mark each ball into each position between the inner and outer part, but that procedure has its root from times when balls have been manufactured with looser tolerances and they were matched by size to other parts.
I think for several decades the balls are machined with such precision that it does not matter.
Than the joints work 99.99% in one direction so if you have the chance, swap the sides.
My brother still drives the car I did the job above and seems the 2 years period is getting close. Have to call him and advise to keep an eye on boots.
 
#22 ·
You have the rare CV joint with long shaft and nut on the end. (not the one on drawing)
Put a wrench on the nut and turn it.
The easiest way I found is put the wheel back with at least 3 bolts, have the wheel on the ground and than you can step on long wrench to get the torque.
Your job will require more disassemble than the one I had.
 
#23 · (Edited)
Kaj,

Thanks so much for the quick reply - thought I was going crazy since my axle set-up doesnt match the thread or any schematics I can find. The 12 pont nut looks odd - like its been crimped onto the shaft and the shaft looks like its knotched to accept such a crimping action. I tried a 27mm socket on the nut - too small. Ill have to figure out the size (guessing 30-34mm) by buying a large socket set or somehow finding the specs for this specific shaft.

I might even resort to a split boot fix till I figure this bitch out :/

EDIT found this link "The front axle nut requires a 30 mm 12 point socket. You're supposed to replace the nut. In order to remove it you must first bend out the nut lock at the axle shaft." Paid $9.00 per nut at the dealers (you can get these online for $3.00). Be careful banging on that ball joint bolt - I used a ball joint extractor (free loaner from Advance Auto). http://www.benzworld.org/forums/w12...g/forums/w124-e-ce-d-td-class/1616619-replacing-4matic-front-axle-question.html
Image
 
#24 ·
Yeah, this is a nut with collar that gets bend for locking.
Each time you need new nut >>> new part is expected to come with new boot set.
I was getting new bolt with EACH boot I bought from the dealer for my W211 what is overkill IMHO.
Now I have 2 high quality, very usable big bolts in my toolbox.
You have links for your case inserted in this topic.
 
#57 ·
Well my aftermarket boots (Rein BKN0067R) lasted just 35 months so I had to do them again. The Merc boots lasted at least 6 years I had owned the car and quite possibly double that. Bummed the new boots break down so fast.

Thought I would mention to be careful with your hammer on the shaft - its very soft metal. I smashed mine a little when tapping them back in. I say 'tapping' but sometimes 'Hulk Get Mad' and I am not even aware Im using too much force (and not using a brass or plastic hammer). So I spent 30 min with a file de-buggering the splines. Thinking I might need a new axle I did find after market whole front axles for $80.00 from Pelican Parts (at that price I am wondering if they would outlast the boots). Anyway I managed to save the axle but it added a lot of time and mess to this fairly simple repair.
 
#26 ·
Lack of hole makes it harder, but you can tap the leg of "spider" with a hammer.
If you are reusing the joint, it better bee brass hammer or brass punch.
The locking spring is kind of tricky. It will hold pretty strong when pulled, but it will snap-off easy with solid tap of 2lb hammer.
Just support the axle to avoid pulling the inner joint out.
 
#27 ·
New technology comes on the market every day, but testing what really works and what is simply salesmen BS can take rest of your life.
CV joints are lifetime item if you maintain boots and grease.
I think I was the only one who had CV joint with boot and grease and crack basket inside. But then I bought the car few months before it become obvious so who knows what PO did.
I am big fan of Redline in my water-sports and RV applications, but when it comes to MB, I'd say "if it is not broken, then why fix it?"