Mercedes-Benz Forum banner

107 Steering Coupler Replacement...With or Without Removing Steering Gear

1 reading
114K views 224 replies 54 participants last post by  Lollybo  
#1 ·
This should be a three to four hour job with the proper instructions and the difficult part is removing the allen bolts on the coupler. Hope this is helpfull. In three parts.


Part 1

Image


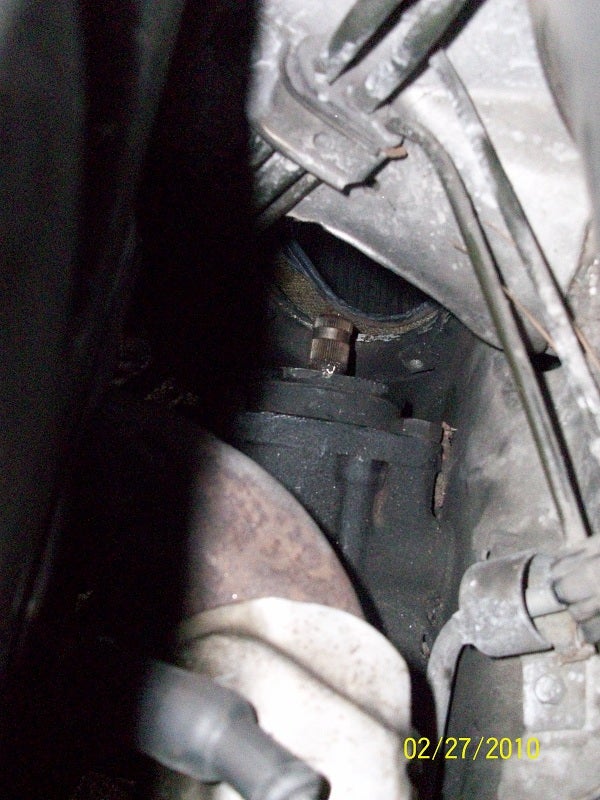
1) Mark position of old coupler on steering gear shaft and steering shaft with white out amd make sure the wheels are straight ahead, bolts heads should be facing up.
2) Soak coupler bolts for three days with PB Blaster (penetrating oil).
3) Use a new 6mm allen socket and 18" extension from top of motor and remove bolts
4) Even after the prep and new allen the heads stripped


Image


5) get 1/4 inch drill bit and drill extension. Drill deep into cap head but not all the way thru. Heat from drilling 90% of time will allow removal. Insert easy out into tight fitting socket and tape. Use long extension and unscrew mine came right out. If still won't come drill bolts out.


Replacing Coupler by way of steering shaft


Image


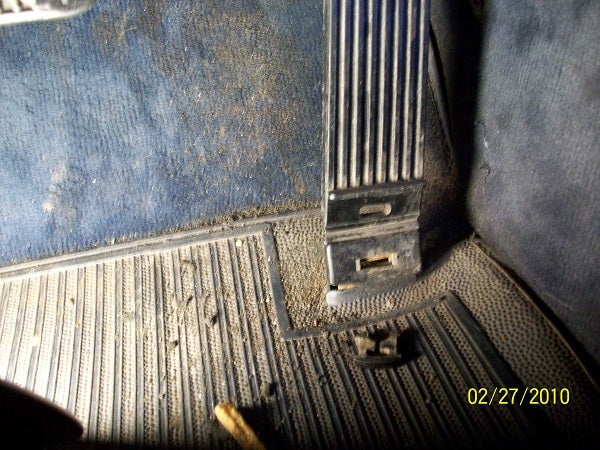
1) Disconnect Battery, remove clip carefully at bottom of gas pedal and slide petal down off accelerator rod. Remove lower panel.


Image


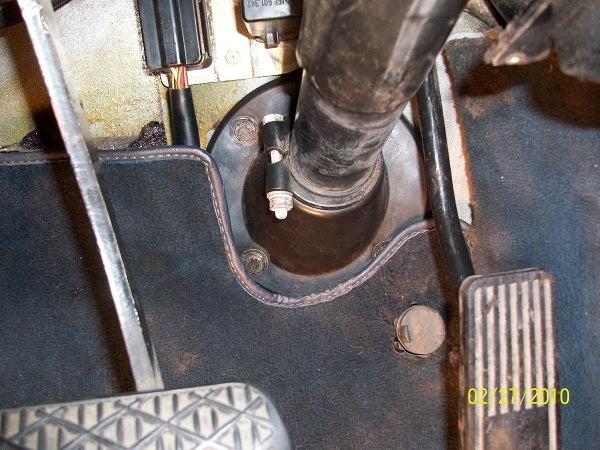
2) remove 4 10mm bolts from dust boot with 1/4 drive and long ext. Loosen lock ring 10mm nut


Image


Image


3) Twist and pull boot up the steering tube carefully (relay above boot) while pushing the accelerator rod toward passenger side.
5) carefully remove horn pad on steering wheel.


Image


Image


6) mark steering wheel on shaft with white out. Unloosen large allen bolt in middle with a 10mm (?) allen wrench. Use 2 foot pipe or very large wrench for leverage. Hold wheel with hand / do not use the steering wheel lock to hold wheel while breaking allen bolt loose. It takes a good amount of force. Use NEW allen wrench. You do not want to strip this head. Remove steering wheel.


Image


7) Remove instrument cluster with hooks on sides or make ones with a coat hanger. You do not have to completely remove cluster unless you have other work to do on it. pull cluster out far enough to access and remove two 10mm bolts for steering tube
 
#3 ·
Part 2

Image


Image


8) carefully remove vinyl cover on turn signal switch, it goes over a curved lip on bottom and top.


Image


Image


Image


9) Loosen 2 screws on back of T/S switch and pull brown and black horn wires. Remove 2 screws holding turn signal switch and lay it to the side.


Image


Image


10) Remove 4 5mm allen screws holding the steering shaft bearing housing to the steering tube. I removed the snap rings but I don't think I needed to.


Image


11) VERY IMPORTANT I am probably a lot slower witted than most of you but not thinking of this step cost me 1.5 hours of head scratching.
TURN THE IGNITION KEY TO THE RIGHT TO RELEASE THE STEERING LOCK.
pics 838/844/835
 
#4 ·
,


Well, Tony's pics are 2460x3280 or some such, and the system max is 800x600. My Picasa photo viewer doesn't have a resize tool (got what I paid for there :D). If any of of you out there can get them from Tony and resize them for us it would be appreciated. Or if someone knows of a download I can get that has the correct tools.

TIA, Dave.
 
#7 ·
I for one am appalled that, as many pics as you've posted, you don't have some type of photo editor on your computer. Or even worse, the possibility that you have one, but don't know where to find it. :D
 
#5 ·
IF you are running XP you can go here for the image resizer and it works very good. Microsoft PowerToys for Windows XP

If you have MS Office Picture Manager you can resize them there also.

If you have WIn 7 you should be able to right click on the photo and resize it.

I'll be happy to do it also, tony e-mail the to me.
 
#8 ·
I did not know I could do that in paint, Dave I am resending in a few


Part 3

Image


Image


Image


12) Pull steering shaft out gently (use a flat head screw driver between bearing housing and steering tube gently but mine slid right out). You do not need to pull the steering shaft all the way out but I did to check the bearings, if play in them a great time to replace them, mine were fine.


Image


13) Slide old coupler off of steering gear (it will fall down in floor board). Install new coupler in same position, splined end on steering gear and square end towards steering shaft. The bolt holes should be facing up.


Image


14) Insert steering shaft into steering tube. make sure the shaft is pointing up (previous white out mark) and slide shaft down tube. Tube is loose so it is easy to use one hand to position tube so the steering shaft goes into coupler. Replace 4 screws for bearing housing to steering tube


Image


Image


15) New part has Torx bolts. Again from top of motor use long ext and a t45 socket and torgue to spec.


Image


16) Reverse order for assembly.

Check your instrument cluster lights while it is still loose. One of my t/s indicator lamps needed reseating. Good time to check your windshield wiper mech.

Drove car and steering felt brand new (all the rubber was out of the old part).

This took me 12+ hours but should have only taken 3 or 4.

You have certainly helped me on a lot of projects so I hope this will help some of you back.
 
#17 ·
Yes, little click and It wanders while driving. I thought I was going to have to adjust steering box but when I saw how much play was in the coupler I knew I needed to fix this problem first. When done problem solved and no steering box adj needed for me. There was no rubber left in coupler metal on metal was the click.
 
#15 ·
This is a job I've been contemplating for a while, but I've got one question, Tony.

Were you able to access the bolt on the shaft end of the coupler from the engine compartment? It looks to be behind the firewall on my SL.

And BTW Weather Man, mine does. I can't say that replacing the coupler will fix that, but on mine the play is very evident.
 
#18 ·
Yes I removed both bolts from the engine compartment. The one next to the firewall was tight but I was using a long extension and a new socket. Then I used the drill and drill extension ($10 from lowes Im sure they are cheaper at harbor freight). then I used an easy out that I placed into a tight fitting socket and taped it with blue painers tape. All done from the top side of the engine compartment. I did not see any way to get to the bolt by the firewall from underneath the car. It could probably accessed thru the inside of the car with the boot and steering shaft removed but as tight as that bolt is I think it would be easier to just drill the head of the bolt off from the top even if you had to do it at a little bit of an angle.
 
#20 ·
Supposedly, you should be able to get the to far bolt from inside by using a cut-down L type allen wrench. The short side is shortened even further to get at the head of the bolt.

I didn't have that kind of luck. Due to clearance issues, I couldn't get to it from above, either. I ended up taking the gearbox out and using a hacksaw to get the thing apart. I had my Easy-Out break off in the socket of the bolt. Not Fun.
 
#22 ·
I've got to do this job, I have two couplers waiting to be installed. I tried on the 380SL but gave up. With the inspiration of this post and hopefully the pictures, I will do it this spring. The 380SL has become noticeably worse.

I will say, that I will do almost anything to avoid a broken or stripped bolt. Whatever time you spend to prevent a bolt from stripping/breaking will be repaid in avoiding the stay in Hell should it break.

It's bad enough when it happens anywhere, but I can't think of a much worse place for it to happen than here (OK, maybe the motor mount bolt). I plan on several soak/heat/soak cycles with what is purported to be the best chemicals for this job in the universe (but dangerous), a 50/50 mix of transmission fluid and acetone.
 
#24 ·
I'm no expert but IMO that part cannot completly fail. it is two interlocking metal parts that are rivoted. The rubber insulators wear out and that is what causes the play in the steering. The only reason I changed it was I like to have a scotch every so often and sure did not want to get stopped because of it wandering with a part I knew needed replacing. Plus I needed a challenge that weekend.
 
#29 ·
I'm glad the pics helped, I would have thought that lossening the bolts would have worked too. I pulled the snap rings but then you would have had to drive the the steering shaft and bearing out of the bearing holder and then the geometry of the length comes into play from what I read. I'm glad you only had six hrs, I had 12+. Did the coupler screws come out or did you have to go the easy out method?
 
#30 ·
It helped that I'd already had my steering wheel off.

Coupler bolts loosened ok, but I'd already fabricated a long hex drive as there wasn't room to line up the column end with a regular hex socket.

Yeah, there's a groove in both of the shafts for the bolt which made removal of the coupling almost impossible with the bolt in. Luckily I'd backed it off to where the threaded portion was what was interfering. I didn't realise the problem until I had them apart.

I'll probably be a little sore tomorrow from standing on my head, but even with issues, it went better than I'd expected.

Had I not had your instructions, I'd have been pretty much lost. Thanks.
 
#31 · (Edited)
I finished this job and also replaced by ignition switch, which was exhibiting the "no blower until key is jiggled" problem. I was expecting this problem so I had already ordered a replacement. This is an easy job, but keep in mind that this is one of the only parts of the car that uses straight blade screws; a mirror is VERY helpful when replacing this part.

I had no problem with the steering coupler. I'm a real believer in having the bolt heads ABSOLUTELY CLEAN before trying to insert the hex tool, and making sure that it goes down all the way BEFORE attempting removal. The tool I used was a long 3/8" Harbor Freight extension (don't try to use 1/4, not enough torque) with a 3/8"-1/4" adapter, with a 3" 1/4" extension and a homemade 1/4" socket with a JB welded in hex, that extends just enough over the end of the socket to completely insert into a bolt head.

I was a little unnerved about making absolutely sure that the steering rod was all the way in, but eventually I was certain of it because I put a feeler between the clamp part of the coupler and felt that it was entirely seated. The manual might be a bit overcautious here because of the possibility of a collapsed column - if the column is collapsed, it's possible that you could tighten everything without actually locking the column in.


Thanks for the pictures!
 
#33 ·
I had no problem with the steering coupler. I'm a real believer in having the bolt heads ABSOLUTELY CLEAN before trying to insert the hex tool, and making sure that it goes down all the way BEFORE attempting removal. The tool I used was a long 3/8" Harbor Freight extension (don't try to use 1/4, not enough torque) with a 3/8"-1/4" adapter, with a 3" 1/4" extension and a homemade 1/4" socket with a JB welded in hex, that extends just enough over the end of the socket to completely insert into a bolt head.
OK. But if you need to use this arrangement, or cut an Allen key down, to remove the bolt on the steering shaft, how do you tighten the torx head bolt on the new coupler? Wouldn't a torx socket be too big to fit into the space between the fire wall and the shaft:confused:
 
#35 ·
Alan,

I suspected exactly the opposite; that you needed a torx socket with a short bit:confused: How did you reach the torx head on the steering shaft, considering that it's recessed. Through the floor board, or down through the engine compartment?

I was thinking of getting a stubby torx socket, and tightening the coupler through the floor board.
 
#37 ·
Steering Box

Why is it easier to pull the steering wheel shaft out of the coupler as opposed to dropping the steering box? I'm looking at the easiest way to do this. There are 3 very accessible bolts on the box, after removing those, is there not enough room and play in p/s lines and steering linkage to remove the coupler?
 
#40 ·
I did mine from the top, pulling the wheel. It wasn't easy due to the very limited access ( I had done one before on a W116 that was much easier). I should think going at the steering gear end would still be harder, unless you have a pit or lift as getting the splines to line up while holding all that heavy metal seems hard. Hopefully I won't need to try it again either way.
 
#42 ·
Been working through the front end trying to get the excess play out of the steering wheel - upper ball joint was shot, steering box needed adjustment, center link was bad and now discovered that the steering coupler is completely shot. This thread should be very helpful in pulling the coupler. I plan to rebuild mine, so I'll post the results of the effort and the process used.
 
#44 ·
quick question everyone, i have got everything done except taken the two bolts out of the couplet to release the shaft. my question is do i need to jack up the car in order to get to the two bolts or just go from under the hood with the extensions?? is there any reason to lift the vehicle or can this be done without lifting it and putting it on jack stands??