

I am posting this as a follow-up to a few suggestions and support from my recent video post regarding the install of the keyless-go, alarm and push-start button in my 2005 ML350:
http://www.benzworld.org/forums/w163-m-class/1677007-keyless-go-true-push-start-remote.html
*I would like to thank warm_mt_dew for the advice and tips*
Along the process, there will be 'intersections' where I consider to be "fielder's choice" meaning whichever direction you decide to take from there is solely up to your preference(s) and/or reason(s). EX: You may be installing a regular remote start system instead of the pushstart, so take your path, accordingly. I have taken pictures of the parts I think are critical and would be informative, the rest will be mentioned in text.
Wiring diagrams/charts were taken from commandocaralarms.com:
'98 - '00 ML320:
1998-2000*Mercedes Benz*Ml 320*Vehicle Wiring Chart and Diagram
'99 - '00 ML430:
1999-2000*Mercedes Benz*Ml 430*Vehicle Wiring Chart and Diagram
'01 - '02 ML-class:
2001-2002*Mercedes Benz*ML Class*Vehicle Wiring Chart and Diagram
'03 - '05 ML-class (I used this chart):
2003-2005*Mercedes Benz*ML Class*Vehicle Wiring Chart and Diagram
***PLEASE NOTE***: Use the above charts as a starting point / general idea as well as my write-up. ALWAYS test your wires/wiring if uncertain. *I am not responsible for any "oops" because you didn't test any/or double check*
Handy things to consider having:
-> Wire cutter/crimp/stripping tool
-> Wire connectors (posi loks, electrical tape, solders, etc...)
-> Multimeter
-> Screwdriver, sockets (10mm), Torx set (T15 thru T27), flathead, philips,
plastic pry-tool, zip ties, etc...
-> Of course any installation instructions.
-> A note pad (in case you vent out some unique combination swear-words)
**The unit I bought came with an internal immobilizer relay/control and chip sense wires that doesn't require me to use an universal transponder bypass such as the DEI 556UW. If your unit does not have this function, then you MUST use a bypass such as DEI 556UW and follow the wire connection instructions under the section "THIS METHOD WILL WORK ON EUROPEAN VEHICLES"**
1) Remove driver's kick panel cover (philips and plastic screws by the pedals). The OBD connector will prevent you from moving the cover further. On the back of that connector, squeeze the pinch points and slide the clip/gate to free and pull out the connector.
2) Steering wheel cover: Loosen the 3 Torx bolts (T25 or T27) underneath the cover...2 on the sides and 1 on the back. Use a flathead to free up the taps at the crease lines where top and bottom covers meet. 4 taps total: 2 on the sides and 2 on the front (behind the steering wheel).
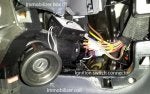
3) Remove the 2 small panels on both sides of the steering wheel (just pull them out with adequate force). You will see the ignition connector and wires:
![]()
4) Remove the Immobilizer box by sliding it towards the ignition wires.
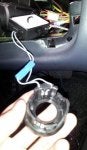
5) The immobilizer coil is encased by the black plastic housing, clipped onto the keyhole. Use a flathead to lift/pry it off, it should pop out easily. Wondering why is there a blue Posi-lok wire connector? That is because I had to undo my installation in order to take the "before" pictures. You will see later in the process that I will be connecting the ends of that wire to the onboard bypass control
![]()
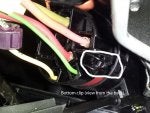
6) The Ignition switch connector is held in by TWO tabs/clips (top and bottom):
![]()
![]()
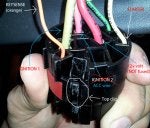
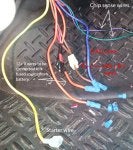
7) After referencing the wire colors to the wiring chart for my year range and a bit of testing to confirm, I was able to identify the wires and in the pin slots below:
![]()
8) The Keysense (Orange) wire: This wire normally does not have 12v going through UNTIL a key is inserted. What I did here was cut the Keysense wire and connected it directly to a 12v source, through an On/Off rocker switch. This is to trick the car that there is a key inserted, otherwise, it will NOT remote start. I put in the On/Off rocker switch so that if I need to open the driver's door for some time, I won't be annoyed by the "key still in ignition switch" reminder beeps. This can also come in handy shall I need to perform any syncing sequences that would normally require me to 'remove the key' as part of the sequence. I tried to hook this up to the remote start unit's IGN 1 wire but it didn't work. I have not tried the ACC wire though, which I think it might work.
*UPDATE!* Connecting the Keysense wire to the ACC wire from the remote start unit worked!
![]()
9) This picture just shows some of the preparations that I did on the remote start unit. The Purple and Green wires (top right) will be connecting to one of the immobilizer's wires. Since the ML only have IGN 1 wire and ACC wire (no IGN 2 wire), I combined the unit's IGN 1, IGN 2 wires and connected those with the ML's IGN 1 wire.
![]()
10) Here, I cut and connected each ends of one of the immobilizer's antenna wires to the unit's onboard immobilizer control Purple and Green wires. (TEST time) After doing this, I plugged the ignition switch connector back in and the coil ring back onto the keyhole, keysense wire connected to 12v (as explained in previous steps), inserted a working factory key, tried to start the engine like normal but it did NOT start. I then removed the key but held the chip side of a working spare key close to the immobilizer coil, pushed the Push-Start button and the ML started right up. This tells me that I can safely attach and leave the chip part of a spare key at all times with the ML and not worry about somebody 'hot wiring' to start. If they can find the wires...
For those using an universal bypass module (DEI 556UW), there is a wire connecting diagram in the manual, under the section "THIS WILL WORK ON EUROPEAN VEHICLES". You will end up doing the exact same thing like the picture below. The ONLY difference is that your "sacrifice" key will be left inside the bypass module's box, instead of attaching it to the immobilizer's coil. The DEI 556UW bypass will also need to be connected to: 12v+, ground and starter status output from your choice of remote start unit. I did not use the DEI 556UW because my unit does not have such starter status output but is replaced with an onboard control/relay. I hope this made sense!
![]()
11) This shows how my spare key is attached to the coil. I am embarrassed to show this pic because I tried to cut the key blade but failed miserably (this is why I suggested a note pad for cool and unique combination swear-words!). Cutting the key blade serves the purpose of bypassing the steering wheel lock, since that I am installing a Push-Start. This is where that "fielder's choice" comes in. In order to bypass the steering wheel lock, you'd need to insert the key blade and turn to ignition ON and leave it there (like forever). This means that if you also have the Ignition connector plugged into the switch, you will constantly have the accessories on (BATTERY DRAIN!). The "fielder's choices" are: completely and permanently unplug the ignition connector (while keeping the key blade in the ON position to constantly bypass steering lock) which is what I did, OR, cut both Ignition wires + the immobilizer antenna wire that was tapped and connect to On/Off switches (and leave it in the OFF) so that you don't drain the battery. This gives you the flexibility that in a case where you need to start your ML with the key it'd work. And yes, HIDE them switches! Did I lose you somewhere? More combination swear words? COOL! IGNORE THIS STEP IF YOU'RE JUST INSTALLING A REGULAR REMOTE START (non push-start).
![]()
http://www.benzworld.org/forums/w163-m-class/1677007-keyless-go-true-push-start-remote.html
*I would like to thank warm_mt_dew for the advice and tips*
Along the process, there will be 'intersections' where I consider to be "fielder's choice" meaning whichever direction you decide to take from there is solely up to your preference(s) and/or reason(s). EX: You may be installing a regular remote start system instead of the pushstart, so take your path, accordingly. I have taken pictures of the parts I think are critical and would be informative, the rest will be mentioned in text.
Wiring diagrams/charts were taken from commandocaralarms.com:
'98 - '00 ML320:
1998-2000*Mercedes Benz*Ml 320*Vehicle Wiring Chart and Diagram
'99 - '00 ML430:
1999-2000*Mercedes Benz*Ml 430*Vehicle Wiring Chart and Diagram
'01 - '02 ML-class:
2001-2002*Mercedes Benz*ML Class*Vehicle Wiring Chart and Diagram
'03 - '05 ML-class (I used this chart):
2003-2005*Mercedes Benz*ML Class*Vehicle Wiring Chart and Diagram
***PLEASE NOTE***: Use the above charts as a starting point / general idea as well as my write-up. ALWAYS test your wires/wiring if uncertain. *I am not responsible for any "oops" because you didn't test any/or double check*
Handy things to consider having:
-> Wire cutter/crimp/stripping tool
-> Wire connectors (posi loks, electrical tape, solders, etc...)
-> Multimeter
-> Screwdriver, sockets (10mm), Torx set (T15 thru T27), flathead, philips,
plastic pry-tool, zip ties, etc...
-> Of course any installation instructions.
-> A note pad (in case you vent out some unique combination swear-words)
**The unit I bought came with an internal immobilizer relay/control and chip sense wires that doesn't require me to use an universal transponder bypass such as the DEI 556UW. If your unit does not have this function, then you MUST use a bypass such as DEI 556UW and follow the wire connection instructions under the section "THIS METHOD WILL WORK ON EUROPEAN VEHICLES"**
1) Remove driver's kick panel cover (philips and plastic screws by the pedals). The OBD connector will prevent you from moving the cover further. On the back of that connector, squeeze the pinch points and slide the clip/gate to free and pull out the connector.
2) Steering wheel cover: Loosen the 3 Torx bolts (T25 or T27) underneath the cover...2 on the sides and 1 on the back. Use a flathead to free up the taps at the crease lines where top and bottom covers meet. 4 taps total: 2 on the sides and 2 on the front (behind the steering wheel).
3) Remove the 2 small panels on both sides of the steering wheel (just pull them out with adequate force). You will see the ignition connector and wires:
4) Remove the Immobilizer box by sliding it towards the ignition wires.
5) The immobilizer coil is encased by the black plastic housing, clipped onto the keyhole. Use a flathead to lift/pry it off, it should pop out easily. Wondering why is there a blue Posi-lok wire connector? That is because I had to undo my installation in order to take the "before" pictures. You will see later in the process that I will be connecting the ends of that wire to the onboard bypass control
6) The Ignition switch connector is held in by TWO tabs/clips (top and bottom):

7) After referencing the wire colors to the wiring chart for my year range and a bit of testing to confirm, I was able to identify the wires and in the pin slots below:
8) The Keysense (Orange) wire: This wire normally does not have 12v going through UNTIL a key is inserted. What I did here was cut the Keysense wire and connected it directly to a 12v source, through an On/Off rocker switch. This is to trick the car that there is a key inserted, otherwise, it will NOT remote start. I put in the On/Off rocker switch so that if I need to open the driver's door for some time, I won't be annoyed by the "key still in ignition switch" reminder beeps. This can also come in handy shall I need to perform any syncing sequences that would normally require me to 'remove the key' as part of the sequence. I tried to hook this up to the remote start unit's IGN 1 wire but it didn't work. I have not tried the ACC wire though, which I think it might work.
*UPDATE!* Connecting the Keysense wire to the ACC wire from the remote start unit worked!

9) This picture just shows some of the preparations that I did on the remote start unit. The Purple and Green wires (top right) will be connecting to one of the immobilizer's wires. Since the ML only have IGN 1 wire and ACC wire (no IGN 2 wire), I combined the unit's IGN 1, IGN 2 wires and connected those with the ML's IGN 1 wire.
10) Here, I cut and connected each ends of one of the immobilizer's antenna wires to the unit's onboard immobilizer control Purple and Green wires. (TEST time) After doing this, I plugged the ignition switch connector back in and the coil ring back onto the keyhole, keysense wire connected to 12v (as explained in previous steps), inserted a working factory key, tried to start the engine like normal but it did NOT start. I then removed the key but held the chip side of a working spare key close to the immobilizer coil, pushed the Push-Start button and the ML started right up. This tells me that I can safely attach and leave the chip part of a spare key at all times with the ML and not worry about somebody 'hot wiring' to start. If they can find the wires...
For those using an universal bypass module (DEI 556UW), there is a wire connecting diagram in the manual, under the section "THIS WILL WORK ON EUROPEAN VEHICLES". You will end up doing the exact same thing like the picture below. The ONLY difference is that your "sacrifice" key will be left inside the bypass module's box, instead of attaching it to the immobilizer's coil. The DEI 556UW bypass will also need to be connected to: 12v+, ground and starter status output from your choice of remote start unit. I did not use the DEI 556UW because my unit does not have such starter status output but is replaced with an onboard control/relay. I hope this made sense!

11) This shows how my spare key is attached to the coil. I am embarrassed to show this pic because I tried to cut the key blade but failed miserably (this is why I suggested a note pad for cool and unique combination swear-words!). Cutting the key blade serves the purpose of bypassing the steering wheel lock, since that I am installing a Push-Start. This is where that "fielder's choice" comes in. In order to bypass the steering wheel lock, you'd need to insert the key blade and turn to ignition ON and leave it there (like forever). This means that if you also have the Ignition connector plugged into the switch, you will constantly have the accessories on (BATTERY DRAIN!). The "fielder's choices" are: completely and permanently unplug the ignition connector (while keeping the key blade in the ON position to constantly bypass steering lock) which is what I did, OR, cut both Ignition wires + the immobilizer antenna wire that was tapped and connect to On/Off switches (and leave it in the OFF) so that you don't drain the battery. This gives you the flexibility that in a case where you need to start your ML with the key it'd work. And yes, HIDE them switches! Did I lose you somewhere? More combination swear words? COOL! IGNORE THIS STEP IF YOU'RE JUST INSTALLING A REGULAR REMOTE START (non push-start).


