Hello,
I though that I should put together in a simple manner all I found out in the process to fix my flaring tranny. I hope this information is useful.
Please add more details, pictures, videos, etc
Its kinda pointless to mess with the tranny if the engine is not working properly. Although, usually the problems come from vacuum leaks. Assuming your engine is running Ok, then just go hunt for vacuum gremlins.
Engine:
-ATF level. If its leaking click here.
-Change all Filters.
-Fuel hose leaks. Upgrade Hand primer pump for a new bosch.
-Chech tank screen.
-Valve Adjustment. Check the Timing chain.
-Compression Test.
-Clean Injection System with Diesel Purge. And Or upgrade to Monarch Nozzles.
-Timing, Injection Pump
- In the case of a Turbo diesel, check your turbo for proper functionality and clean it. Use the ALDA screw to adjust for a richer air mix. Clean the "banjo" bolt.
-Oil consumption/loss.
-Linkages, are they working right? moving smoothly?
-Glow plugs, if the engine is starting rough/ smoking and gets better at Op.Temp. When changing them you may want to get rid of the carbon buid up using a "reamer":
http://www.benzworld.org/forums/w12...g/forums/w123-e-ce-d-cd-td/1594582-replaced-glow-plugs-carbon-reamer-clean.html
-Tranny additives... this is what Benzworld think:
http://www.benzworld.org/forums/w123-e-ce-d-cd-td/1550717-tranny-additive-good-bad.html
=============================================
Vacuum:
- Simplify the vacuum routing. Delete EGR. Leave one of the vac lines from the main hose going directly to the VCV with a "Y" connector shared with the black line that goes directly to the Modulator. Connect your MV to "other users" one by one to test for leaks again. Then start connecting one by one "other users" to see if there is a leak in one of such systems. Go for a test ride with each one of them. Usually there is a leak in the Door Locks or Climate Control, if that's the case, bypass it and deal with that later. EGR is not needed, you should bypass it.
- Replace all rubber connectors that look aged or brittle ... Its cheap, just do it all. Don't forget the most important one at the Modulator.
- Check Modulator vacuum line is holding pressure. Usually black, goes from the top of VCV to under the car and connects into the Modulator. If not, replace the line and go to the modulator itself and check if it holds vacuum .
QUOTE: "You don't necessarily need to replace the modulator if it doesn't hold vacuum. Sometimes you can replace the rubber O ring or rubber cap to repair it. Only if you draw oil through it, you'll need to replace the modulator."-GOVERT70227
If the modulator doesn't hold vac, the you may need to replace it. Although is not just swapping parts it needs to be adjusted to the right pressure and the new piece doesn't come with a thrust pin, look inside of the old one and use that part with the new one.
- Check main vacuum hose and Pump (It should read 21-25 inches of Hg). Disconnect main vac hose from brake booster and plug that end with thumb, connect mighty vac to both plastic tees (with a Y connector) that were connected to all vacuum lines. Use the MV as a gauge. This is done with engine at idle.
-Disconnect Cruise control electric plug and then disconnect all vacuum hoses but one going in top of the VCV and tho other to the shut off valve. You are leaving out cruise control, climate control, EGR and door locks.
-VCV adjustment, this is a valve that leaks vacuum in relation with the position of throttle. Its located in top of the IP and is made of a white/yellowish plastic. It can be adjusted to control when shifting happens, this is usually THE FIX. With old/worn trannys, you may have to deal with a harsh 1-2 shift to avoid flares between 2-3 and early 4th gear. Use your MV as a gauge between "Y" in top of VCV and Modulator line, original set up is 15Hg at idle to 0Hg at full throttle.
Check this link by Gregs300CD: http://www.benzworld.org/forums/w123-e-ce-d-cd-td/1261744-transmission-flaring-clunking-vcv-diy.html
Remember that you need a check valve at least closing the door system and reservoir.
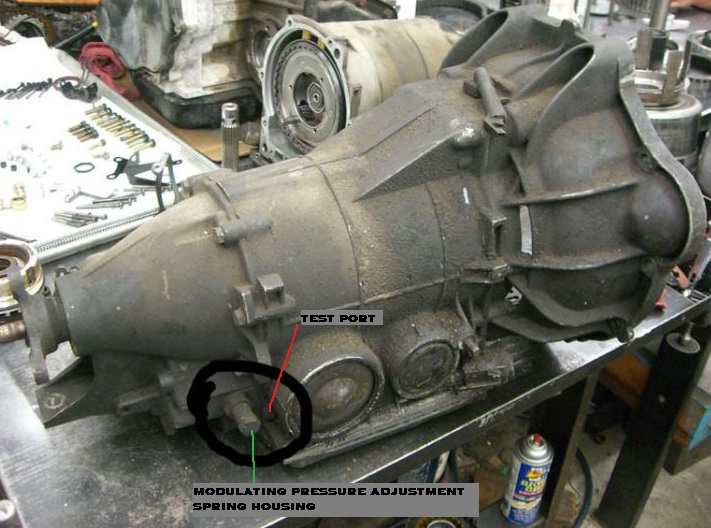
-Someone messed with the Mod. pressure before... well, that's a tough one... regulating the Mod to specs is a real pain in the ass. But it can be done with a gauge connected to the test port, sometimes can only be read with the car running at 50mph.
=================================================
Simple Explanation of 722.xxx Mercedes Trannys:
-Hydraulic pressure controls Shifting.
-Hydraulic pressure is set by the primary pump and governor. This is NOT adjustable.
-Some pressure can be adjusted externally to control timing and quality.
-4 types of pressure work in concert:
a. Working Pressure: From the front driven primary pump, and its the basis of all pressures. Cannot be adjusted, but can be measured by a port.
b. Governor Pressure: Builds pressure with centrifugal force in a gradual proportion as the speed of the tranny increases. It works directly against control pressure to regulate the shift depending on vehicle speed. Cannot be adjusted, but can be measured by a port with the car driven a certain speeds.
c. Modulating Pressure: controls the working pressure, from partial to full throttle. Modulator can be adjusted to harden or soften the spring inside it. One way is constant, by turning the key inside it and the other way is constantly changing because is vacuum. This vacuum is also controlled by the VCV which leaks vacuum in proportion of the throttle position. Modulating pressure controls the shifts by varying the applied pressure to the bands on the clutches. Modulating pressure acts as a control for the working pressure in proportion to the torque of the engine. Can be adjusted by turning the key in the modulator and checking the pressure in the port close to it.
d. Control pressure: This is relative to the pedal position. Obtained from the modulator by means of the control pressure valve, which is influenced by the linkage or cable from the tranny to the accelerator linkage.
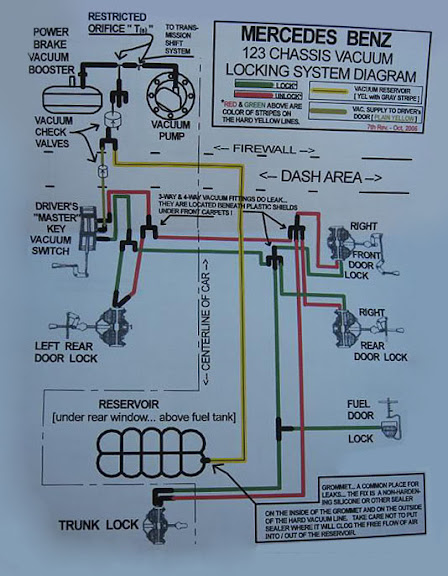
Useful Diagrams:
Vacuum:
Engine 617.912 (Model 300D/CD/TD) [1980 federal?]
![Image]()
Engine 617.950 (300SD)
![Image]()
1980 CA
![Image]()
1981-1984
![Image]()
1984-1985
![Image]()
1985 CA
![Image]()
![Image]()
---------------------------------------------
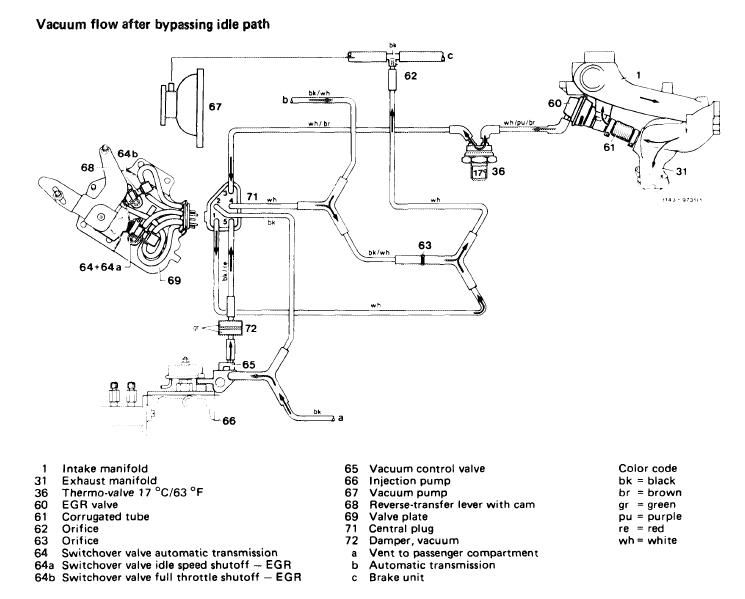
1981 300TD non-turbo
![Image]()
QUOTE: "Valve 64 is for the transmission, valves 64a en 64b are for the EGR (EGR shut-off for idle and full load).
Valve 64 switches between full vacuum from the pump (nr. 1 on the plug) at idle and Controlled Vacuum from the VCV. It does that by connecting 1 and 4 at the plug at idle and connecting 4 and 5 when the accelerator pedal is pressed.
In the picture it seems like 1, 2 and 3 are connected and it also seems as if not all the switchover valves are there, but the picture is not clear.
If you want to by-pass the EGR, simply plug nr. 3 port. That works if the switchover valves are still working and not leaking. I'm not sure if the switchover valve 64 is dependent on either 64a or 64b, but if not, you can remove 64a and 64b or plug them.
You can also repair the switchover valves, sometimes a rubber line or a little flipper is worn out.
Alternatively you can install a simpler 1980 switchover valve or remove the switchover valve altogether as was originally suggested. The transmission might not shift back to first upon take-off or stand in first in idle (so that it pulls harder), but I suppose you could live with that. " -by Govert70227
------------------------
WEBSITE WITH VACUUM DIAGRAMS, CLICK HERE
![Image]()
![Image]()
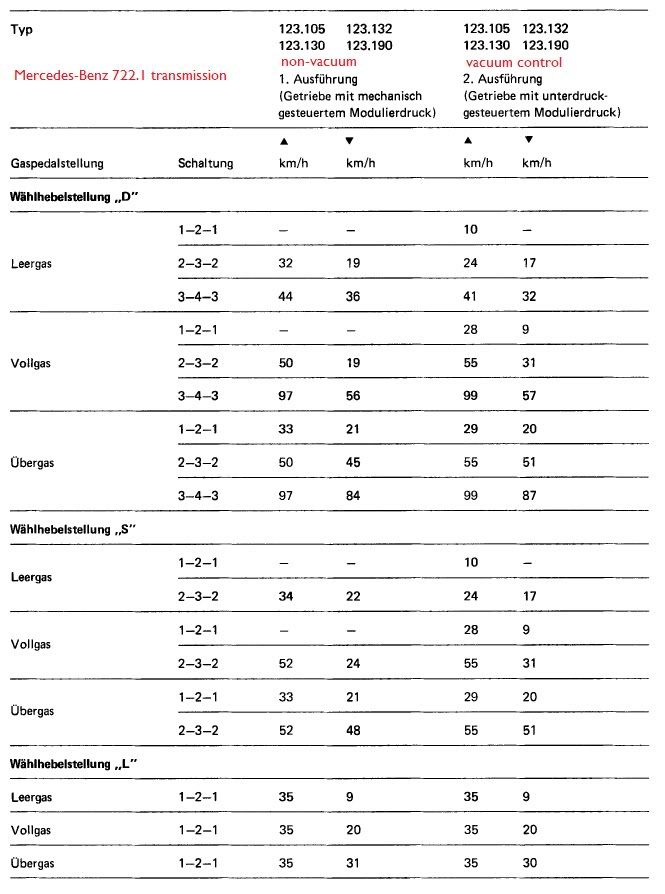
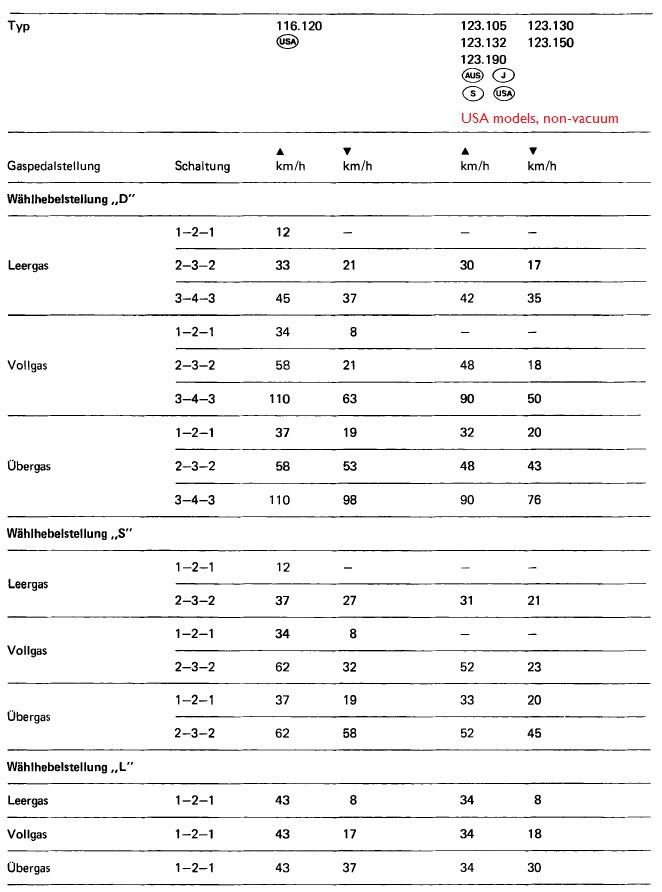
Shifting points for NON VACUUM PRE-1980:
![Image]()
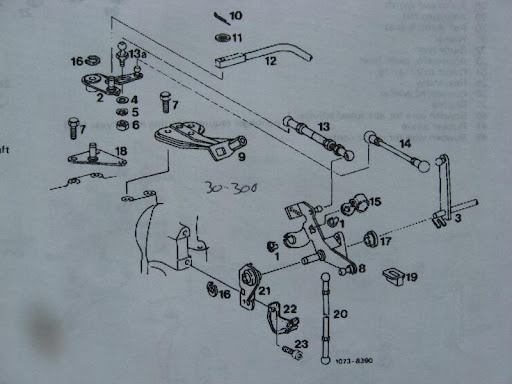
Linkage:
![Image]()
![Image]()
![Image]()
VACUUM EGR DELETE (Rmac58) :
![Image]()
above, the blue painted line goes thru the firewall to leak, its open an usually black
Useful Links:
PROPER VACUUM SYSTEM "TUNING" ACHIEVES OPTIMAL SHIFT CHARACTERISTICS AND AN ACCURATE REPAIR
DIESEL PURGE
VALVE ADJUSTMENT
INJECTOR NOZZLE REPLACEMENT
EGR DELETE BYPASSING MAINFOLD
VACUUM TROUBLESHOOTING BASICS
Mercedes 123 126 Diesel Transmission Ultimate Diagnostic and Tuning Kit
Helpful thread: "Transmission Experts: Please help"
PEACHPARTS THREADS ON THE SUBJECT by Whunter
Video from mercedes source about shifting problems:
Thanks to all the people that helped me with advice and images, you guys rock!!
I though that I should put together in a simple manner all I found out in the process to fix my flaring tranny. I hope this information is useful.
Please add more details, pictures, videos, etc
Its kinda pointless to mess with the tranny if the engine is not working properly. Although, usually the problems come from vacuum leaks. Assuming your engine is running Ok, then just go hunt for vacuum gremlins.
Engine:
-ATF level. If its leaking click here.
-Change all Filters.
-Fuel hose leaks. Upgrade Hand primer pump for a new bosch.
-Chech tank screen.
-Valve Adjustment. Check the Timing chain.
-Compression Test.
-Clean Injection System with Diesel Purge. And Or upgrade to Monarch Nozzles.
-Timing, Injection Pump
- In the case of a Turbo diesel, check your turbo for proper functionality and clean it. Use the ALDA screw to adjust for a richer air mix. Clean the "banjo" bolt.
-Oil consumption/loss.
-Linkages, are they working right? moving smoothly?
-Glow plugs, if the engine is starting rough/ smoking and gets better at Op.Temp. When changing them you may want to get rid of the carbon buid up using a "reamer":
http://www.benzworld.org/forums/w12...g/forums/w123-e-ce-d-cd-td/1594582-replaced-glow-plugs-carbon-reamer-clean.html
-Tranny additives... this is what Benzworld think:
http://www.benzworld.org/forums/w123-e-ce-d-cd-td/1550717-tranny-additive-good-bad.html
=============================================
Vacuum:
- Simplify the vacuum routing. Delete EGR. Leave one of the vac lines from the main hose going directly to the VCV with a "Y" connector shared with the black line that goes directly to the Modulator. Connect your MV to "other users" one by one to test for leaks again. Then start connecting one by one "other users" to see if there is a leak in one of such systems. Go for a test ride with each one of them. Usually there is a leak in the Door Locks or Climate Control, if that's the case, bypass it and deal with that later. EGR is not needed, you should bypass it.
- Replace all rubber connectors that look aged or brittle ... Its cheap, just do it all. Don't forget the most important one at the Modulator.
- Check Modulator vacuum line is holding pressure. Usually black, goes from the top of VCV to under the car and connects into the Modulator. If not, replace the line and go to the modulator itself and check if it holds vacuum .
QUOTE: "You don't necessarily need to replace the modulator if it doesn't hold vacuum. Sometimes you can replace the rubber O ring or rubber cap to repair it. Only if you draw oil through it, you'll need to replace the modulator."-GOVERT70227
If the modulator doesn't hold vac, the you may need to replace it. Although is not just swapping parts it needs to be adjusted to the right pressure and the new piece doesn't come with a thrust pin, look inside of the old one and use that part with the new one.
- Check main vacuum hose and Pump (It should read 21-25 inches of Hg). Disconnect main vac hose from brake booster and plug that end with thumb, connect mighty vac to both plastic tees (with a Y connector) that were connected to all vacuum lines. Use the MV as a gauge. This is done with engine at idle.
-Disconnect Cruise control electric plug and then disconnect all vacuum hoses but one going in top of the VCV and tho other to the shut off valve. You are leaving out cruise control, climate control, EGR and door locks.
-VCV adjustment, this is a valve that leaks vacuum in relation with the position of throttle. Its located in top of the IP and is made of a white/yellowish plastic. It can be adjusted to control when shifting happens, this is usually THE FIX. With old/worn trannys, you may have to deal with a harsh 1-2 shift to avoid flares between 2-3 and early 4th gear. Use your MV as a gauge between "Y" in top of VCV and Modulator line, original set up is 15Hg at idle to 0Hg at full throttle.
Check this link by Gregs300CD: http://www.benzworld.org/forums/w123-e-ce-d-cd-td/1261744-transmission-flaring-clunking-vcv-diy.html
Remember that you need a check valve at least closing the door system and reservoir.
-Someone messed with the Mod. pressure before... well, that's a tough one... regulating the Mod to specs is a real pain in the ass. But it can be done with a gauge connected to the test port, sometimes can only be read with the car running at 50mph.
=================================================
Simple Explanation of 722.xxx Mercedes Trannys:
-Hydraulic pressure controls Shifting.
-Hydraulic pressure is set by the primary pump and governor. This is NOT adjustable.
-Some pressure can be adjusted externally to control timing and quality.
-4 types of pressure work in concert:
a. Working Pressure: From the front driven primary pump, and its the basis of all pressures. Cannot be adjusted, but can be measured by a port.
b. Governor Pressure: Builds pressure with centrifugal force in a gradual proportion as the speed of the tranny increases. It works directly against control pressure to regulate the shift depending on vehicle speed. Cannot be adjusted, but can be measured by a port with the car driven a certain speeds.
c. Modulating Pressure: controls the working pressure, from partial to full throttle. Modulator can be adjusted to harden or soften the spring inside it. One way is constant, by turning the key inside it and the other way is constantly changing because is vacuum. This vacuum is also controlled by the VCV which leaks vacuum in proportion of the throttle position. Modulating pressure controls the shifts by varying the applied pressure to the bands on the clutches. Modulating pressure acts as a control for the working pressure in proportion to the torque of the engine. Can be adjusted by turning the key in the modulator and checking the pressure in the port close to it.
d. Control pressure: This is relative to the pedal position. Obtained from the modulator by means of the control pressure valve, which is influenced by the linkage or cable from the tranny to the accelerator linkage.
Useful Diagrams:
Vacuum:
Engine 617.912 (Model 300D/CD/TD) [1980 federal?]

Engine 617.950 (300SD)

1980 CA

1981-1984

1984-1985

1985 CA


---------------------------------------------
1981 300TD non-turbo
QUOTE: "Valve 64 is for the transmission, valves 64a en 64b are for the EGR (EGR shut-off for idle and full load).
Valve 64 switches between full vacuum from the pump (nr. 1 on the plug) at idle and Controlled Vacuum from the VCV. It does that by connecting 1 and 4 at the plug at idle and connecting 4 and 5 when the accelerator pedal is pressed.
In the picture it seems like 1, 2 and 3 are connected and it also seems as if not all the switchover valves are there, but the picture is not clear.
If you want to by-pass the EGR, simply plug nr. 3 port. That works if the switchover valves are still working and not leaking. I'm not sure if the switchover valve 64 is dependent on either 64a or 64b, but if not, you can remove 64a and 64b or plug them.
You can also repair the switchover valves, sometimes a rubber line or a little flipper is worn out.
Alternatively you can install a simpler 1980 switchover valve or remove the switchover valve altogether as was originally suggested. The transmission might not shift back to first upon take-off or stand in first in idle (so that it pulls harder), but I suppose you could live with that. " -by Govert70227
------------------------
WEBSITE WITH VACUUM DIAGRAMS, CLICK HERE

Shifting points for NON VACUUM PRE-1980:

Linkage:


VACUUM EGR DELETE (Rmac58) :

above, the blue painted line goes thru the firewall to leak, its open an usually black
Useful Links:
PROPER VACUUM SYSTEM "TUNING" ACHIEVES OPTIMAL SHIFT CHARACTERISTICS AND AN ACCURATE REPAIR
DIESEL PURGE
VALVE ADJUSTMENT
INJECTOR NOZZLE REPLACEMENT
EGR DELETE BYPASSING MAINFOLD
VACUUM TROUBLESHOOTING BASICS
Mercedes 123 126 Diesel Transmission Ultimate Diagnostic and Tuning Kit
Helpful thread: "Transmission Experts: Please help"
PEACHPARTS THREADS ON THE SUBJECT by Whunter
Video from mercedes source about shifting problems:
Thanks to all the people that helped me with advice and images, you guys rock!!