Mercedes-Benz Forum banner

R230 ABC Rear Valve Block / Accumulator removal Procedure

85K views 65 replies 29 participants last post by  Starfleet56  
#1 · (Edited)
Hello all, I searched but found no info regarding removal of the rear Valve Block on a R230 (anywhere on the 'net). As removal is necessary to change the two rear Accumulators as well as service or clean the rear Valve Block this procedure will be necessary at one point or another in the life of many of our R230's:

Time: With car on stands and wheel off ready to begin removal about 1 hour

Two notes:

1) It is absolutely crucial to keep the work area, hoses and valve block clean and free of any dirt at all times! Even the smallest particle of dirt introduced into the ABC system can cause system failure. IF you do not plan to remove and clean the Valve Block Assembly I strongly recommend purchasing an assortment of hydraulic plugs (IE Capplugs.com) so you can immediately plug the port in the Valve Block as soon as a ABC Hose is removed. Cap plugs should be available at any facility that deals with hydraulic hoses or fittings.

2) It is in no way necessary to place any undue stress on any of the ABC hoses to remove the Valve Block Assembly. No prying, pulling or twisting is necessary! Please handle all ABC Hoses with care so you do not end up with a leaky hose which requires replacement!

On to removal:

I had a tool that made removal a breeze. I consider this tool necessary to remove the valve block assembly. I see no way to remove the assembly safely without it:

Snap-On 17mm Crows Foot: FRHM17

A similar crows foot may work but, this is the exact tool I used and removal was a snap. If you don't have one, you can call or stop by any service shop and ask any tech for the number of the local snap-on distributor. Alternatively, a parts store or Craftsman crows foot may work.

Here are the primary tools I used for removal:
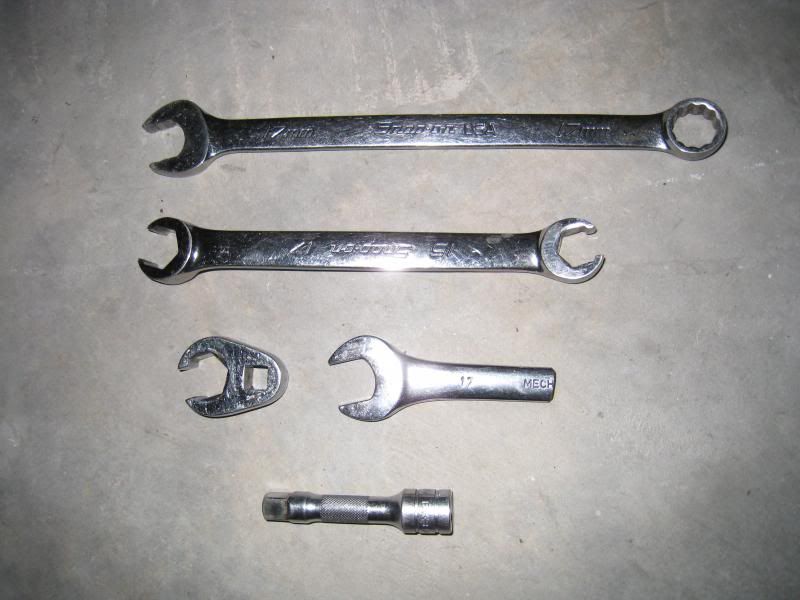


All ABC Hose Fittings requiring removal to remove the Valve Block are 17mm.

The short 17mm wrench is a wrench I cut down long ago. This helped in removing one of the ABC Hoses but, I don't consider it crucial to the job. As with any hydraulic hose you MUST use a wrench designed specifically for removing hydraulic lines. Failure to do so will likely result in a rounded off ABC Hose Fitting and possibly necessitate replacement of the entire ABC Hose! The standard wrenches above were used for ease in loosening and removing the ABC hoses only after they were initially broke free using one of the Line Wrenches.

First, all 4 corners of the car were up on jack stands. While the Valve Block Removal procedure could be carried out with just the rear of the car up on stands I will be working on the front Accumulator as well so, the car was in the air. I mention this as having all 4 wheels at full droop completely depressurizes the ABC system (after about 15 minutes in the air).

To be safe, I also loosened the rear left ABC valve:
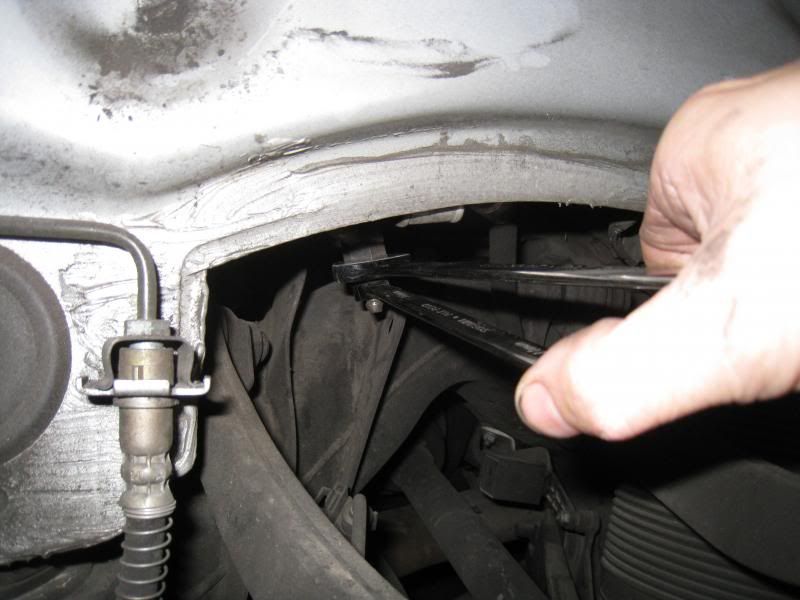


I loosened this fitting slowly and there was some pressure released along with minor fluid loss. Place a drain pan under the fitting and Loosen slowly!

Move the drain pan below the Valve Block Assembly. Clean the entire area (any dirty hoses, Valve Block and Accumulators) with Brake Clean then blow off with compressed air. Air in a can is fine if you don't have a compressor handy. Wipe down any excess with a clean rag.

First, remove the 10mm nut securing the hose retainer. This will allow for extra movement in the hoses while disassembling.
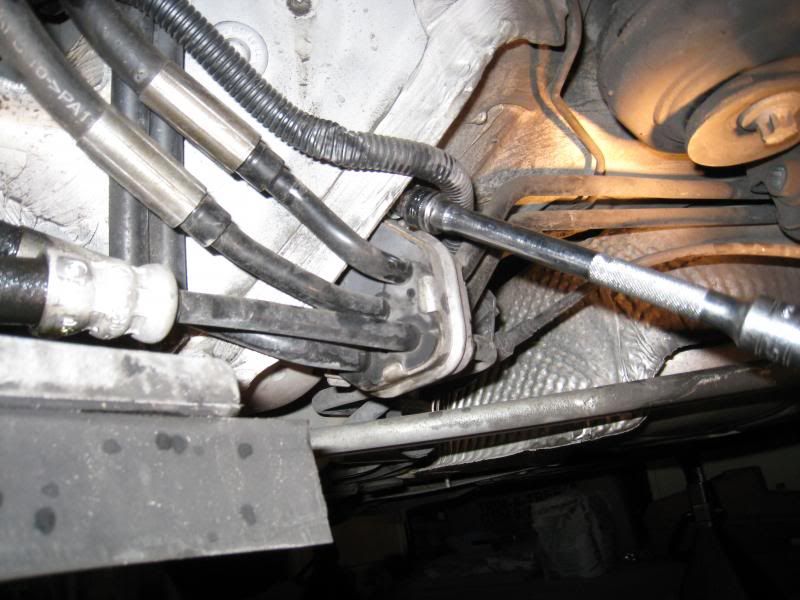


Remove the first hose:
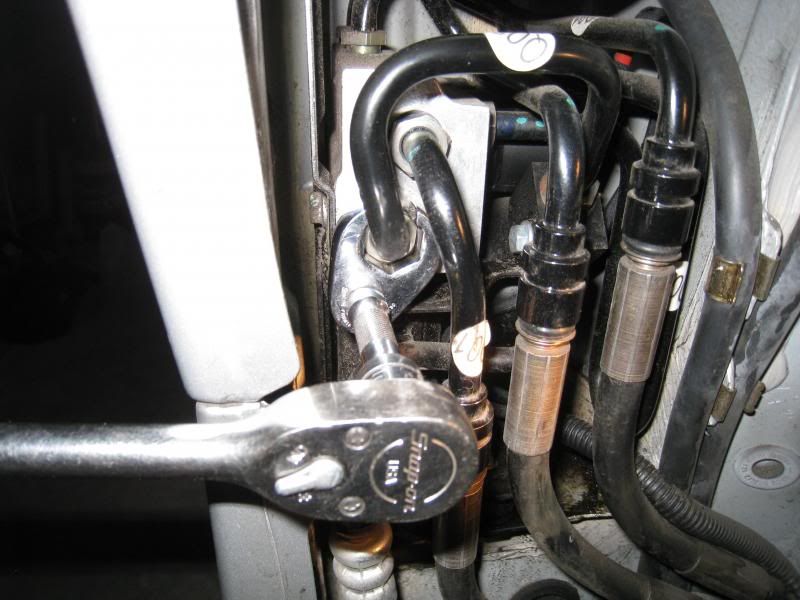


As you can see the Crows Foot is a perfect fit for hose removal. Break the hose free then use the crows foot or your fingers to remove.
As soon as the hose was removed from the Valve Block I cleaned the fluid off with brake clean on a rag, then wrapped the hose end with saran wrap and tape to insure no dirt enters the hose. If you are not planning to disassemble and clean your Valve Block install a plug in the port immediately to keep dirt out.

2nd hose, the other end of this hard line:
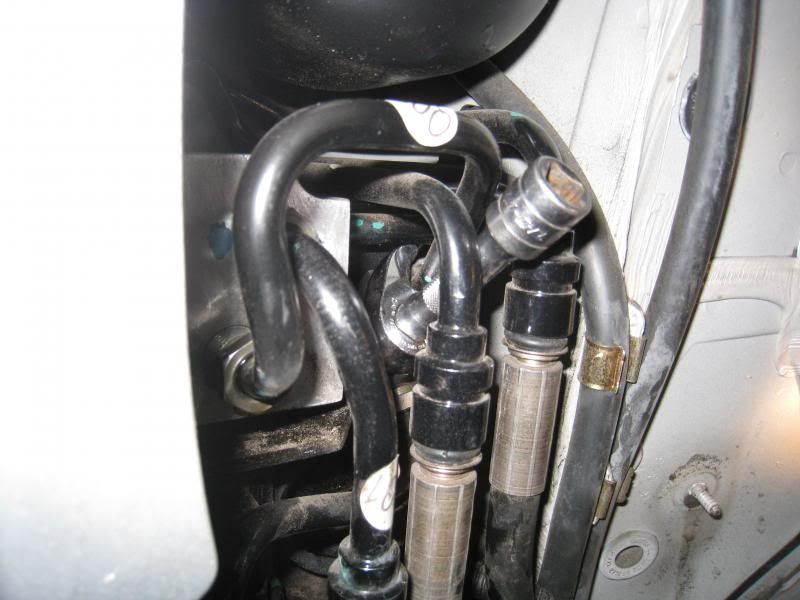


Again, the crows foot sneaks right in with a short extension. This end attaches to the small Accumulator junction block.

Remove the short hard line entirely and block both ends.

On to the next hose:
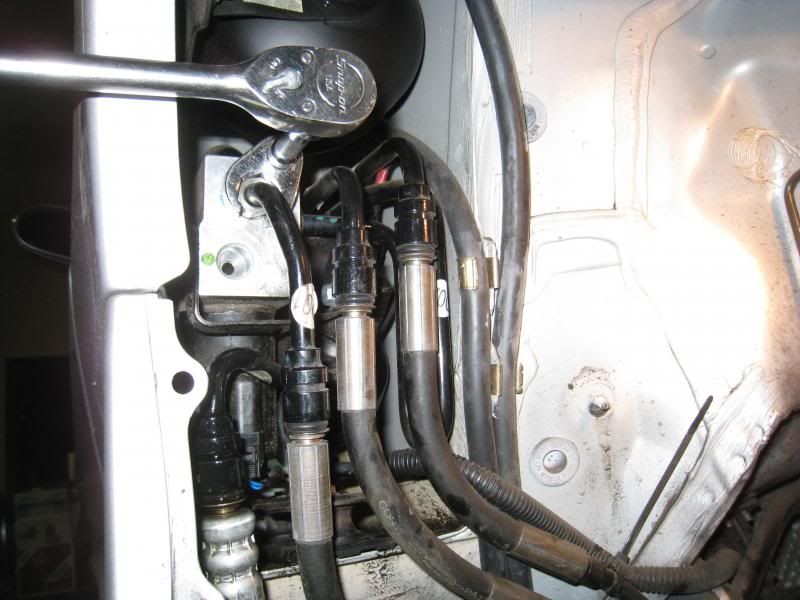


Again, wrap with Saran Wrap and tape/block the hose end and also the port in the junction block if not planning to clean it.

And the next one:
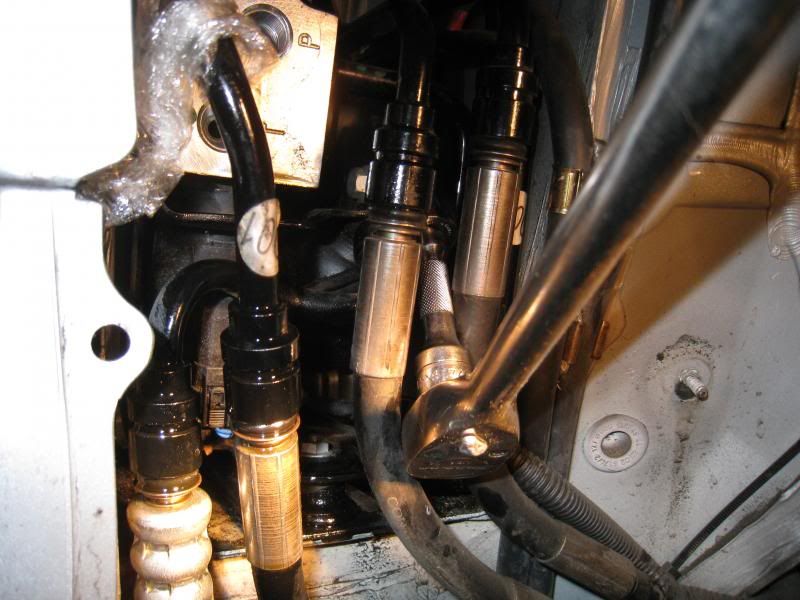


This fitting was difficult to photo but, the crows foot slid right in. No issues here at all.

And now moving to the 1st hose on top of the Valve Block:
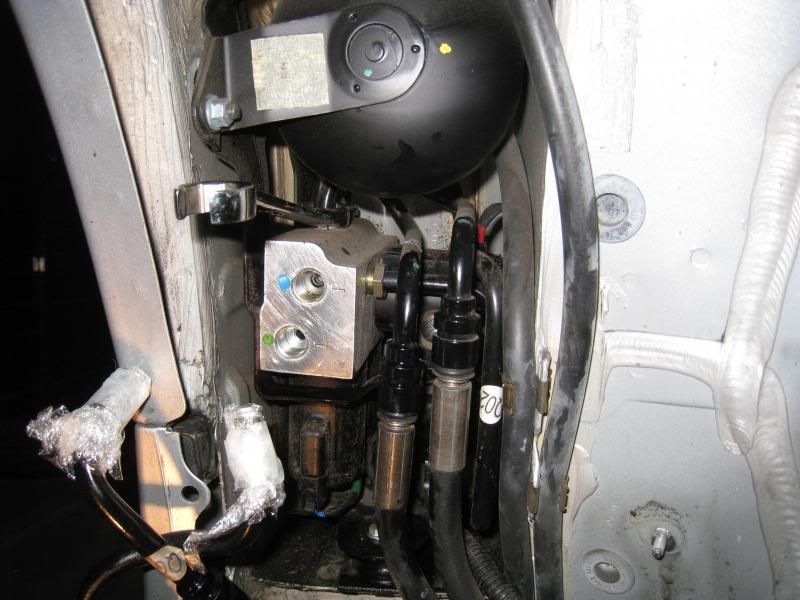


It's a little tight removing this hose once the fitting is removed from the Valve Block. Clearance is at a minimum between the Valve Block and the Accumulator. I found the hose much easier to safely maneuver when grasped from below with one hand then the top of the hose maneuvered out and away with your other hand:
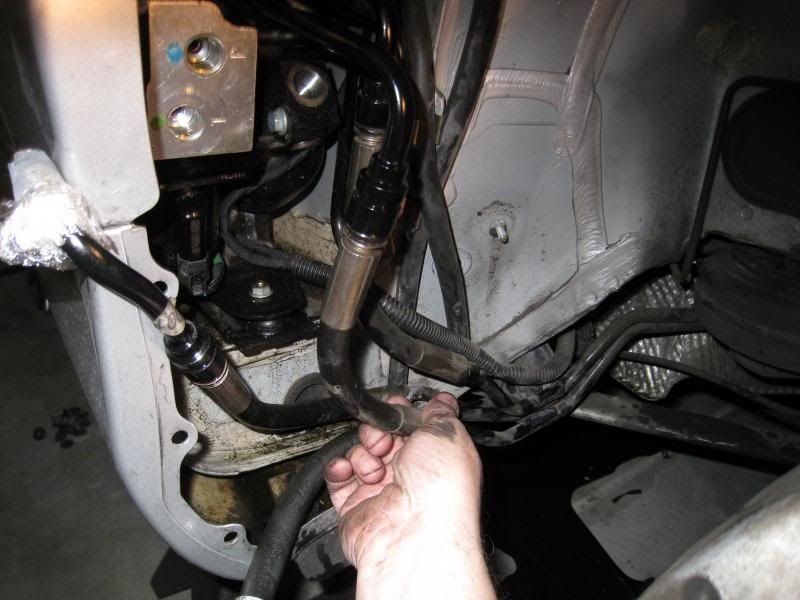


Once that hose is safely removed proceed to remove the rear hose:
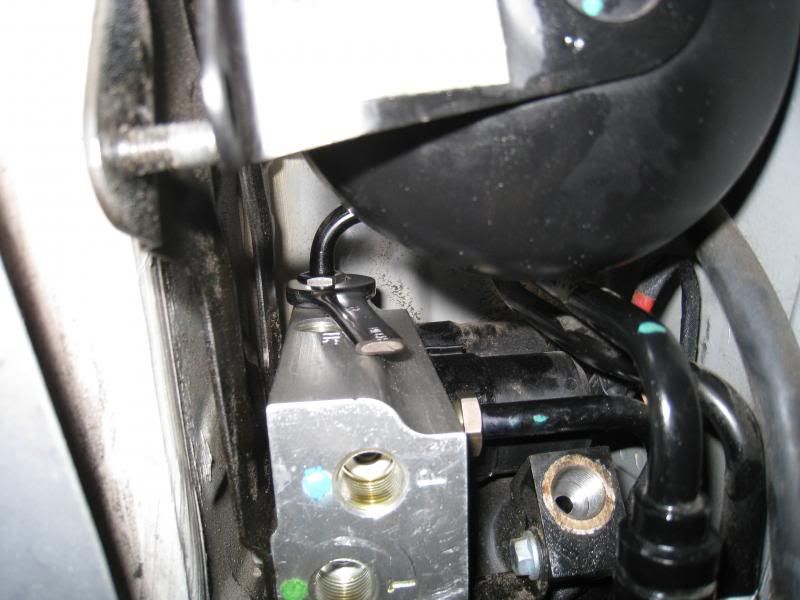


Here I had already broke the fitting loose with the line wrench and was proceeding to loosed the fitting with the stubby 17mm. If I did it again I would remove the top nut securing the entire assembly to the car (via the rubber insulator, just above the large accumulator) and carefully try to slide the entire assembly out a little bit and get a hand in there to loosen the fitting by hand. It was a real pain loosening the fitting even with the short wrench. There's just not a lot of room in there. With all the other ABC hoses removed at this point it's likely you can slide the entire assembly part way out.

I mention above the entire assembly slides out on the bottom. Here is a good pic showing the slide mount:
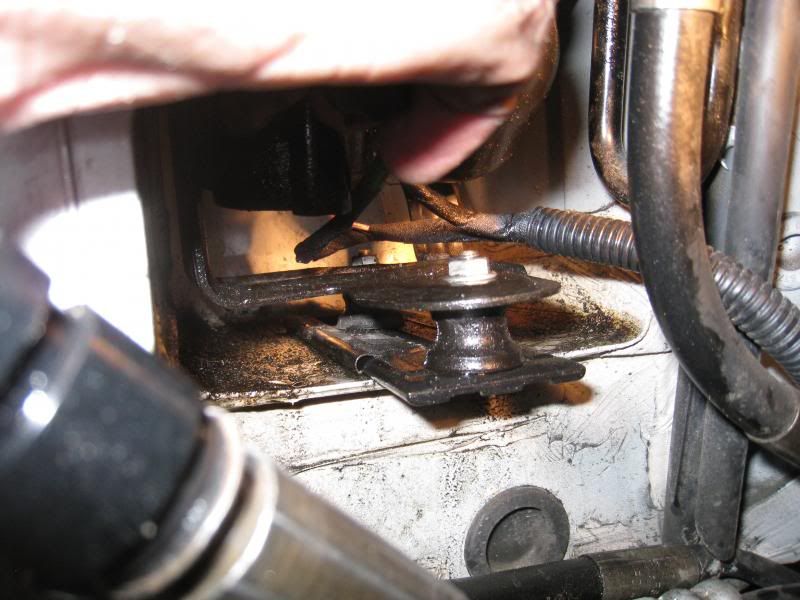


Once you have removed the top rear hose in the step above you are ready to very carefully slide the entire assembly out of it's cubby. Be sure to clear the way of the ABC hoses you have removed and you don't pull on any wires connected to the Valve Block. Slide the Assembly just enough to reach each electrical connector to disconnect.

I took a picture of the electrical connectors as they attach to the Valve Block:


Here is the assembly removed:

Finally, the entire assembly removed from the car:
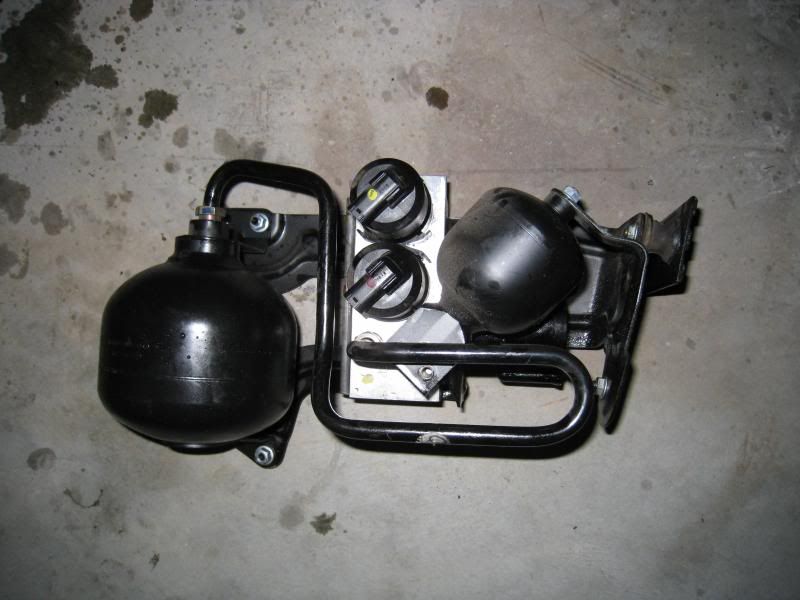


That's it!

Hope this helps,

Brian
 
#2 · (Edited)
Good Post

Brian, thanks for the informative pictorial. Please give us more information in regards to the necessity of this type of repair. What symptoms were you experiencing? Any warning lights? What year car? (please fill out your profile). How did you complete the repair? To the dealer for a "Rodeo"? Or another method? It's great to see that someone in the R230 forum is actually working on their car and creating a post with pics, we need more of this. I currently have a 2009 SL550 Silver Arrow Edition with 24k on her and I have an extended warranty. So I probably won't be posting any type of repairs soon, although after being an old MB/ Porsche tech many years ago, I still enjoy tinkering and would enjoy creating a repair pictorial to post. Keep up the good work.................Thor
 

Attachments

#4 ·
Hi Thor, Profile Updated thanks for the tip. I actually wrote this procedure up for a gentleman on another Mercedes Forum as he is changing out his Rear Accumulator this week and could find no how-to on how to do this. I figured I'd throw it up here as well as I frequent both forums.

My car is a 2005 SL55 AMG.

This *should* apply to all R230's 2003 to I *believe* 2009. I know it applies through 2007 but, I am not as familiar with the changes made to the later years.

Note there are two Valve Block/Accumulator assemblies on the R230. One is for the front suspension and is located in behind the front bumper cover, in front of the Front Left wheel. This one is quite accessible and there are numerous write up's on line regarding removing and servicing this unit.

The second is the rear Valve Block Assembly I have covered here.

There are a number of reasons one may need to remove the rear Valve Block Assembly from the car. The primary reasons would be to change the Accumulators or, clean (or replace) the Valve Block Assembly.

The Accumulators: These are the black balls you see on my removed assembly. The accumulators consist of a rubber bladder in the center separating a rear chamber of Nitrogen Gas from the front chamber which fills with ABC fluid. The purpose of the Accumulator is to absorb rebound in the suspension system through pressure on the fluid (similar to the way a shock insert dampens rebound in a conventional McPherson strut assembly).

Signs of a bad Accumulator are a harsh ride (I've heard this described by people as the car riding link a tank). The Accumulators fail by the rubber membrane deteriorating over time. This is bad as it can contaminate the ABC system with small chunks of rubber from the deteriorating membrane. It seems from forum research these rarely fail all at once but, rather ride quality deteriorates over time into a harsh, poor handing ride.

There will be no warning lights when these fail.

The best way I've found to test the accumulators is the simple bounce test. Go out to your car and with the engine off push down firmly on the bumpers. The car should be near rock solid. If there is any bounce or rebound than your accumulator is compromised.

My car has 97,000 miles on it. I purchased it recently. The other day I started the car and had ABC fluid pouring our the fill cap and dipstick tube. I have found other forum members report this problem but, no one had a definitive answer as to why. For some the problem simply "went away" while other performed a fluid flush/fill and rodeo and this corrected the problem. I believe the problem of ABC fluid out the reservoir cap or dipstick tube may be caused by a failure of the nitrogen bladder in a ABC Accumulator pressurizing the system. With 100,000 miles I planned to change all my accumulators as preventative maintenance anyway. Genuine Mercedes Accumulators run about $130.00 on line or, about $200 from the dealer.

Valve Block - the Valve Block is interesting. Seems more than a few of these have been unnecessarily replaced by tech's who don't have a clear understanding of their function or operation. The most notable failure of a Valve Block is one corner loosing pressure and the car sinking over a relatively short period of time (a few days without starting). Even a tiny piece of dirt can keep the block from maintaining system pressure, allowing ABC fluid to leak out of the strut back into the system and cause that corner to sink.
While replacing the Valve Block will certainly remedy the issue it may be unnecessary. The valve block can be removed, disassembled and cleaned as per these instructions:

http://www.benzworld.org/forums/w215-cl-class/1649786-i-have-intention-repair-valve-block.html

There are numerous other write up's and even some youtube vid's I believe if you look around.

**Please note** I am not a Mercedes Tech, I am simply sharing my finding with others here in a hope to spread knowledge.
 
#5 · (Edited)
One more note: Surprisingly little fluid is lost when removing the Valve Block Assembly. Changing the Accumulator on the front of the car does not necessitate removal of the valve block and results in even less fluid loss than servicing the rear. Once the assemblies have been reinstalled and the car is back on the ground top off the ABC fluid reservoir and have an assistant use the raise/lower button to raise and lower the car several times while you top off the ABC reservoir with fresh Pentosin CHF-11s.This may take a little time but negates the need for a Rodeo. NEVER run the engine with an empty ABC reservoir!! The pump may ingest air which will kill it in short order!

However, if it has not been done so recently I would *strongly* recommend a complete ABC fluid flush and fill while servicing the valve blocks/accumulators. This is the cheapest insurance you can buy against future ABC failures. While Mercedes has no recommended service interval for the ABC fluid most agree that 60,000 is an ideal range. I will likely change mine out every few years. It's a relatively simple process and requires no special tools, equipment or rodeo. Search "ABC fluid flush" and you will find much info and even youtube videos on how to do this.

I have ordered a Star Diagnostic setup from Mackhack here on this forum as I consider it an indispensable tool for servicing any modern Mercedes but, it is not completely necessary for the procedures outlined above.
 
#7 ·
AAHHHH!! I actually suspected this when the hoses swiveled at that point!
That would truly make the procedure of removing the valve block very, very easy!

The tools would be money WELL spent for someone looking to remove their ABC Valve Blocks

Thanks for this info and contributing the part numbers to this thread Frank!
 
#9 ·
I assume the rear is sinking over a period of time? How quickly does it sink?

I've heard a rodeo/fluid flush *can* help but, results do seem to vary.

What are your symptoms?
 
#11 ·
Hi VTvette,
Thanks for the detail. It was really helpful this weekend when I removed my rear valve block for cleaning. I was noticing the right side slumping after being parked for a few days.
But I made one grave mistake! I flushed the fluid and put in a new filter before removing the valve block. I lifted the car and placed one jack stand under the left rear. I followed your post and worked great. I followed the post about cleaning the valve block and replaced the seals with the recommended seals. I reinstalled the block and started the car to check for leaks. My mistake was in pushing the ride height button while it was up on the jack stand!! When I put the wheel back on and let it down, the car now thinks that position is level!!! The left rear is up in the air and the rest is low.

I limped it to the MB dealer and asked them to reset the ride height sensors and perform a rodeo. They tell me that they have not been able to set the height. They reversed the electrical connectors on the rear valve block and the problem switched the opposite side.
They`re suggesting replacing the rear valve block but I don't believe that is the problem.

Any thoughts?
Brian
 
#13 ·
If it were me I would jack up the rear, confirm the electrical connections to the valve body are correct if there is still any question, remove the rear wheels and with the rear of the car up in the air depressurize each rear strut at the schrader valve on the ABC hoses leading to each rear strut (ask if you're not sure of this I can post pictures). Put the wheels back on, lower the vehicle onto the ground (you will likely need to place some wood under the tires as the car will likely bottom out on the jack - it will be slammed to the ground) then start the car and let it lift and find level.

This is just what I would try.

Hope this helps,

Brian
 
#16 ·
Thanks Brian. I asked the dealer about this and he thought they tried it already, but not sure. He would ask his shop foreman and let me know later today. He said they worked on it for 4 hours, trying everything they could think of, but could only come up with replacing the valve block. I'm curious as to what testing they did to determine the valve block was faulty to the point that it would cause only the left rear to stand 4 inches higher than the rest of the car? And that when they switched the connections on the valve the problem showed itself on the opposite side? I'm not 100% sure of the valve block function. I only know from reading posts here that if it is beginning to fail the car drops on that side when parked.
I was concerned that the dealer could not come up with a practical solution so I called Mercedes USA and created a service file. They said someone would contact me within 24 hours. The dealer has been very nice about it but suggesting a $3,300 repair without knowing if it will solve the problem is not what I expected to hear.
Thanks for the response. I'll let you know what I find out!

Brian
 
#20 · (Edited)
Hi Brian, here is a picture of one of the bleeder valves I referred to earlier. I apologize for any confusion I referred to it as a shrader valve it is actually a bleeder valve located on each of the rear ABC hard lines which leads to the rear struts. With the rear wheels removed you will see them clearly and easily when looking into the rear wheel well. In this picture I have the two wrenches in place and ready to crack this bleeder loose to release pressure to the strut:


I see no reason to remove the fuses during this procedure

The procedure again:

1) crack the rear wheel lug nuts loose while the car is on the ground.

2) Jack up the rear of the car and remove both rear wheels. Place a couple of jack stands under the rear of the car.

3) You will see the bleeder as described and shown above in each wheel well. They may have a rubber boot over the end of the valve you will remove.

4) Wait about 15 minutes from the time you jacked the rear of the car up (this helps relieve some pressure at the rear struts) then place a container under the bleeder valve and SLOWLY crack the bleeders open to relieve the pressure in each rear strut using two wrenches - one to hold the bleeder body and the other to open the bleeder valve. You should loose very little ABC fluid but it will be under a fair bit of pressure.

5) Once the pressure has been relieved tighten the bleeders back up and bolt the rear wheels back on the car.

6) Place some wood under the rear wheels and slowly lower the car. As the rear struts have been completely relieved of pressure the rear of the car will sit very low. The rear wheels will be up in the wheel wells when the car is lowered. The wood under the tires insures the struts are fully compressed and the car does not bottom out on the jack.

NOTE: If you lost more than a couple of oz of ABC fluid when relieving pressure to the rear struts at the bleeder valves be sure to check the ABC fluid in the reservoir and add as necessary before starting the car. I highly doubt this will be necessary though.

7) Start the car and it should rise to normal ride height. You may need to cycle the ride height button to raise the car initially.

8) Torque the wheels tight

9) Check the ABC reservoir and top off if necessary.

As mentioned I can't guarantee this will solve the issue but common sense says it's worth a shot.

On a side note, if you follow the procedure above and the ride height is still uneven in the rear another idea is to repeat the procedure but this time crack the bleeders open and with the bleeders open place the wheels back on the car and lower the car onto down onto the wood placed under the tires. What this would do is use the force of the strut compressing when lowering the car onto it's wheels to push the fluid out of the damper via the bleeder valve. Once the car has been lowered onto it's wheels and had pushed the fluid out of the bleeders reach under each side and snug the bleeders tight as best you can with the car on the ground. Jack the car back up, remove the wheels and tighten the bleeder valves securely. Replace the rear wheels, lower the car again and follow the rest of the procedure as outlined above. The reason I say to tighten the bleeder valves while the car is on the ground is to keep from ingesting air into the system when the struts decompress from jacking the car back up.

Best of luck and let us know how it turns out.
 
#21 ·
ABC Warning Visit Shop

I have a for question for whomever that can help. Replaced my right rear shock and the visit Workshop came on. The shop told me the travel sensor in the shock. I replaced the shock, warning still on. The dealer couldn't clear the code and suggested replacing the control module. There is no communication between the systems. Can the module be reprogrammed?
 
#24 · (Edited)
I am in the process of replacing all the accumulators/dampeners on my '03 SL55 with 49K miles. None of them 'seem' bad, but I'm doing this so I won't need to be concerned about THESE components leading to other damages in the ABC system. Flushed the system last year without a rodeo at 47K miles (old fluid was still green), and will flush it WITH a rodeo (currently getting the STAR system from Shardul) this spring. I'll also replace both the 3 micron filter in the reservoir and the magnetic filter I installed on the return hose in front of the reservoir. Currently, there are no signs of seepage or any indication of damage in the hoses/connections throughout the system.

I have ordered the two 'tools' referenced by Frank_S500 in post 6 of this thread, and commented on by vtvette in post 7. When I am finished with the R&R, I will make them available on loan 'free' to anyone who would like to borrow them (requiring only a fully refundable deposit and the cost of shipping both ways).

The tools hopefully provide a MUCH simpler method of getting full access to both the rear accumulator and dampener. With those 4 hoses disconnected, it should be quite simple to pull the 'system' out via the carrier and replace both. I know the accumulator can be replaced without disconnecting these hoses, but it's a difficult job to get the system out and back in. And, it would be impossible (for me at least) to replace the dampener without removing the hoses - either as vtvette has done, or by the quick disconnect procedure using the tools.

I've asked Frank_S500 to provide us with a brief description of "HOW" to use the tools, so that will be preserved for all 'DIY' guys and gals in the future.
 
#26 ·
Tools...

I'm in too Gary. Probably have the fronts DIY this weekend. If the tools work on a 2003 the rear will be cake!


On a related note...we need to start a "tool shed" posting for DIY guys like Gary & me. Pay it forward for the help we've received here!

I'm offering up my front suspension bushing extractor / press if you want to replace your lower arm front end bushings. I'll throw in the ball joint tool so you can remove the ABC strut & outer ball joint connections on the arm.

Pay shipping both ways and the cost of the tools ($200). Refunded upon return in good shape. They are not doing any good sitting on the shelf.

PM me for pictures so you can see how it looks. Kelly
 
#27 ·
Kelly,

I've been a long time member of the Porsche 928 Owners Club. We started a tool loaner program about 10 years ago for 'specialty tools' that an owner may only use once in 5 years, or maybe only once ever. It has been a successful program, and it operates the same way you and I have proposed here - deposit for the original cost of the tools, plus pay for shipping both ways. The 'borrower' may keep the tool for up to two weeks with full refund of the deposit. Longer than that, and a fee is paid, which on occasion can be negotiated due to unforseen circumstances. That organization has about 10 'meets' around the US/Canada each year, and since they usually have at least as much technical content for DIY's as social content, some of these tools may be used for technical demonstrations at these meets. Works very well, and I'm hoping you and I may have started something similar for the MB SL55/SL65 community. There may not be as many DIY's here as in the 928 community, but it can be helpful to those who ARE here!!

Interestingly, I just finished the front suspension R/R on the strut control arm bushings. I was planning to make the tools I used for that available for loan also. Depending on location, it might be cheaper for someone to pay shipping from either you or me. When this is all 'said and done' here on this thread, I'll open a new thread about 'Tool Shed Opening' or something like that and people can post there with any other tools available, etc.

Cheers,
 
#28 · (Edited)
Accumulator update

For those that are following along...

Just did the front accumulators (bombs) on my SL55 today. Really easy job, maybe 3 hours for both front bombs if you don't spend any time cleaning.

Tools required:

Front valve block (under headlight) is 17mm and 22mm open wrench to break loose the bomb
10mm for bracket nuts (3 of them)
11mm closed end wrench for bleeding ABC pressure
An additional 8mm socket and flat screwdriver to remove the fender liner

Pump valve block (at rear of left front well)
3 more 10mm nuts
24mm open wrench
About a 3/4" jaw plumbers wrench or crescent wrench to hold the valve block

Drip pan and rags to clean the mess you will make.

The front valve block bomb was still good, but the rear bomb diaphragm had failed (with no dash warnings or noises...everything was fine).

The rear bomb is to dampen the pump pulses into the system. With it failed, the system will see sawtooth pressure spikes as the pump does it's job. I think this leads to pump failure and further ABC issues, but it is just my theory. Member COBRA had his failed too when removed. So, if you want to prevent more issues, at least check this bomb, or while you are in there, replace it!

My pump is still fine, and with the new pump dampener bomb the rest of the sytem will be happy.

Then I moved to the rear ABC valve block, and I'm pretty sure there are quick disconnects, but I did not have the tools to break them.
A MB Tech friend said the quicks were not installed until 2005 if I recall correctly, but the lines swivel and it appears to have a connection there. So I broke loose all of the 17mm pressure lines and pulled the block carriage to access the bomb fitting. I left the far forward line in place, just loosened it. It is the same bomb as the front valve block (the pump dampener is a different).

Last note: I was going to rebuild the valve blocks with new O rings on the solenoids, but it's not broke so don't fix it. I don't have any sag issues, the fluid was just flushed, I've got 2 new struts, and 3 new bombs. Should be fine for a while.

Data point - 2003 SL55 with 86K miles
 
#29 · (Edited)
kbob999,

I did both of my front accumulators/dampeners yesterday. Same procedure as you used. These are pretty easy. I'll add a bit about my experience that might be helpful to others in the future:

I found the 17mm pipe locking nut on my front accumulator to be VERY tight. I needed a 22 mm open end wrench to hold the old accumulator then used the 17 mm flare nut wrench to get the pipe locking nut off. IT was still VERY tight, and I thought I might need to put a pipe extension on the flare nut wrench to get it loose (and, I'm fairly strong for an old dude), but that last 'UH' got it to break loose.

Similarly, the dampener was VERY tight on the block in the back of the front wheel well. I used a large adjustable open end wrench (cresecent wrench) to hold the block, and a 22 mm open end wrench on the dampener. I still could not get it loose. I put some Penephite on it and let it set 15 minutes. STILL no joy! Then, I used the propane torch and very gently heated the portion of the valve block where the dampener screws in for about 30 seconds, moving the torch around as much of the female threaded area as I could. I immediately put the wrenches on and applied lots of pressure. Shazam - it came loose.

Also, the MB electronic parts catalog shows this dampener needs a sealing ring (small rubber 'O' ring). I ordered one, but it turns out the MB official part comes with the new 'O' ring installed on the male threaded part.

I replaced the accumulator on the rear wheel opening last week. I'm now waiting for the second MB tool to fly across the Atlantic so I can hopefully separate the hoses to easily pull the carrier out and then have good access for installing the new dampener.
 
#30 · (Edited)
Hi Gary.

So far i had not to work with it, so this is my best guess.

In order to seperate the connectors (red line) push the hose up and apply force with the tool (green arrows) to release the connector lock.
(Sorry iam a non native speaker, hope the picture explains what iam trying to say)

Cheers, Frank
 

Attachments

#31 ·
Frank,

Thank you very much for your information about separating the hoses. I'll give that a try.

I wish my Deutsche was anywhere NEAR as good as your English. I last took the language course 60 years ago. I appreciate your assistance.

Guten Tag und danke schoen (no umlaut on my keyboard!!)

Gary
 
#32 · (Edited)
I've had both of the 'tools' Frank suggested in hand for a few days now. When the second one arrived, I promptly went to work on getting the rear hoses disconnected and the rear dampener replaced. I tried, cajoled, urged, asked, etc. for these tools and the hoses to cooperate, so the hoses became two pieces instead of one. NO JOY. I could not get the hoses to separate.

So, I proceeded to do the work using vtvette's procedure that initiated this thread (THANK YOU for that - it was very helpful). I have a set of metric 'crows feet' that contact 5 points of a bolt (cheap set from Harbor Freight), so I decided to use these (don't own very many Snap On tools!!). I also have a set of 'stubby' open/boxed end metric wrenches from Harbor Freight and the 17mm one worked well as a replacement for the shortened wrench shown in vtvette's pictures. Overall, his procedure works very well.

One issue I had was getting the VERY small bolt back into the extended steel section of the new dampener that stabilizes it to the carriage. VERY limited space, and no way my large size fingers were going to get it started (need a 6 year old girl's fingers to hold/start the bolt!!). I finally got it started by embedding the bolt head in the boxed end of a 10 mm Craftsman box/open end wrench with a small piece of paper towel to hold the bolt firmly, then carefully lining things up and turning the bolt about 1/3 turn (all the space will allow) to get it started. Must have spent 30 minutes on that one bolt alone!!

Finally, I now have all 4 'bombs' replaced, fluid reservoir brought back to spec level and the car cycled through about 40 fully up/downs. No leaks, and when left the car for several days at full up position, full height was maintained at all four corners. And, I believe 'bombs' may be the right terminology for them. Several of us now believe that whenever ONE of these fails (bladder ruptures and Nitrogen gas gets into the system/hydraulic fluid fills the emptied chamber), the ABC pump may be damaged and fail in short order. That was my primary reason for replacement at moderate mileage on the car.

Next will be a 'rodeo' (my laptop with the STAR/DAS program arrives back from Shardul tomorrow). I'll then purge the system again (did so 11 months ago), and install new 3 micron and Magnefine filters. The ABC system should not need any further service for another 3-4 years, which will come MUCH sooner than the 45K miles that were on it before last years fluid purge.

IF you have an '05 or later car and want to borrow the hose disconnect tools (I've been told '05 was the model year where the factory engineers finally realized the 'bombs' would need replacing, and doing so with this process was unnecessarily complex), please contact me via PM regarding the procedure for getting/returning them. I can't guarantee they will work for you, as the hoses I have look exactly like those in vtvette's pictures, and swivel in the same manner he described. But, I could NOT get them to cooperate with the tool for separation!! IF you are successful, please post the procedure with pictures for future DIY'ers. By the way, I can't BELIEVE what MB charges for these two small right angle tools. I think on a weight basis, they may equal the cost of pure silver!!