
I'm getting the first signs of the shifter lever failure. The lever is difficult to move right and down from the park position. The plastic lever must be bending and about to break. I bought the replacement part a couple years ago in anticipation of this failure. The car has about 76K miles on it. I'm going to do the repair myself, have all the PDF's for removal of the shifter mechanism and viewed the YouTube post to replace the plastic lever. In the video the mechanic stated that STAR is required to have the vehicle recognize the shifter again. I have not seen this in any of the posts. Is this correct? If the shifter is not recognized will I just get a malfunction message on the dash and be able to drive it, or will the car not go into gear. If there is an malfunction message I want to be able to drive it to my Indy to have it reset. Thanks for the help.

Richrider

DIY: Shift/Gear Lever repair
Richrider
Discussion starter
212 posts
·
Joined 2012
- Add to quote Only show this user
I'm getting the first signs of the shifter lever failure. The lever is difficult to move right and down from the park position. The plastic lever must be bending and about to break. I bought the replacement part a couple years ago in anticipation of this failure. The car has about 76K miles on it. I'm going to do the repair myself, have all the PDF's for removal of the shifter mechanism and viewed the YouTube post to replace the plastic lever. In the video the mechanic stated that STAR is required to have the vehicle recognize the shifter again. I have not seen this in any of the posts. Is this correct? If the shifter is not recognized will I just get a malfunction message on the dash and be able to drive it, or will the car not go into gear. If there is an malfunction message I want to be able to drive it to my Indy to have it reset. Thanks for the help.
10,334 posts
·
Joined 2005
Conding is needed if you replace the entire module.
If you're just replacing plastic spacers and bushings, you will be fine...
If you're just replacing plastic spacers and bushings, you will be fine...
234 posts
·
Joined 2004
bayhas is correct
Although he refers to spacers & bushings. The replacement of the locking lever that you are planning does not require recoding the shifter assembly.
Regards,
Kevin
Although he refers to spacers & bushings. The replacement of the locking lever that you are planning does not require recoding the shifter assembly.
Regards,
Kevin
Richrider
Discussion starter
212 posts
·
Joined 2012
Okay got the shifter repaired yesterday. As always, when you are doing something for the first time, it takes twice as long. This is an involved procedure, not technically, but tight quarters for access, being very careful wilth the trim pieces, the car has to be jacked up for access to the transmission shift rod, drilling the rivets on the shifter. Putting it all back together was a snap after the replacement lever was installed. I used the MB repair PDF's which is imperative, as the sequence of removing the various compoents must be adhered to, so that you don't have to go back and repeat the removal. MB suggests using ball hex wrenches to remove the bolts that secure the shifter to the body. I didn't have any so I had to loosen the console, first by removing the rear storage compartment, then raising the console and pushing it to one side so that I could use a regular hex wrench, you'll need torx wrenches sizes T-10 to a T-40, the hex is 5mm and your regular assortment sockets with a swivel connector. The job is 5 on a scale of 1 to 10 and Star is not required.The video on YouTube left off a couple keys points and I'll go over those. I'm not sure how to attach the MB PDF repair manual instructions, I'm only able to print them, I may have to scan and attach as GIF. If anyone can help me this it would be appreciated.
The first step is to remove the side paneling, Use the plastic pry bars designed for this purpose Start from the center top and work your way toward the ends, As you can see these are metal clips, not the typical plastic ones which have a tendency to break. Once they are removed there are three torx screws on each side along the top. They are about an inch and a half long. Next remove the shifter lever cover. place a wedge under the leather , pry up and push up over the top of the knob, exposing a black plastic locking ring, turn it 90 degrees counterclockwise and pull off the knob.
The first step is to remove the side paneling, Use the plastic pry bars designed for this purpose Start from the center top and work your way toward the ends, As you can see these are metal clips, not the typical plastic ones which have a tendency to break. Once they are removed there are three torx screws on each side along the top. They are about an inch and a half long. Next remove the shifter lever cover. place a wedge under the leather , pry up and push up over the top of the knob, exposing a black plastic locking ring, turn it 90 degrees counterclockwise and pull off the knob.
Attachments
-
 69.6 KB Views: 3,063
 -
 65.4 KB Views: 3,680
Richrider
Discussion starter
212 posts
·
Joined 2012
Next remove the covers from the cup holders. Use a small thin screw driver under the bottom outside lip to start the removal then move to the center bottom and continue prying, very gently. There is an indentation in the middle, pry at that point. The covers are mounted on two studs, with the holding cup on the covers.. Close the beverage holders. The shifter lever must be in the neutral position, with the ignition off. You won't be able to remove the key at this point. Open the storage tray cover in center console. Start to lift the console cover from the back edge. There are two plastic tabs on the top of the cover that slip into a slot that holds the top in place. Be very careful to push the top down while pulling back, keep the cover at about a 30 degree angle. Slowly work you way back and over the shift lever. Move the shift lever to P in vehicles with 722 transmission. and turn off the ignition. My shifter was still working so I was able to move the shift lever. If the shifter is already broken I'm not sure if you be able to get it back to neutral once it's back in P. In that case leave in neutral It will be necessary to move the lever into drive to access one of the mounting bolts and to remove the transmission shift rod. Once you disconnect the steering wheel cable from the front of the shifter shifter you can push the cable in manually and remove the key. If you want to remove the cover from the car label the electric connectors. I left the cover in the car on its side, but two of the cable still have to be removed to gain access to the mounting bolt. Remove the two allen head screws from the console cross brace to the shifter.
Now comes the fun part. Jack the car up on all four corners. Remove the cross strut near the back of the tunnel. Sorry I don't have photos. four bolts. Next remove the front stiffening bridge, four bolts over the twin exhaust pipes and two screws that connect to the front paneling. Access is a little tight for the four bolts. Next loosen the rear heat shield and push it to the rear. It won't move very far maybe a couple inches but this is enough clearance. Move the shifter into D. Now pry off the locking tab, holding the rod to the shift by using a small screwdriver in the bottom slot, twisting slightly to detach the shift rod. You will see a slot on the tab that the blade of the screwdriver goes in. It didn't take a lot of movement to release the rod, keep removal pressure on the rod and it will pop off. The locking tab will remain on the shifter.
Now comes the fun part. Jack the car up on all four corners. Remove the cross strut near the back of the tunnel. Sorry I don't have photos. four bolts. Next remove the front stiffening bridge, four bolts over the twin exhaust pipes and two screws that connect to the front paneling. Access is a little tight for the four bolts. Next loosen the rear heat shield and push it to the rear. It won't move very far maybe a couple inches but this is enough clearance. Move the shifter into D. Now pry off the locking tab, holding the rod to the shift by using a small screwdriver in the bottom slot, twisting slightly to detach the shift rod. You will see a slot on the tab that the blade of the screwdriver goes in. It didn't take a lot of movement to release the rod, keep removal pressure on the rod and it will pop off. The locking tab will remain on the shifter.
Attachments
-
 31.3 KB Views: 1,810
 -
 56.8 KB Views: 2,831
Richrider
Discussion starter
212 posts
·
Joined 2012
Disconnect the electrical connections from the shifter, remove the cable connector in front by raising the black locking lug with a small screwdriver, press coupling over the cable connection fitting against the spring force turn the coupling counterclockwise 90 degrees and pull out cable. You can remove the ignition key by pressing the cable and remove the key. Actually it may not be necessary to remove the key if all the power is off and no messages in the instrument cluster. Keyless go has different instructions, but basically keep the fob away from the car to make sure the ignition is off. The shifter lever must be in D. To remove the front bolt. Press your 5mm hex key against the pin that covers the bolt, you'll just be able to get it in. There is piece of spring steel inside the shifter that keep the pin out. Also there is a small clip on the pin that slides off. I'm not sure of the purpose for this pin, unless it's just to aggravate us and impede the removal of the bolt, and to remind us that you own a MB and only trained professionals are allowed to work on your vehicle. Next remove the rear two bolts. Like I said I didn't have ball hex wrenches and ended up removing the storage compartment and loosened the console for clearance. Get the Ball hex wrenches for about fifteen bucks or less. Now remove the shifter by tilting and pulling back. The slot in the floor is just wide enough for the bottom shift lever to clear. You can just see the clip and cable in the photo. Success, the shifter is now out. The job is 75% complete.
Attachments
-
 54.8 KB Views: 2,981
Richrider
Discussion starter
212 posts
·
Joined 2012
Here is the link for the YouTube tutorial to replace the inside lever.
https://www.youtube.com/watch?v=MDUmdD3koqE
It is self explanatory, but a couple details were omitted.
Remove the three screws on the perimeter to remove the housing.
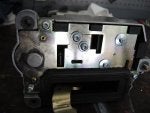
To remove the top shield remove the screw on the side tab. There are two rivets that attach the bottom portion, these have to be drilled out. Just drill the top of the rivet, no need to go all the way through.
Remove the two screws in the black plastic side panel, then lever the panel off by starting at the bottom edge and then insert a screwdriver to where the center dowel is and lever it up, do a little at a time so not to cock it crooked and jam it.
In the last picture the parts are off and you can see the offending lever perched on top of the solenoid.
It is not necessary to remove the computer as stated in the video.
https://www.youtube.com/watch?v=MDUmdD3koqE
It is self explanatory, but a couple details were omitted.
Remove the three screws on the perimeter to remove the housing.
To remove the top shield remove the screw on the side tab. There are two rivets that attach the bottom portion, these have to be drilled out. Just drill the top of the rivet, no need to go all the way through.
Remove the two screws in the black plastic side panel, then lever the panel off by starting at the bottom edge and then insert a screwdriver to where the center dowel is and lever it up, do a little at a time so not to cock it crooked and jam it.
In the last picture the parts are off and you can see the offending lever perched on top of the solenoid.
It is not necessary to remove the computer as stated in the video.
Attachments
-
 53.9 KB Views: 2,055
 -
 35.7 KB Views: 2,228
 -
 52.5 KB Views: 1,796
 -
 66.3 KB Views: 2,206
 -
 81.9 KB Views: 2,160
Richrider
Discussion starter
212 posts
·
Joined 2012
Here is the lever exposed. There is a tiny spring on the bottom of the plastic lever, similar to ones found in ball point pens.
As you can see the lever was about to break, caught it just in the nick of time. If you can feel a resistance when moving the shift lever to the right and down you know the lever is cracking and bending, which means it is not fully releasing.
Remove the spring that appears as a piece of flat metal at a 45 degree angle. This is done by removing the two screws on the bottom. Now you have perfect access to remove the lever.
When installing the new one lubricate the sliding edges with a bit of grease. The round spring has to be carefully installed as there must be a tiny shaft in the mounting area. This mount can be removed by squeezing the tabs on the bottom and pushing it upward. There is a clip has to slid off the shaft to remove the lever..Use a couple sheet metal screws to reattach the metal shied. Had to grind them down so they didn't protrude to far into the interior.
I used a plastic lever, aluminum ones are also sold. I read somewhere that the aluminum ones can be a bit noisy. Don't think it really matters. The local Indy uses the aluminum levers when they rebuild the shifter. I figured it took 75k for this one to break, at the miles I put on the car it will take fifteen years to break again. The car will likely be gone before its needed again. Although the replacement part is suppose to be built stouter with better material and I can see on the new lever it's about 50% thicker, in the area where it cracked.
When assembling don't forget that annoying pin, the screw is inserted first and then the pin goes in from the inside.
Putting the shifter back in and reassembling the interior is a snap. Be careful when installing the console cover to insert the two top tabs into their respective slots
It took me about eight hours to do the job at a very leisurely pace. I could do this job again in 3-4 hours.
Another job well done , dealer price to replace shifter $1700, DIY $75.
Attachments
-
 74.4 KB Views: 1,936
 -
 52.7 KB Views: 1,673
 -
 50 KB Views: 1,633
 -
 42.5 KB Views: 1,583
35 posts
·
Joined 2013
Rich rider
Thank you for this hard work detailing this lever replacement
Larry Mann
Sent from AutoGuide.com Free App
Thank you for this hard work detailing this lever replacement
Larry Mann
Sent from AutoGuide.com Free App
480 posts
·
Joined 2006
Nice work.....have updated the thread title and will add to the wiki once i get it up..........
35 posts
·
Joined 2013
Wednesday I replaced the plastic lever in the gear box of my 2003 sl500
Carefully followed the procedure documented by rich rider
All went well and I have a new aluminum part in my gear box
When I removed the plastic part there was no wear at all
It was built July 2003 and put in my car August 2003 60,000 miles ago
It is quite a task for diy but I was glad I replaced this part
All that I had read on our blog was not a matter of if it would fail but when
Did not want to be somewhere special when it left me stranded
This aluminum part will not break for sure
Feel much better about shifting now
Thank you for putting this diy on our blog!
Sent from AutoGuide.com Free App
161 posts
·
Joined 2010
Great post. I have read about this issue. My shift lever always feels 'solid' so I have been thinking nah, mine must be fine. Today I hop in to run to the store and wouldn't you know...it did not want to go down and right...out of Park. It has done that before but just guessed it was nothing major as it feels solid. So now I'm thinking about this SINCE Richrider put this fine thread together.
I'll see if I can track the part down this weekend...Mark
I'll see if I can track the part down this weekend...Mark
35 posts
·
Joined 2013
Rich
Took me eight hours. I'm slow but steady. No rush
Could not have done the job without the 5mm ball hex
What a tool. Thanks for that advice!
Much more confident shifting now!
Sent from AutoGuide.com Free App
Took me eight hours. I'm slow but steady. No rush
Could not have done the job without the 5mm ball hex
What a tool. Thanks for that advice!
Much more confident shifting now!
Sent from AutoGuide.com Free App
128 posts
·
Joined 2005
Hi ohmann: My wife's 05 SL55 just started exhibiting the dreaded hard to shift out of park problem. How difficult was it to remove the tunnel cross strut and the front stiffening bridge. Did you torque these bolts on reassembly?
Thanks
Thanks
35 posts
·
Joined 2013
The cross members under the car are not difficult no torque required for reassembly
Must have a 5mm ball hex tool to get the shifter out
Think the aluminum part is 120
My oem plastic part looked brand new but I am happy I replaced it
Cannot imagine having my car with OHMANN license plates towed to the dealer then it would be oh---- for sure
Happy new year
Top down today Jan 3 Venice Fl
79 and Sunny
Sent from AutoGuide.com Free App
128 posts
·
Joined 2005
I was hoping that there was enough slack in the shifter cable to disconnect the linkage from inside the car. Apparently this is possible in other MB models. I already have the aluminum part and will pick up the 5mm ball hex key today. The wife really misses her ride so I need to start / finish work today.
Thanks for the reply, enjoy our great Florida weather
Alan
Thanks for the reply, enjoy our great Florida weather
Alan
1 post
·
Joined 2015
Awesome post! Just got an '07 SL55 last week, and this dreaded shifter issue has already reared its ugly head. I'll be showing my mechanic this thread on Monday. As someone mentioned before, the dealer wants $1700...I won't be DIY, but my out of pocket certainly won't be that much! ")
13 posts
·
Joined 2008
I did this repair about a year ago but ever since i now have some play in the shifter lever which throws an out of park error. i usually have to shift back to neutral and then to park again to get it to lock in. i also notice that the shifter can be in gear but the gear light indicator will disengage because of the play in the shifter. anyone else run into this and if so know how to fix it?
4 posts
·
Joined 2015
Hello to all,
my Name is Fahri and Im 27 Years old.
Im from Germany and drive a SL 500 2001--AMG Mods.
First i want say.... this Page is realy great and have lot of Informations.
I see that some Guys do realy good Jobs and Tutorials with Pictures.
Special Thanks to Richrider.....you help me a lot of.
I have the same Problem with the Shift.... End of this Summer my Parking Postion not want go out.
Finally i try now to repair in my Garage it now.
Now i have a Problem:
How i become the Completle Shifter out???
All Screws is out....but the Shifter is on the Ground with the Vehicle together (Gear shift linkage)
Must i do this out from the ground of the Car or i can do it out from the Vehicle inside with a Special Tool??
Greetings from Germany......and Sorry for my English....
Wish all a Nice Driving without Problems.
Attachments
-
 22.2 KB Views: 756
62,879 posts
·
Joined 2004
I recommend you use the 'google custom search box' top right. Among your search results will be threads related to your issues from the forum archive, which contains a wealth of information.
If you get lost with an English expression, you can PM me. I am German, originally from Bielefeld and Hannover and came here by way of W Africa and Iran.
Best translation site is probably 'Leo.org' = Technische Universität München (TUM)
Cheers
If you get lost with an English expression, you can PM me. I am German, originally from Bielefeld and Hannover and came here by way of W Africa and Iran.
Best translation site is probably 'Leo.org' = Technische Universität München (TUM)
Cheers
492 posts
·
Joined 2013
Fahri,
I have not done this to my car yet, but will soon.
The instructions say you need to lift the car and remove the linkage from under the car.
You might be able to ask a Mercedes technician if it is possible from the top of the shifter, inside the car. They would know if there is a special tool available.
Good luck...and let us know what you find, Kelly
4 posts
·
Joined 2015
Hey Kelly,
thank you for your Answer...
my first Mind was the same that i must do it under the Car.
#The Mercedes Specialist nor like to give so informations.
But maybe find some Informations in the German Forum.
I will check it and if all work than i will write here, how i do this Project until to the End.
Thanks to God that i have time until 04/15 than here the Season for Roadster begin :grin
14 posts
·
Joined 2007
See post #13 in this thread - poster says he was able to disconnect the linkage from inside the car.
Maybe you can contact him for more info. Please post if you do.
Anyone Have This Stuck In Park Problem? - MBWorld.org Forums
Edit: Sorry - his car is an S, not an SL
Maybe you can contact him for more info. Please post if you do.
Anyone Have This Stuck In Park Problem? - MBWorld.org Forums
Edit: Sorry - his car is an S, not an SL
Richrider
Discussion starter
212 posts
·
Joined 2012
There have been some that say you can disconnect the linkage from inside the car, but the time and busted knukles you'll suffer is not worth the effort. Just raise the car, unscrew and push the shielding back remove the two cross braces and you'll have access to the linkage, use a medium screwdriver to unclip the linkage and you're finished. Like I stated earlier the whole process has to be done in the proper sequence, otherwise you'll be doing twice as much work and could cause damage to some parts. Use the PDF's I have attached and follow the factory procedure. You'll be assured of a job done correctly.
4 posts
·
Joined 2015
Hey Richrider,
thanks for your Answer.
I check now in German pages too.
Its really so, some one say they do this inside from the Car but its not savety.
I think the same.....we will do this from the Ground.
The Instruction From MB say the same.
Wish all a good driving with your Roadstars.
mcfahri
thanks for your Answer.
I check now in German pages too.
Its really so, some one say they do this inside from the Car but its not savety.
I think the same.....we will do this from the Ground.
The Instruction From MB say the same.
Wish all a good driving with your Roadstars.
mcfahri
-
?
-
?
-
?
-
?
-
?
-
?
-
?
-
?
-
?
-
?
-
?
-
?
-
?
-
?
-
?
-
?
-
?
-
?
-
?
-
?
- posts
- 7.8M
- members
- 747K
- Since
- 1999
BenzWorld.org forum is one of the largest Mercedes-Benz owner websites offering the most comprehensive collection of Mercedes-Benz information anywhere in the world. The site includes MB Forums, News, Galleries, Publications, Classifieds, Events and much more!


