

Since I had the joys of removing my engine on my 2003 S55 I thought I would make a post on what is involved. This procedure should be the same for an S430, S500 and the S55. The 4MATIC might be different but at least it is a rough idea.
So since I was doing this on my back and my car died before I could move it to where I wanted it I had to make lemon aide out lemons.
So here is what I did
Before my car died I knew I was going to remove the engine to fix a coolant leak between front timing cover and cylinder block.
Before even getting into removing any parts, covers, bolts or anything I bought a box of Zip Lock bags, a good set of torx sockets(both internal and external) cheap ones will cause more problems then good, a strong suction pump, brake clean none chlorinated (this way parts will not be spotty if looks are important to you), permanent markers, duct tape, drain pans, absorb all, a good light, new gas can (to collect ABC/power steering fluid), a few boxes various sizes, rags, hand cleaner, gloves, empty jugs and zip ties. I had the car ramps, 2x4 and wheel blocks. Make sure where you willing be doing this job is clean and well lit.
One thing I found very handy is my cell phone. I recommend taking pictures of things to remember where a part goes. If your phone does not take pictures grab a cheap point and shoot from Craigslist or any source.
Having access to WIS is very helpful but not a 100% necessary.
First raise the front of the car and put parking brake on and a piece of wood(or some other item behind the wheel I used sand bags for light stands). Since I have ABC suspension I placed two pieces of 2x4 on top of the upper control arm and zip tied them in. Place the 2x4 with the 4 inch side up. This way my suspension will not drop to the bottom. AIRMATIC might be a good idea as well. I just did not want to put strand on the engine when I try to start for the first time.
Put car in neutral. I found on WIS that the key must stay in the EIS when battery is disconnected and Keyless Go card must be out of range.
Remove the negative battery cable, then remove positive battery cable. Make sure they will not come in contact with the battery posts. I tucked mine down each side.
Then prop trunk to keep from closing (if storing car out side after removing engine you might not want to do this) I did this because I have heard horror stories of people not being able to get into the trunk when the battery is dead. So I figure why chance it
Remove all upper engine cover, air ducting and air filter boxes. You will be surprised how much room you have.
Remove all the lower engine covers. Take all bolts and place them in a Zip Lock bag, use the marker and write on them what they are for (I actually did this for each panel). Do this for every set of bolts you removed (lower oil pan, valve cover left/right and so on)
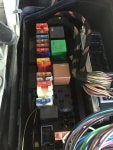
Once lower panels/upper engine cover and air filter box are off I went for the electrical disconnections. Since there was no power supply I started at the fuse box on the right hand side of the car. Remove the lid of the fuse box. You will see the ECU. Follow the harness coming from the engine through the fire wall and into the fuse box. It is very obvious which connection need to be disconnected. Start with the plug closest to the passenger compartment and work you way forward. I will supply pictures from WIS to show which plugs to disconnect and a picture of my car empty slots. There is one wire that runs to a fuse. This was the first thing I took a picture of it as I knew I would not remember it. Then fish the harness back to the engine try not to bend it too much. Just let it rest on the top of supercharger or manifold. My harness was held in with zip ties to the firewall none reusable type (cut them off making sure not to cut into the harness) Then disconnect the O2 sensors from the harness. This is it for now there is a couple other electrical plugs that I tackled as I was working on the unit to which they belong.
On the right side of the car you will find a small heat shield right about where the coolant line is on the transmission remove that and you will find an electrical connection one with a 10mm head nut and one with a 13mm nut remove these as this for the starter and alternator. When I first looked at removing the wire connections at the starter I was like how am I going to get access to these. This is 90% of the electrical disconnected.
So while under the car I unbolted all the lower parts (bell housing bolts, torque convertor bolts, exhaust and lower engine mount bolts) The torque convertor bolts are accessible from the engine side via a plastic cover about 2 inches wide by 3 or 4 inches in height. It just pulls out. Very important to get to all the torque convertor bolts you must spin the engine make sure you only turn the engine in the direction of rotation when running. Which is clockwise, this is important because if you go the wrong way the timing chain can bind or jump. There are 6 torque convertor bolts. I Zip Lock bagged the lower bel housing bolt separate from the top. The right side exhaust manifold can be tricky to remove the bolts more of the inside one (I ran into issues and had to cut the bolt). Unbolt the AC compressor as it will just rest in the sub frame and there is no need to drain the system. You must remove the support the runs from the block to the tandem pump as one AC line runs between it and the block. There are only 3 bolts that hold the AC compressor on two at the rear one at the front. The two long bolts will not come out of the compressor till the engine is out. Disconnect the AC compressor electrical connection.
So with everything unbolted and lower wiring harness disconnected it is time to move up top. Before you do place a small jack with a piece of wood at the bell housing of the transmission. Jack the jack till just applies pressure to the transmission.
Tandem pump needs to be drained or the supply hosed clamped off, I went with the drained hence the suction pump and new small gas can. I bought a cheap pump that is used to syphon liquids off. A hose with a squeeze pump. It would not pull the ABC/power steering fluid up more then a inch. I thought it would pull it up and syphon the fluid into the gas can. It did not so I had to clamp off the hoses which did not work out as well as I would have liked. I used small vise grips and the fluid still leaked pass them. You need a new clean plastic container for the ABC/power steering fluid as there cannot be any contaminates in the fluid if you want to reuse. When working around the tandem pump there are three things to remember clean, clean and clean. I sprayed around all fittings with brake cleaner, the used a rag to wipe around everything, sprayed brake cleaner again and wiped did this till there was no signs of grime. Now with all fittings clean either syphon off fluid or clamp hoses. Grab zip lock bags and zip ties. Remove supply lines then I removed the tanks just because there is more room and I want to clean them and flush them out. I removed the return lines to the tanks again these lines were cleaned 100%. I zip tied zip lock bags to each line coming and going to the tank. With the tank out of the way remove the ground wire from the pump to the body and the pressure sensor electrical connection. Now remove the high-pressure lines form the pump. Again use zip ties and zip lock bags to cover ends of lines. Once engine is out you can go back and use something different to seal if you prefer. I dropped a couple of the copper washers for the high pressure lines, I was not worried as they will be replaced anyway just remember two per line.
Left side of the car is done, underneath is done, right side is done, ABC/power steering is drained so now to work on the front.
Drain the coolant. I used the drain tap (left side of car) and a hose to drain the radiator and once it was just dripping a bit I closed off the valve and drained pan. I had two pans. I was not going to use the coolant again as it had dye in it to find my coolant leak so I transferred the coolant to empty jugs I had saved up for this job. Then dispose of the coolant properly. So with the coolant system drained but not completely I placed a catch pan under the lower rad hose at the block removed it and placed the other pan under the radiator drain and open it. I let the coolant drain over night.
So now the coolant is drained now it is time to unbolt the upper bell housing bolts. Remove them and bag/ label
The fan shroud needs to come out. There are two bolts up top and two locating tabs at the bottom. You need to disconnect the wire connection to the fan motor. I had to remove the upper transmission coolant line to get the fan assembly out. It was a bit of a pain but it came out.
So everything is unbolted disconnected and you are almost ready to remove the engine. Find a thin piece if plywood, sheet metal, foam board, a few pieces of cardboard to cover the rad. Just incase the engine hits it. I did not even come close to thread when removing the engine.
Time to put the chains on the mounting points. The engine has two at the rear of the engine and I used one of the M12 threaded holes on the top of the supercharger. I kept the chain relatively tight to the engine. I also had the adjustable engine chain lift, which I did not use. Lift engine a little bit. Now go and lift the jack you placed under transmission to keep everything in line lift engine again till out of the mounts. Lift transmission as again to keep everything aligned. Once engine is free from mounts you will see the gap in between the engine in and transmission use a pry bar to separate them. Pay careful attention to the front of the engine and if the torque convertor is coming with the engine. If torque convertor is coming gently pry the convertor away from flex plate. As soon as there is room slide torque convertor back into transmission be very careful as you can damage pump seals etc. With the engine free from the transmission move all your attention to the front of the engine and the rad. I was doing this by myself so I was lifting the engine very slowly. There is really a lot of room between the engine and rad. Lift engine till it clears the rad support. Once cleared roll engine hoist back to clear body then lower engine to a safe height. You are done. Now prep engine to go on engine stand or what you are planning to use. A note when bolting engine to engine stand make sure you do not bolt the stand to the oil pan if you are removing the oil pan. So look for separation point between engine and oil pan. If you did bolt the engine stand to oil pan you could risk damaging threads in the block if you let the engine hang on two bolts while you move the arms up from pan
Some notes on why I did things in this order. I left draining of coolant to the last as if it spilled I di not want to be dealing with cleaning it up before I could unbolt disconnect anything under the car. I did all the under the car things at once because the car was not up that high and I did not want to keep going in and out form under the car. With not being that high my engine hoist easily clear the body.
I left the transmission in for two reason when car died I could not get the back of the car lifted and I really did not want the extra work of dropping exhaust, disconnecting drive shaft, transmission connections and so on. The engine came out very well without the transmission. Yes if I just need to repair engine I would leave the transmission in. Would I do this again if I had to yes. It would be actually a pretty decent job with a hoist (car lift) or the car higher. Hoist (car lift) would be ideal and figure you could have the engine out with in about 3-4 hours at a, none rushed pace.
One thing to remember is not to rush and take pictures if you are not sure you will remember. I had to disassemble my engine so I used duct tape to label every electronic connection from each coil pack to every sensor. Would rather have some glue residue to deal with then have no idea where a connector goes
For the build up of the engine I am going to buy a point and shoot camera or a D5200 to take pictures of the procedure. My issue with taking pictures are my cameras are worth more then both of my cars put together.
Same as the install I will have many more pictures and possible video.
I just figured I would post this to show it is not that bad of a job and is completely doable with normal hand tools. Also with many of the W220 getting up there in mileage I thought there might be a few members needing an engine swap.
Anyway if this helps anyone great.
Once again I would like to thank all the members that helped me with this project(right enough it is not completed yet it still needs build and installed), the stickies( a great source of info) and the forum in general.
If I missed anything please jump in and ad to this thread
Once again thanks everyone for the help and all your patients with me on this S55
![]()
![]()
![]()
View attachment Disconnecting, connecting engine wiring harness.pdf
So since I was doing this on my back and my car died before I could move it to where I wanted it I had to make lemon aide out lemons.
So here is what I did
Before my car died I knew I was going to remove the engine to fix a coolant leak between front timing cover and cylinder block.
Before even getting into removing any parts, covers, bolts or anything I bought a box of Zip Lock bags, a good set of torx sockets(both internal and external) cheap ones will cause more problems then good, a strong suction pump, brake clean none chlorinated (this way parts will not be spotty if looks are important to you), permanent markers, duct tape, drain pans, absorb all, a good light, new gas can (to collect ABC/power steering fluid), a few boxes various sizes, rags, hand cleaner, gloves, empty jugs and zip ties. I had the car ramps, 2x4 and wheel blocks. Make sure where you willing be doing this job is clean and well lit.
One thing I found very handy is my cell phone. I recommend taking pictures of things to remember where a part goes. If your phone does not take pictures grab a cheap point and shoot from Craigslist or any source.
Having access to WIS is very helpful but not a 100% necessary.
First raise the front of the car and put parking brake on and a piece of wood(or some other item behind the wheel I used sand bags for light stands). Since I have ABC suspension I placed two pieces of 2x4 on top of the upper control arm and zip tied them in. Place the 2x4 with the 4 inch side up. This way my suspension will not drop to the bottom. AIRMATIC might be a good idea as well. I just did not want to put strand on the engine when I try to start for the first time.
Put car in neutral. I found on WIS that the key must stay in the EIS when battery is disconnected and Keyless Go card must be out of range.
Remove the negative battery cable, then remove positive battery cable. Make sure they will not come in contact with the battery posts. I tucked mine down each side.
Then prop trunk to keep from closing (if storing car out side after removing engine you might not want to do this) I did this because I have heard horror stories of people not being able to get into the trunk when the battery is dead. So I figure why chance it
Remove all upper engine cover, air ducting and air filter boxes. You will be surprised how much room you have.
Remove all the lower engine covers. Take all bolts and place them in a Zip Lock bag, use the marker and write on them what they are for (I actually did this for each panel). Do this for every set of bolts you removed (lower oil pan, valve cover left/right and so on)
Once lower panels/upper engine cover and air filter box are off I went for the electrical disconnections. Since there was no power supply I started at the fuse box on the right hand side of the car. Remove the lid of the fuse box. You will see the ECU. Follow the harness coming from the engine through the fire wall and into the fuse box. It is very obvious which connection need to be disconnected. Start with the plug closest to the passenger compartment and work you way forward. I will supply pictures from WIS to show which plugs to disconnect and a picture of my car empty slots. There is one wire that runs to a fuse. This was the first thing I took a picture of it as I knew I would not remember it. Then fish the harness back to the engine try not to bend it too much. Just let it rest on the top of supercharger or manifold. My harness was held in with zip ties to the firewall none reusable type (cut them off making sure not to cut into the harness) Then disconnect the O2 sensors from the harness. This is it for now there is a couple other electrical plugs that I tackled as I was working on the unit to which they belong.
On the right side of the car you will find a small heat shield right about where the coolant line is on the transmission remove that and you will find an electrical connection one with a 10mm head nut and one with a 13mm nut remove these as this for the starter and alternator. When I first looked at removing the wire connections at the starter I was like how am I going to get access to these. This is 90% of the electrical disconnected.
So while under the car I unbolted all the lower parts (bell housing bolts, torque convertor bolts, exhaust and lower engine mount bolts) The torque convertor bolts are accessible from the engine side via a plastic cover about 2 inches wide by 3 or 4 inches in height. It just pulls out. Very important to get to all the torque convertor bolts you must spin the engine make sure you only turn the engine in the direction of rotation when running. Which is clockwise, this is important because if you go the wrong way the timing chain can bind or jump. There are 6 torque convertor bolts. I Zip Lock bagged the lower bel housing bolt separate from the top. The right side exhaust manifold can be tricky to remove the bolts more of the inside one (I ran into issues and had to cut the bolt). Unbolt the AC compressor as it will just rest in the sub frame and there is no need to drain the system. You must remove the support the runs from the block to the tandem pump as one AC line runs between it and the block. There are only 3 bolts that hold the AC compressor on two at the rear one at the front. The two long bolts will not come out of the compressor till the engine is out. Disconnect the AC compressor electrical connection.
So with everything unbolted and lower wiring harness disconnected it is time to move up top. Before you do place a small jack with a piece of wood at the bell housing of the transmission. Jack the jack till just applies pressure to the transmission.
Tandem pump needs to be drained or the supply hosed clamped off, I went with the drained hence the suction pump and new small gas can. I bought a cheap pump that is used to syphon liquids off. A hose with a squeeze pump. It would not pull the ABC/power steering fluid up more then a inch. I thought it would pull it up and syphon the fluid into the gas can. It did not so I had to clamp off the hoses which did not work out as well as I would have liked. I used small vise grips and the fluid still leaked pass them. You need a new clean plastic container for the ABC/power steering fluid as there cannot be any contaminates in the fluid if you want to reuse. When working around the tandem pump there are three things to remember clean, clean and clean. I sprayed around all fittings with brake cleaner, the used a rag to wipe around everything, sprayed brake cleaner again and wiped did this till there was no signs of grime. Now with all fittings clean either syphon off fluid or clamp hoses. Grab zip lock bags and zip ties. Remove supply lines then I removed the tanks just because there is more room and I want to clean them and flush them out. I removed the return lines to the tanks again these lines were cleaned 100%. I zip tied zip lock bags to each line coming and going to the tank. With the tank out of the way remove the ground wire from the pump to the body and the pressure sensor electrical connection. Now remove the high-pressure lines form the pump. Again use zip ties and zip lock bags to cover ends of lines. Once engine is out you can go back and use something different to seal if you prefer. I dropped a couple of the copper washers for the high pressure lines, I was not worried as they will be replaced anyway just remember two per line.
Left side of the car is done, underneath is done, right side is done, ABC/power steering is drained so now to work on the front.
Drain the coolant. I used the drain tap (left side of car) and a hose to drain the radiator and once it was just dripping a bit I closed off the valve and drained pan. I had two pans. I was not going to use the coolant again as it had dye in it to find my coolant leak so I transferred the coolant to empty jugs I had saved up for this job. Then dispose of the coolant properly. So with the coolant system drained but not completely I placed a catch pan under the lower rad hose at the block removed it and placed the other pan under the radiator drain and open it. I let the coolant drain over night.
So now the coolant is drained now it is time to unbolt the upper bell housing bolts. Remove them and bag/ label
The fan shroud needs to come out. There are two bolts up top and two locating tabs at the bottom. You need to disconnect the wire connection to the fan motor. I had to remove the upper transmission coolant line to get the fan assembly out. It was a bit of a pain but it came out.
So everything is unbolted disconnected and you are almost ready to remove the engine. Find a thin piece if plywood, sheet metal, foam board, a few pieces of cardboard to cover the rad. Just incase the engine hits it. I did not even come close to thread when removing the engine.
Time to put the chains on the mounting points. The engine has two at the rear of the engine and I used one of the M12 threaded holes on the top of the supercharger. I kept the chain relatively tight to the engine. I also had the adjustable engine chain lift, which I did not use. Lift engine a little bit. Now go and lift the jack you placed under transmission to keep everything in line lift engine again till out of the mounts. Lift transmission as again to keep everything aligned. Once engine is free from mounts you will see the gap in between the engine in and transmission use a pry bar to separate them. Pay careful attention to the front of the engine and if the torque convertor is coming with the engine. If torque convertor is coming gently pry the convertor away from flex plate. As soon as there is room slide torque convertor back into transmission be very careful as you can damage pump seals etc. With the engine free from the transmission move all your attention to the front of the engine and the rad. I was doing this by myself so I was lifting the engine very slowly. There is really a lot of room between the engine and rad. Lift engine till it clears the rad support. Once cleared roll engine hoist back to clear body then lower engine to a safe height. You are done. Now prep engine to go on engine stand or what you are planning to use. A note when bolting engine to engine stand make sure you do not bolt the stand to the oil pan if you are removing the oil pan. So look for separation point between engine and oil pan. If you did bolt the engine stand to oil pan you could risk damaging threads in the block if you let the engine hang on two bolts while you move the arms up from pan
Some notes on why I did things in this order. I left draining of coolant to the last as if it spilled I di not want to be dealing with cleaning it up before I could unbolt disconnect anything under the car. I did all the under the car things at once because the car was not up that high and I did not want to keep going in and out form under the car. With not being that high my engine hoist easily clear the body.
I left the transmission in for two reason when car died I could not get the back of the car lifted and I really did not want the extra work of dropping exhaust, disconnecting drive shaft, transmission connections and so on. The engine came out very well without the transmission. Yes if I just need to repair engine I would leave the transmission in. Would I do this again if I had to yes. It would be actually a pretty decent job with a hoist (car lift) or the car higher. Hoist (car lift) would be ideal and figure you could have the engine out with in about 3-4 hours at a, none rushed pace.
One thing to remember is not to rush and take pictures if you are not sure you will remember. I had to disassemble my engine so I used duct tape to label every electronic connection from each coil pack to every sensor. Would rather have some glue residue to deal with then have no idea where a connector goes
For the build up of the engine I am going to buy a point and shoot camera or a D5200 to take pictures of the procedure. My issue with taking pictures are my cameras are worth more then both of my cars put together.
Same as the install I will have many more pictures and possible video.
I just figured I would post this to show it is not that bad of a job and is completely doable with normal hand tools. Also with many of the W220 getting up there in mileage I thought there might be a few members needing an engine swap.
Anyway if this helps anyone great.
Once again I would like to thank all the members that helped me with this project(right enough it is not completed yet it still needs build and installed), the stickies( a great source of info) and the forum in general.
If I missed anything please jump in and ad to this thread
Once again thanks everyone for the help and all your patients with me on this S55


View attachment Disconnecting, connecting engine wiring harness.pdf


