Okay guys, I've been searching for days on a DIY for the harmonic balancer on our cars and couldn't find any so I snapped a few photos while doing mine earlier. I had some vibrations at idle that continued after replacing my motor and trans mounts and when I pulled the harmonic balancer, I noticed a lot of dry rot and some small chunks of rubber missing.
![Image]()
What you'll need:
17mm socket
27mm socket
breaker bar
Some kind of extension for leverage
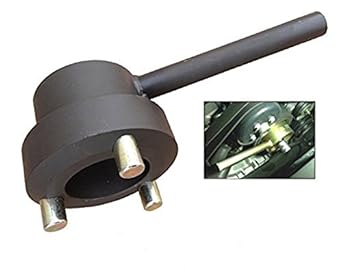
Counterholder tool
New harmonic balancer
New harmonic balancer bolt
Crankshaft seal (optional)
Serpentine belt (optional)
This thread here has the WIS documentation for this procesure with the correct torque specs
http://www.benzworld.org/forums/w220-s-class/1701506-harmonic-balancer-diy-tips-tricks.html
I'll start by saying having the proper crank holder tool makes all the difference in the world, it's pretty much a one time use item but c'est la vie. Also I managed to change the balancer while leaving the radiator fan on though it would have made for more space without it, I decided to leave it on.
First, start by locating the tensioner, this is what keeps the serpentine belt under tension. There is a 17mm bolt that you can't really see that sits under the tensioner pulley, if you under it to the left of the pulley you'll find it (it's circled in red-note harmonic balancer and serpentine belt are removed)
![Image]()
When you put your socket on the 17mm nut, push down like you're going counter-clockwise and you will release the tension on the belt enough to slip it off and remove it.
Next you'll want to place your harmonic balancer holder into the crank pulley so that the 3 feet fit in the spokes. It's hard to see while the fan is in place so feel your way around until it holds.
![Image]()
![Image]()
In the last photo you can see the tool sitting like it should in the crank pulley.
Next is the most tedious part, you need to line up a 27mm socket on the crank pulley bolt and then attached your breaker bar to the socket. My car is an '02 with 248k miles on it and I'm guessing it's the original harmonic balancer so this took some coaxing to get off. I put a two foot section of 1/4" wall steel pipe on the breaker bar while my brother had a section of steel on the pulley tool, we're both quite strong and it took three good push/pulls for the bolt to break it's hold on the crank.
Once the bolt is loose, remove your socket and tool and back the bolt out by hand. You will notice the harmonic balancer starting to loosen and come off. This is what it should look like without the balancer in place.
![Image]()
Keep in mind, this is a good time to replace the crankshaft seal while you're here. I forgot to get mind when I ordered so I'll be replacing that in the future (and remember if you take the balancer back off, get a new crank bolt!)
Now that the balancer is off, look for the locating groove on the new harmonic balancer and try and see where it is on the crankshaft snout sticking out of the block. Go ahead and line it up and put the new balancer on and tighten the bolt back hand tight.
![Image]()
Now reverse your steps above where you put the holding tool back on the new pulley and tighten the crankshaft bolt. The bolt needs to be tightened to 200Nm or about 147ft lb.
Once the bolt is tight, remove your holder, sockets, and start routing your belt around the appropriate pulleys. Once it's on all but the tensioner, take your 17mm socket and put it on the nut and again turn the tensioner counter clockwise until it's back far enough to slip the belt over.
![Image]()
Release the tensioner and the belt will be taught again. Do a final check to make sure the belt is aligned properly on the pulleys and look for any leftover sockets and tools in the engine bay. Start the motor and visually check for belt alignment and pat yourself on the back for saving yourself a few hundred dollars!

What you'll need:
17mm socket
27mm socket
breaker bar
Some kind of extension for leverage
Counterholder tool
New harmonic balancer
New harmonic balancer bolt
Crankshaft seal (optional)
Serpentine belt (optional)
This thread here has the WIS documentation for this procesure with the correct torque specs
http://www.benzworld.org/forums/w220-s-class/1701506-harmonic-balancer-diy-tips-tricks.html
I'll start by saying having the proper crank holder tool makes all the difference in the world, it's pretty much a one time use item but c'est la vie. Also I managed to change the balancer while leaving the radiator fan on though it would have made for more space without it, I decided to leave it on.
First, start by locating the tensioner, this is what keeps the serpentine belt under tension. There is a 17mm bolt that you can't really see that sits under the tensioner pulley, if you under it to the left of the pulley you'll find it (it's circled in red-note harmonic balancer and serpentine belt are removed)

When you put your socket on the 17mm nut, push down like you're going counter-clockwise and you will release the tension on the belt enough to slip it off and remove it.
Next you'll want to place your harmonic balancer holder into the crank pulley so that the 3 feet fit in the spokes. It's hard to see while the fan is in place so feel your way around until it holds.


In the last photo you can see the tool sitting like it should in the crank pulley.
Next is the most tedious part, you need to line up a 27mm socket on the crank pulley bolt and then attached your breaker bar to the socket. My car is an '02 with 248k miles on it and I'm guessing it's the original harmonic balancer so this took some coaxing to get off. I put a two foot section of 1/4" wall steel pipe on the breaker bar while my brother had a section of steel on the pulley tool, we're both quite strong and it took three good push/pulls for the bolt to break it's hold on the crank.
Once the bolt is loose, remove your socket and tool and back the bolt out by hand. You will notice the harmonic balancer starting to loosen and come off. This is what it should look like without the balancer in place.

Keep in mind, this is a good time to replace the crankshaft seal while you're here. I forgot to get mind when I ordered so I'll be replacing that in the future (and remember if you take the balancer back off, get a new crank bolt!)
Now that the balancer is off, look for the locating groove on the new harmonic balancer and try and see where it is on the crankshaft snout sticking out of the block. Go ahead and line it up and put the new balancer on and tighten the bolt back hand tight.

Now reverse your steps above where you put the holding tool back on the new pulley and tighten the crankshaft bolt. The bolt needs to be tightened to 200Nm or about 147ft lb.
Once the bolt is tight, remove your holder, sockets, and start routing your belt around the appropriate pulleys. Once it's on all but the tensioner, take your 17mm socket and put it on the nut and again turn the tensioner counter clockwise until it's back far enough to slip the belt over.

Release the tensioner and the belt will be taught again. Do a final check to make sure the belt is aligned properly on the pulleys and look for any leftover sockets and tools in the engine bay. Start the motor and visually check for belt alignment and pat yourself on the back for saving yourself a few hundred dollars!
")