Mercedes-Benz Forum banner

W210 Cheap tail lamp upgrade

29K views 41 replies 13 participants last post by  Al_Savage  
#1 · (Edited)
I just finished upgrading some of my exterior lighting on my 2000 E55. This was prompted by one of the original HID low beam D2R bulbs going bad (pink). I bought some 6000K HID low beams to replace them and upgraded the H7 high beams and H3 fogs to Sylvania Silver Star ZXE's.
Inspired by the improvement I decided to upgrade the rear of the car as I have not been impressed with the tail and brake lights when following the car on the rare occasion that it is driven by another family member.
I have repaired the tail/stop light socket connections a few times - a common weak link on this model. I was also dismayed by the poor selection of upgrades for the standard 7225 lamp (none, unless you want LED's). So, how do you fit a commonly available dual element bulb? I elected to go with the common 1157 lamps as that would afford a wide choice of replacements. I perused the local auto parts stores with the stock lamp socket in hand to look for options. Below is what I did.

What is required:
8mm Nut Driver
Wire cutter/stripper
Drill with 3/32" bit
Soldering Iron w/electrical solder

Purchase:
2ea - Dorman 85830 Double contact socket for 1157 bulb (I got two for less than $13 at Advance)
Your choice of 1157 bulbs (I bought a two pack of Sylvania 1157ST Silver Stars for $9.95 at Advance)
2ea - 1/4"X6" heat shrink tubing (optional)

First, remove the tail light assemblies from the car - pop open the "door" in the trunk liner and gently remove the wiring harness connector from the bottom of the unit. Squeeze at the edges and pull down.
Image

Use the 8mm nut driver to remove the 4 nuts that hold the housing into the vehicle. Wiggle the housing out of the body of the vehicle and take it to your work area. Repeat for the opposite side.

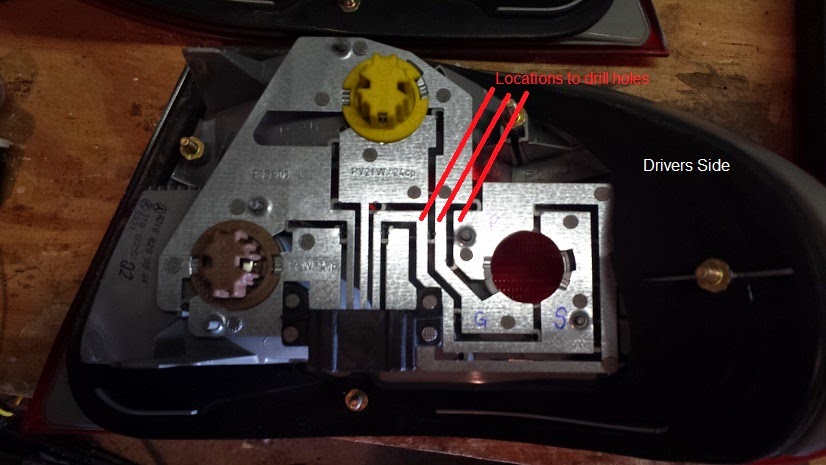
I did some checking with a multi meter and found the contact strips for the ground, stop, and parking lights on each side. You can see my labeling in the photos.
Image

Image

Next, I did some checking with a battery on the new lamp socket to determine the corresponding wires for each function - Black for Ground, Brown for Parking, Yellow for Stop. Here is a pic of the new socket.
Image

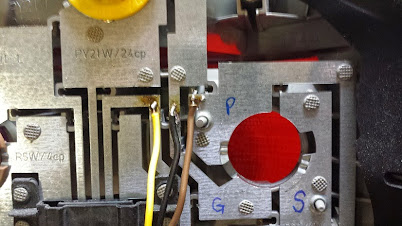
Then, I drilled a hole where each wire would be attached. The wires were stripped a 1/4" and tinned with the soldering iron. Then, the shrink tubing was placed over the wire bundle and each wire was attached to the proper hole with a drop of solder.
Image

Image

Image

The sockets will twist lock into the housings with minimal effort and no modification allowing you to go back to the stock bulb holders any time you want to. I remounted the housings to the car.
Image

I also replaced the inner park lamps with Sylvania 1156ST Silver Stars. The results are pretty dramatic.
Image


Total cost was only about $35 and about 2 hours of my time.
 
#8 ·
I tried this on my 99 TD and did not find the socket fit on to the circuit board, I'm going to have to modify the socket that's not a problem but I found the true reason for the bad connections. the plastic support under the stoplight connection is melting everytime you press the brakes . I just shoved a toothpick pick in between the plastic support and the steel making a good connection now. See how long it lasts.
 
#10 ·
Hey everyone:

Stu1021, first of all, thank you for taking the time to post this DIY, I followed your advice & did the 1157 socket swap on my 1998 e430 Sport. (Prior to doing this fix, I would only get bulb malfuction errors once every 25 drives in my car - I would then open the trunk, take out swamp the left and right brake sockets - and it would usually buy me another 25 or so trips in my car without the warning light)

After doing the fix everything was working great, I also replaced the inner park lamps with Sylvania 1156ST Silver Stars like you recommended.

Unfortunately, I am still getting bulb malfunction alerts on my car (usually when lightly applying the brake - the car will show no malfunction alert sometimes till 10 minutes into the drive with all lights on).

So first off, I removed the 1156ST's park lamps & put the OEM spec ones back in - Still getting the bulb malfunction warning even though all my lights are working.

Second,
I removed the brown & blue butterfly bulb sockets, sanded down the taillight assembly metal where they contact, & added some solder to the ends of the butterfly sockets that were a bit pitted - Still getting the bulb malfunction warning after 5 to 10 minutes of driving.

The weird thing is that when I go through the bulb malfunction identification steps (turn on car apply brake 5 seconds etc) I cannot make the malfunction come up like it will when I actually have a bulb out on the car.

It only comes up when I lightly break - My only other guess is that the power used by the 1157 bulb is different then the OEM dual filament bulb.

Anyone else had this issue? I really want to get rid of this malfunction light.
 

Attachments

#12 ·
are all of your bulbs exact replacements to OE?

is the "OEM spec" bulb you referred to labeled P21?

if you look up the tech specs for P21 v 1157 you will note differences (though
physically sized the same). would it be better (or worth trying) the more
appropriate 7225 Sylvania/Osram instead? i will leave the pin orientation
comparison and verification to you though

be sure to verify that the bulb is correctly inserted into the plastic holder,
oriented properly and locked into the holder. it should not drop out if held
upside down (or pulled out-able) an indication that it isn't locked in

are you using any LEDs in ANY of your exterior lighting sockets?

since bulbs can't measure 'time' then it can only be amperage, resistance,
heat.... or continuity

a couple months ago i experienced repeat display of 'bulb malfunction' on my
1999 E320. it was triggered only when i rotated the exterior light rotary switch
one click or more....yet all exterior bulbs were lit. after chasing this back and
forth for a couple of months and noting a clear pattern i went back to the
license plate bulbs and found that one was slightly dimmer than the other.
both bulbs were festoon LED in bright white. fortunately all I had to do was to
replace the dim bulb ($5 for pack of 10) and all is well

I can only think to suggest that a methodical approach and note of the subtle
changes and patterns in which the dash alert is triggered may get you the
next step closer.

(if you're reasonably close to Boeing Field, let me know and I may be able
to swing by)
 
#13 ·
are all of your bulbs exact replacements to OE?

is the "OEM spec" bulb you referred to labeled P21?

if you look up the tech specs for P21 v 1157 you will note differences (though
physically sized the same). would it be better (or worth trying) the more
appropriate 7225 Sylvania/Osram instead? i will leave the pin orientation
comparison and verification to you though

are you using any LEDs in ANY of your exterior lighting sockets?
Raymond, thank you for your quick response.

All of my bulbs are OEM spec except for the 1157's due to this mod (the pink colored socket). I did try non-OEM bulbs in the park lamps but I removed the 1156ST's park lamps (when i did the 1157 Mod) & put the OEM spec ones back in yesterday (the brown colored socket).

I am not using any LED's in this car.

I checked out the 7225 online you recommended - I have not tried these (but I am assuming that I would have to go back to the pink colored butterfly socket if I went this route) - Is that correct?

As for checking continuity - Do I just do that on the bulbs themselves? I do have a continuity tester I can use.

I will check the rear trunk license plate lights as well.

I live just south of Shoreline by Jackson Golf Course btw.

Thank you again for the help.
 
#14 ·
thanks for the background. had you used LEDs in any of the circuits, it would
help understand the symptoms sometimes, kind of like the EMT asking if you
are you are a smoker or something.

the 1157 and 7225 and P12 should be using the same socket but i'll let you
google for a cross reference chart/table on that. i'm in a waiting room (sigh)....well, waiting.

...but reading back now, since you have already stated "...Still getting the bulb malfunction warning even though all my lights are working." continuity of the
bulb isn't likely the problem and more with resistance and amperage. so I'm
thinking that some component within that circuit...even though your bulb(s) are
all intact...is tricking the system into displaying the 'bulb malfunction' alert

that is why i posted my experience with the license plate light, ie an example of
high resistance or low amperage triggering the alert in my case
 
#16 ·
that is why i posted my experience with the license plate light, ie an example of high resistance or low amperage triggering the alert in my case
I may have posted this anecdote here before . . .

I've owned five Ford Aerostars, still driving the last one as the dog-hauler, and pioneers long ago learned the hard lesson about modifications and LED lamps on the Aeros. Newbies rediscover this one every so often . . .

Change the stop lamps to LED. They sure look cool!

But, now, no cruise control! No overdrive! No torque converter lockup! WTF?

The ECM (which, on '96-97 is also the TCM) will not engage OD or lock the TCC if the brakes are applied, which is monitored by the brake pedal switch. But not the Mercedes way . . . the ECM senses ground on the lamp side of the switch when not depressed. Pedal depressed = 12v to lamps and ECM. Pedal not depressed = ECM ground through the stoplamps' filaments (low enough resistance for a signal to ground, though not a true zero-ohm ground).

Unpowered LEDs don't have low enough resistance when (the diodes are biased high enough) to effect a proper ground to the ECM: ECM thinks, "no ground, brake pedal must be depressed" and will not lock TCC or allow OD.

Same situation with cruise control.

Solution: install small bypass resistor parallel with new LED stop lamps.

(or stick with OEM setup: 1157LL for me). I do a exterior lights check at every fuel fillup anyway, and lights out are rare in my world.
 
#15 ·
Check the wiring from the replacement sockets (brown / yellow wire connection points). The bulbs have different resistances for tail and stop filaments. So if the tail filament is lit instead of the stop filament, the resistance difference will cause the warning (less current).

If you look at the pictures, in one case, the brown wire is connected to the outer, metal strip, and on the other the yellow one is connected. Is this correct ?
 
#17 ·
Thanks for this info. Is the socket issue also responsible for causing the brake lamp switch to go bad and cause the error message? The previous owner of my 2001 E320 wagon replaced the brake lamp switch 4 or 5 times over the course of 54,000 miles.
 
#20 ·
Well, you only listed two incidents :) The first one may be a genuine brake switch problem, I don't know, so replacing it solved the problem of shifter lock. The second one may be due to improper installation of the first one, who knows. The MB brake switch could be installed, and work for a while, but over time it could lose its adjustment which is a crucial part of its proper operation. There are Technical Service Bulletins on proper installation of the switch, and I am not sure if the technicians are aware of the problems associated with improper installation.

It could also be a bad wiring / connector issue which provide a resistive connection over time. The previous owner should have complained to the servicing workshop that the brake switches (or their function) do not last as long as they should. Maybe some mechanical adjustment at the pedal where the switch is installed was needed.


In the meantime you could look at the TSB below.
 

Attachments

#21 ·
Thanks, again. I believe two other times it strictly pertained to the lights on the dash coming on. If i understand correctly, a wiring issue downstream, perhaps a brake or tailight with resistance issues, could have caused the switch to fail or short? (I am not electrically savvy.)

And, the improper installation makes sense. I will be having my car serviced with a Indy MB master tech, so it should be more hands on in terms of access.
 
#22 ·
I do not believe the brake light switch for your model carries the current that operates the brake light bulbs. The brake lights are powered by the illumination control module based on the sensing of the brake switch contact status. There are two contacts in the brake switch (typically), and one contact is for the brake light control and the other is for the BAS/ASR/ABS, and the status of both switches are monitored. When one is open, the other is closed, and this reverses when the brake pedal is pressed.

The adjustment of the switch plunger stub is critical. There is another TSB that advises to install the switch with the plunger pulled half way out (5 clicks) instead of full pull (10 clicks). This must have been based on high number of customers' complaints regarding the brake switches.

A good technician should connect a scanner (Star SDS or equivalent) to look at the codes from various modules, and determine the cause based on the error codes, rather than guessing at your expense.
 
#24 ·
The OEM spec ?? The 1157 (be it standard or long life) is NOT OEM spec. The OEM bulb is 7225, and there is a significant difference between the specifications.

7225 = 21W / 4W

1157 = 26.8W / 8.3W

As you can see there is substantial difference. The 1157 brake lights may work depending on the brake light current supervision threshold. I am not sure what the threshold is but it appears that the 1157 bulbs you used were just beyond the threshold level, and as the bulb filament gets hotter, the resistance slightly drops so the wattage slightly increases. It is better to use a bulb that is closer to the 7225 spec.
 
#25 ·
So are you saying that I need to take out the 1157LL?

Will the 7225 bulb fit in the 1157 socket (because looking at the contact points (150 degree versus 180 degree) it does not look like it will fit in my modified 1157 socket)?

Is it okay to run 1157LL's?

Is there like a sticky that has all the OEM interior/exterior bulb sizes on the forum, gonna place an order for some spare bulbs?

I did a few searches but nothing substantial came up using CTRL+F find on the stickies? It would be nice just so I can order some replacement bulbs for the car to have when they eventually go out.

Thank you again,
 
#26 ·
I am just saying that the 1157 is not the specified bulb, and with different current specifications. If it works for you, that is fine. But eventually, if you have intermittent brake light indicator faults, you will know why.

The 7225 will not fit into the new socket. If there is a bulb that can fit (180") and has closer specs to the 7225, that would be a better solution, that's all.

For the bulb list:

http://www.mercedesmedic.com/lights/#e-class
 
#28 ·
2na, I did not mean to lead you astray: my anecdote was about Fords, not W210s; it was an illustration of how what seems a minor modification can turn into something larger.

1157 can melt the taillight lens on some vehicles not designed for it, if you are stopped in traffic for a long time. I have seen this on other European makes where an 1157 was substituted for the OEM lamp.

I cannot advise about the contacts layout; boca may have some input on this, but I do not recommend leaving 1157 installed unless you know for certain that it won't generate too much heat for the W210 lens, ie if someone else pipes up and says, "I've been using 1157s for years, no problem".
Alright now I get what you guys are saying about getting too hot - So what about these guys: 7528 (see attached photo)

The 7528 has 180 degree contacts & are specificed @ 25W / 6W (Versus OEM Spec 7225 21W / 4W) it is a little closer to spec then the (1157 26.9W / 8.3W I have installed now)

Is there anything else closer to OEM that will fit in the 1157 slot other then the 7528?
 

Attachments

#27 ·
2na, I did not mean to lead you astray: my anecdote was about Fords, not W210s; it was an illustration of how what seems a minor modification can turn into something larger.

1157 can melt the taillight lens on some vehicles not designed for it, if you are stopped in traffic for a long time. I have seen this on other European makes where an 1157 was substituted for the OEM lamp.

I cannot advise about the contacts layout; boca may have some input on this, but I do not recommend leaving 1157 installed unless you know for certain that it won't generate too much heat for the W210 lens, ie if someone else pipes up and says, "I've been using 1157s for years, no problem".
 
#30 ·
Hi, Guys.

Since I'm new to the 210 scene, is there a reason NOT to use the OEM bulb? Why all the debate if the OEM bulb is least likely to cause an issue? Are they hard to find or expensive?
 
  • Like
Reactions: Al_Savage
#31 ·
If you are talking about this application (use of a 1157 socket and bulb), the reason for this maybe unavailability of a suitable Baz15d socket with pigtail wiring for the 7225 bulb. The socket used here accepts Bay15d bulbs only, so the 7225 bulb cannot be used.

Ideally, a suitable socket with pigtail plus a 7225 bulb would meet the requirements of current monitoring and heat dissipation. The 7225 bulb itself is not expensive, but the pigtail wired socket for it if available, can be expensive to order..
 
#32 ·
At issue is the w210 taillight construction/design. MB's method of securing the
bulb and having it integral with the car's lighting circuit is done via the
bulb holder 'wings' and the metal chassis/floorplate of the taillight assembly.
However, it is well documented that the design and application has flaws.

Owners have reported poor conductivity between the bulb and the holder....
from the holder to the taillight chassis...pitting on the chassis...signs of high
temperature on the bulb's contact points.

So various workarounds have been suggested over the years. But you should
note that the workarounds are anecdotal and may be suitable ONLY for the
problem that owner is experiencing, or for only temporarily

Just because someone performs a bypass operation by hardwiring the wing
to the chassis....or by stuffing aluminum foil (STICKY) into the bulb holder....
swapping holders between right with left taillights etc doesn't mean it will work
for you.

Care should be taken not to chase symptoms without also narrowing down the
cause of the problem (like the several described above).

Of course, it should go without saying that should you go rogue and fabricate
a hack which sounds creative, you also should be watchful for any problems
you may have unintentionally triggered.

examples: lowering suspension begats camber arms, replacing exterior lights
with LEDs is likely to result in bulb malfunction warning, tinting windows may
interfere with radio reception, etc
 
#33 ·
I haven't calculated the value of the bypass resistor required, and I suspect that a rude calculation would be off due to the characteristics of LEDs, but . . .

. . . if I was fighting the TL lamp holder problem and felt like modifying it to use a pigtail as the beginning of this thread illustrates, in the absence of the Baz15d socket/pigtail combo, I think I'd do the 1157 (Bay15d) socket/pigtail mod, add a common 1157 LED replacement, and add a bypass resistor to bring the circuit load back up to the 7225 spec. (21W/4W).

I'd probably use a decade box (or my excellent resistor assortment) and ammeter to dial in the resistor to ~(1.5-1.75a/.28-.33a).

That would probably make the lamp check circuit think everything's OK. However, I also doubt that a failed LED would trigger the check circuit reliably. And LED clusters don't fail all at once: they fade, flicker, and die off one element at a time.

All in all, I'd prefer to find a way of increasing the reliability of the 7225 work in the circuit. I haven't looked at the holder, but I bet I could do a partial disassemble of a holder and add my own pigtail wires.
 
#35 ·
<....>
I'd probably use a decade box (or my excellent resistor assortment) and ammeter to dial in the resistor to ~(1.5-1.75a/.28-.33a). <....>
if i were to add a decade box to my toolbox, Al, would i be adequately served by purchasing
one using jumper switch selection ($20), versus say, toggle switch vs rheostat etc? (< $100)
it's not like there are a lot of reviews out there for such ancient tools
 
#34 ·
In my case, it was one of the pink/brown spacers that hold the space between various metal plates lost its head, so the metal plate did not keep the contact pressure enough, and this raised intermittent failures. I would get the lamp failure message but when I checked the bulbs all were OK. It must have been due to a short disconnection / higher resistance when I went over a speed bump or something. I just stuck a toothpick between the spacer and the metal plate which works for about 6 months. I am planning to have a "buildup" over the spacer plastic, but have not decided what material to use to build a "mushroom" over the spacer column.
 
#36 ·
Why not just calculate ? If you need to emulate a a P21W/4W bulb with and LED array bulb and two resistors in parallel, you can calculate what the resistor values should be.

Just subtract the LED wattage per circuit from 21, and divide by 12V. That should give you the current value that will go through the resistor. Then you can calculate the resistance values needed. So if the LED is rated 5 watts at 12V, you need to dissipate 16 watts within the resistor in parallel which comes out 1.33 amps. The resistor value should be around 9 Ohms for the stop light part.

For me, to upgrade the stop / tail lights to LEDs does not make sense, especially if you use quality long life bulbs, as it will not reduce the battery drain due to the defective bulb current supervision requirements.

I have replaced most of the interior bulbs (dome, map, glove box, door courtesy, lighter) to LEDs, as these lights are not supervised. Also, I do not believe the third stop light is supervised, so it may be a candidate for me to replace it with an LED equivalent, when the long life bulb is burnt out (which may be years:))