

Hi all, I have finished converting my '98 E430 wagon to LPG (Liquefied Petroleum Gas). So it now runs on Propane/Butane, as well as regular unleaded. Although quite a common thing in Europe, I know this is a rare thing to do in the states and other countries, so I thought a few might be interested in the process...
Take one rusty old battled scarred E430 wagon:
![Image]()
I bought it about 6 months ago for the rather pleasing price of £500 (about $750 USD). Although dented, scratched and with rust in the usual places, everything works and it is quite good mechanically. It sailed through the MOT (our yearly safety test) last week with no concerns.
Anyway, the only problem with the car is the fuel consumption! Although it will do 30mpg on my regular trips from the UK to Germany, around town it is sometimes in single figures. LPG is half the price of regular unleaded in the UK and almost a third the price in Belgium on the way to Germany.
I have converted a few cars before, so wasn't a complete beginner, but these were all on old carburettor based vehicles, never on a modern sequential fuel injected engine. As such, there was to be something of a learning curve ahead! I had removed an LPG system from a 90's S320, which would provide most of the parts, but an s320 is obviously a very different car, not least being short of two cylinders.
So, how does the LPG conversion work?
Simple version... A dedicated LPG tank is installed in the spare wheel well with safety solenoid and vent. Fuel is stored at around 7 bar (100 psi). At this pressure, the LPG is kept as a liquid. A copper pipe running under the car brings the liquid to the front where a vapouriser allows regulated fuel to become less pressurised and expand back into a gas. It is then at about 1.4 bar ready to be supplied to the injectors. This vaporising/decompressing process has a large cooling effect (same principle as a fridge), so the reducer must be connected to the engines water system to keep it warm and not freeze up.
The gas is then fed to a second set of injectors that are plumbed in near the regular injectors, thus giving the ability to switch between fuels. The wiring to the original injectors is re-routed to a piggyback LPG ECU, and from this ECU, wired back to both sets of injectors. So, it receives the sequential signal to each cylinder from the original engine management, then either squirts petrol or LPG into each cylinder as required. This is all completely transparent to the original ECU. The LPG ECU has a number of sensor inputs such as vacuum, temperature in several places, lpg pressure etc and a take off the Lambda sensors, to keep the system closed loop. It is a clever bit of kit.
My install...
So it is all second hand stuff other than 8 new LPG injectors, the tank, and lots of pipe/wire/zip-ties etc. If I ignore the cost of the original kit (it basically came free on a car broken for spares), it owes me about £200 all in. Nice.
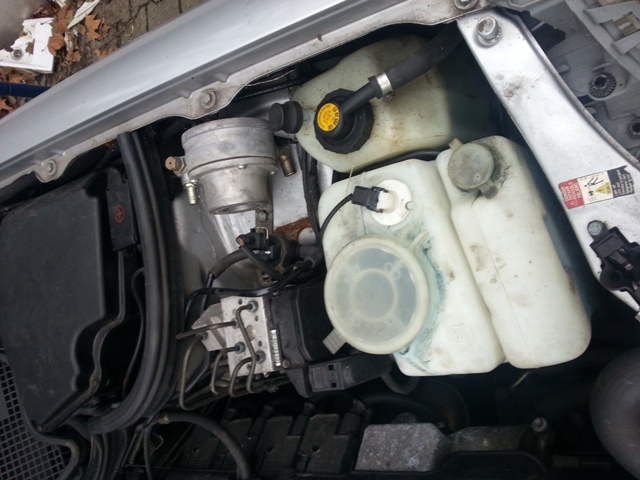
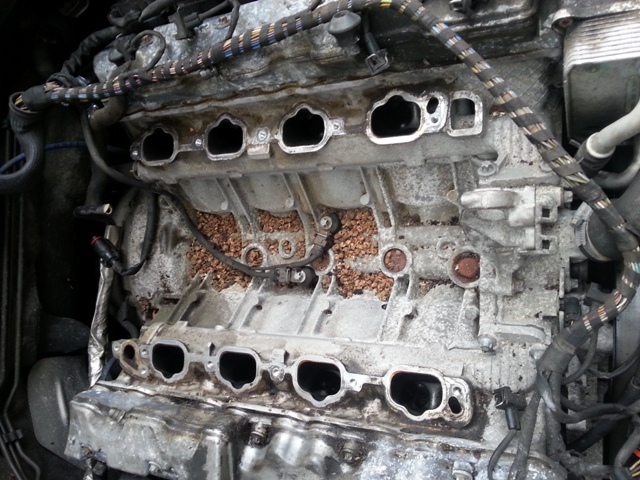
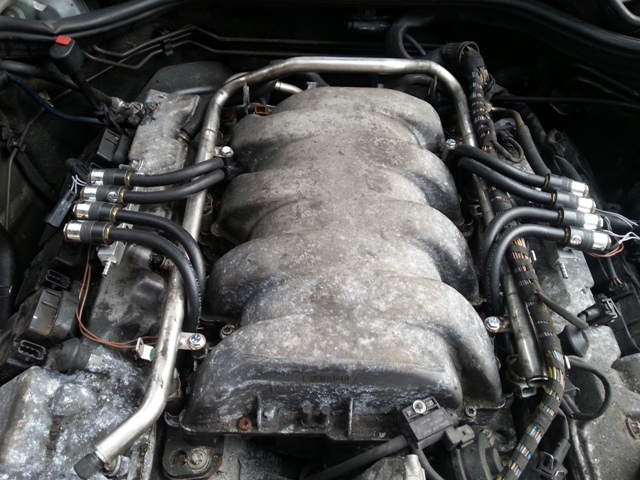
Pre-conversion engine bay
![Image]()
Day 1...
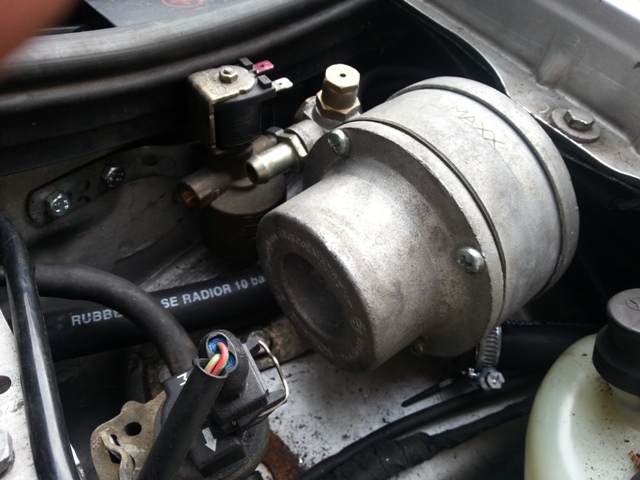
First job was finding a suitable location for the vapouriser, and mounting it securely. The E430 has so little space in the engine bay, this was a challenge! I found a spot next to the ABS pump that it could just squeeze into. This was plumbed into the heater pipes from the engine by cutting into and T'ing off the inlet and outlet pipes to the cabin heater matrix, one bottom left of the engine (looking in from the front) and one top right at the back.
Tight fit, but vapouriser bolted in
![Image]()
And plumbed in
![Image]()
Note solenoid next to the vapouriser. There is one of these on the tank and one at this end for safety. The are both controlled by the LPG ECU.
Day 2...
Next was the tank install. Whilst LPG donut tanks are plentiful, finding one that is designed to stand upright was something of a challenge. You can buy them new, but there is a 2-3 month wait and they are very expensive. Luckily a rather badly worded eBay ad came to the rescue and I picked up a two year old upright tank for €60. This was bolted in securely and the fuel pipe run alongside the original fuel pipe underneath the car to the vaporiser in the picture above.
Here it is bolted securely into the spare wheel well.
![Image]()
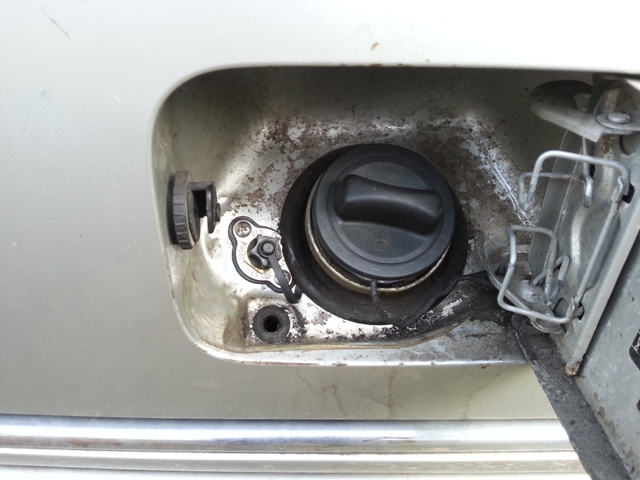
A second pipe was then run under the back of the car (shielded from the exhaust) to the fuel filler door, at the filler mounted discretely next to the normal filler.
![Image]()
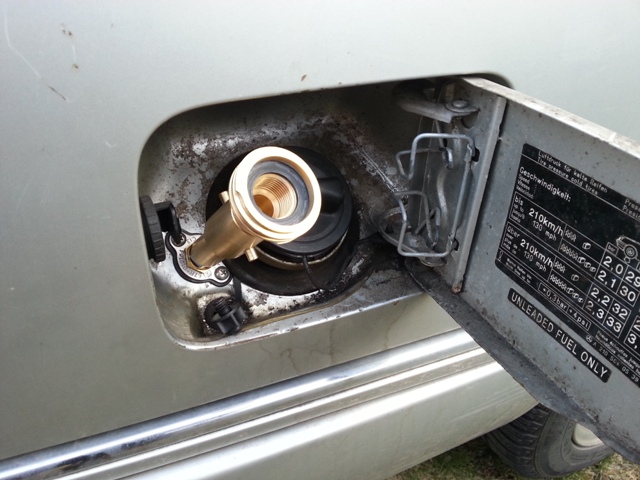
And here is the apadtor screwed in to connect to the LPG pump.
![Image]()
Day 3...
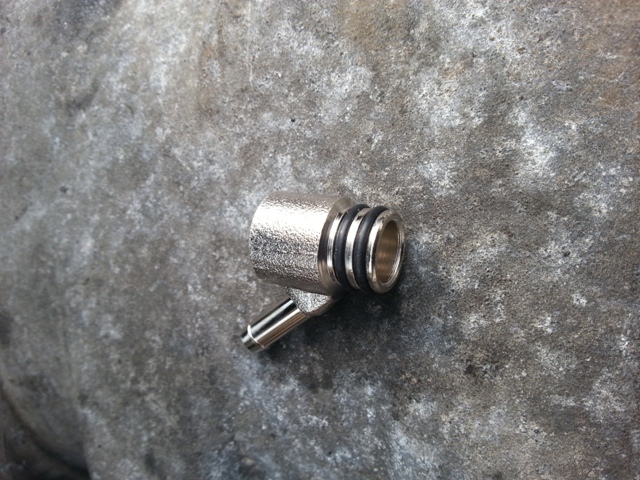
So, now the fun bit! The injectors. Previously, this was a tricky job as you had to remove the inlet manifold and then drill and tap it for the LPG injectors. However, I found these clever little adaptors on the internet which saved a heap of hassle.
![Image]()
You simply remove the injector rail and injectors, plug 8 of these little devils into the injector holes, then re-install the injector rail on 1/2 inch stand-offs.
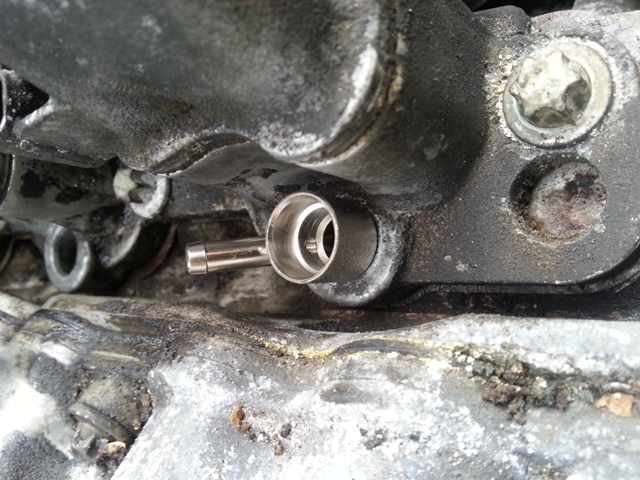
Should have been a 10 minute job, except as I removed the injector rail, I caught the edge of one injector when lifting, and a washer dropped into the injector hole. Balls! The inlet had to come off. On the plus side, at least it gave the opportunity to clean all the injector holes up properly. Also, a squirrel or something must have used the top of the engine block as a storage area, as it was completely full of little shrivelled nuts!
![Image]()
So, new gaskets, inlet back on, and adaptors slotted in
![Image]()
Below is a photo the adaptors and regular injectors, then the rail sitting above on a small standoff.
![Image]()
The original idea was to keep it as stealth as possible and hide the LPG injectors under the plastic engine cover. This worked well on the right hand side..
![Image]()
..but the cover is a different shape on the other to go around the MAF and air intake tube.
![Image]()
So, unfortunately, I had to abort that idea, and place them all on top of the inlet manifold.
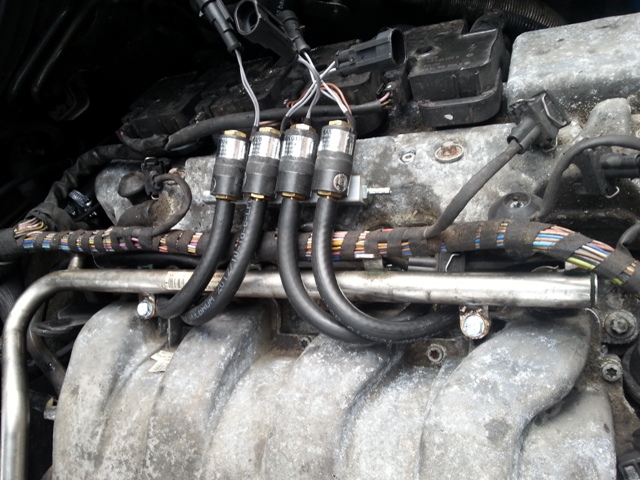
I forgot to take a picture on day 3 of this, so here is a picture of the injector system after being wired up.
![Image]()
I still need to tidy up the wiring as I didn’t have any heat-shrink at the time, so had to use electrical tape (day 3 was Easter Sunday, so no shops were open). I will make this look tidier in the coming weeks. The pipes at the back of this picture are the gas inlet pipes from the vapouriser, and the thin pipes T’ed together at the front go off to an LPG pressure sensor, which is then wired back to the LPG ECU.
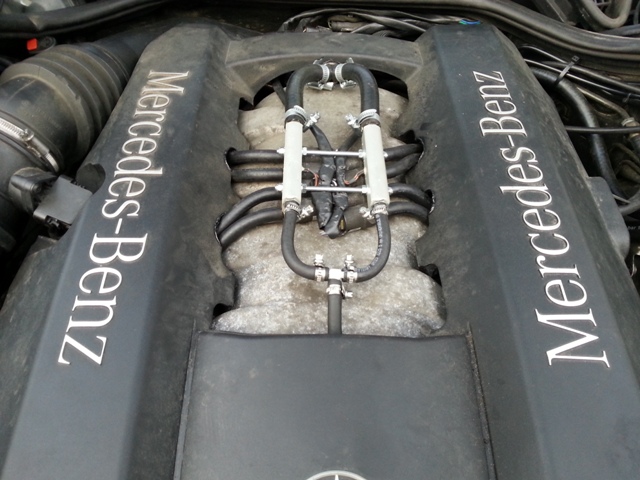
Picture with engine cover on:
![Image]()
Day 4...
Wiring up and configuring.
I had a stroke of luck when finding a place to mount the LPG ECU. With some very slight modification to the main ECU electronics box behind the firewall, the ECU slotted in and fitted perfectly! I couldn’t believe it, almost like it supposed to be in there. Yay!
![Image]()
The LPG ECU is the one in the middle with the purple clip on its right hand side. See what I mean, made to measure!
So wiring up was almost a full days work to keep it as neat as possible. Wires are traced along the fuel line from the back for a safety solenoid and the LPG fuel gauge. Then, as described in the introduction, the loom has 24 connectors for the injectors. There are 8 that you plug into the original injector wires. These then provide inputs to the LPG ECU. Then there are 8 back to the original injectors and 8 to the new injectors. The ECU also requires inputs from the Lambda sensors, from various pressure and vacuum sensors and a pulse input from number 1 cylinder.
Continuing with the stealth install idea, I hid the fuel switch/fuel gauge inside/under the ashtray cover.
![Image]()
The switch has an LED to show when it is running on unleaded, and one for LPG. It then has 5 LED’s to show LPG fuel level. From where it is located, I can see all LED’s from the driving seat without having to move my head.
Once the install was complete, it was time to see if it worked! After a quick drive to put 10 litres of LPG in the tank, I plugged the computer into the LPG ECU, and it connected first time!
![Image]()
The software told me it was running on unleaded, was idling at 650 rpm, and gave readouts for the pressure and lambda sensors. All good. I told the ECU that it had 8 cylinders, what type of fuel gauge etc, then pressed configure. It then read the map from the normal ECU and configured it for the LPG system. The software has full mapping ability right through the rev range, but by just reading the inputs, it can get produce a map close enough for initial running. As it happened, it worked quite well.
Power is down slightly, but not significantly, and there is a slight misfire between 3000 and 3500 rpm when running of LPG. Above 4000 the LPG ECU mixes in a small amount of unleaded with the LPG, and the car pulls like a train!
I need to get the system certified and car papers changed to dual-fuel, so it does need to go to an approved fitter at some point, but this will cost £50 instead of £1000+ for them to fit the system. When it is with them, I will ask them to tune out the misfire.
All in all, I am quite pleased with the way it went. It took a full 4 days, I made a few mistakes, but I learnt a lot along the way and would certainly be quite happy to do it again. I think the next one would take 3 days, or less if I had another pair of hands to help feed wires and pipes around the car.
But the savings will be immediate. I am writing this from the UK after driving back from Germany a couple of days ago. It would normally cost around £120 to do our usual route, but we have put £50 of LPG in so far, and still have nearly half a tank full. I will be doing this drive at least once a month now until October, so the savings will more than pay for themselves very quickly.
Take one rusty old battled scarred E430 wagon:

I bought it about 6 months ago for the rather pleasing price of £500 (about $750 USD). Although dented, scratched and with rust in the usual places, everything works and it is quite good mechanically. It sailed through the MOT (our yearly safety test) last week with no concerns.
Anyway, the only problem with the car is the fuel consumption! Although it will do 30mpg on my regular trips from the UK to Germany, around town it is sometimes in single figures. LPG is half the price of regular unleaded in the UK and almost a third the price in Belgium on the way to Germany.
I have converted a few cars before, so wasn't a complete beginner, but these were all on old carburettor based vehicles, never on a modern sequential fuel injected engine. As such, there was to be something of a learning curve ahead! I had removed an LPG system from a 90's S320, which would provide most of the parts, but an s320 is obviously a very different car, not least being short of two cylinders.
So, how does the LPG conversion work?
Simple version... A dedicated LPG tank is installed in the spare wheel well with safety solenoid and vent. Fuel is stored at around 7 bar (100 psi). At this pressure, the LPG is kept as a liquid. A copper pipe running under the car brings the liquid to the front where a vapouriser allows regulated fuel to become less pressurised and expand back into a gas. It is then at about 1.4 bar ready to be supplied to the injectors. This vaporising/decompressing process has a large cooling effect (same principle as a fridge), so the reducer must be connected to the engines water system to keep it warm and not freeze up.
The gas is then fed to a second set of injectors that are plumbed in near the regular injectors, thus giving the ability to switch between fuels. The wiring to the original injectors is re-routed to a piggyback LPG ECU, and from this ECU, wired back to both sets of injectors. So, it receives the sequential signal to each cylinder from the original engine management, then either squirts petrol or LPG into each cylinder as required. This is all completely transparent to the original ECU. The LPG ECU has a number of sensor inputs such as vacuum, temperature in several places, lpg pressure etc and a take off the Lambda sensors, to keep the system closed loop. It is a clever bit of kit.
My install...
So it is all second hand stuff other than 8 new LPG injectors, the tank, and lots of pipe/wire/zip-ties etc. If I ignore the cost of the original kit (it basically came free on a car broken for spares), it owes me about £200 all in. Nice.
Pre-conversion engine bay

Day 1...
First job was finding a suitable location for the vapouriser, and mounting it securely. The E430 has so little space in the engine bay, this was a challenge! I found a spot next to the ABS pump that it could just squeeze into. This was plumbed into the heater pipes from the engine by cutting into and T'ing off the inlet and outlet pipes to the cabin heater matrix, one bottom left of the engine (looking in from the front) and one top right at the back.
Tight fit, but vapouriser bolted in
And plumbed in
Note solenoid next to the vapouriser. There is one of these on the tank and one at this end for safety. The are both controlled by the LPG ECU.
Day 2...
Next was the tank install. Whilst LPG donut tanks are plentiful, finding one that is designed to stand upright was something of a challenge. You can buy them new, but there is a 2-3 month wait and they are very expensive. Luckily a rather badly worded eBay ad came to the rescue and I picked up a two year old upright tank for €60. This was bolted in securely and the fuel pipe run alongside the original fuel pipe underneath the car to the vaporiser in the picture above.
Here it is bolted securely into the spare wheel well.

A second pipe was then run under the back of the car (shielded from the exhaust) to the fuel filler door, at the filler mounted discretely next to the normal filler.
And here is the apadtor screwed in to connect to the LPG pump.
Day 3...
So, now the fun bit! The injectors. Previously, this was a tricky job as you had to remove the inlet manifold and then drill and tap it for the LPG injectors. However, I found these clever little adaptors on the internet which saved a heap of hassle.
You simply remove the injector rail and injectors, plug 8 of these little devils into the injector holes, then re-install the injector rail on 1/2 inch stand-offs.
Should have been a 10 minute job, except as I removed the injector rail, I caught the edge of one injector when lifting, and a washer dropped into the injector hole. Balls! The inlet had to come off. On the plus side, at least it gave the opportunity to clean all the injector holes up properly. Also, a squirrel or something must have used the top of the engine block as a storage area, as it was completely full of little shrivelled nuts!
So, new gaskets, inlet back on, and adaptors slotted in
Below is a photo the adaptors and regular injectors, then the rail sitting above on a small standoff.

The original idea was to keep it as stealth as possible and hide the LPG injectors under the plastic engine cover. This worked well on the right hand side..
..but the cover is a different shape on the other to go around the MAF and air intake tube.
So, unfortunately, I had to abort that idea, and place them all on top of the inlet manifold.
I forgot to take a picture on day 3 of this, so here is a picture of the injector system after being wired up.
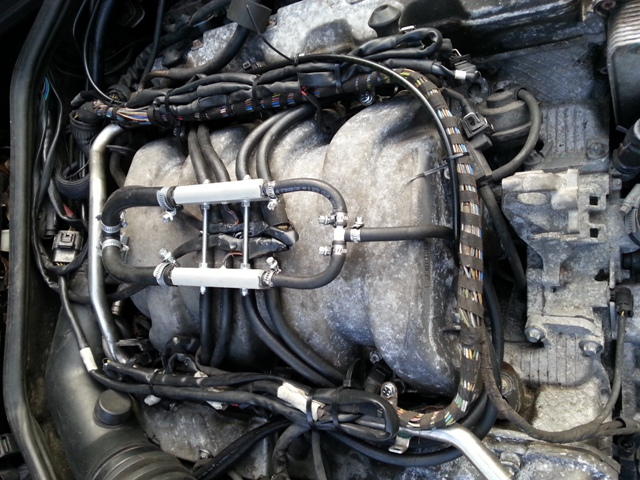
I still need to tidy up the wiring as I didn’t have any heat-shrink at the time, so had to use electrical tape (day 3 was Easter Sunday, so no shops were open). I will make this look tidier in the coming weeks. The pipes at the back of this picture are the gas inlet pipes from the vapouriser, and the thin pipes T’ed together at the front go off to an LPG pressure sensor, which is then wired back to the LPG ECU.
Picture with engine cover on:
Day 4...
Wiring up and configuring.
I had a stroke of luck when finding a place to mount the LPG ECU. With some very slight modification to the main ECU electronics box behind the firewall, the ECU slotted in and fitted perfectly! I couldn’t believe it, almost like it supposed to be in there. Yay!
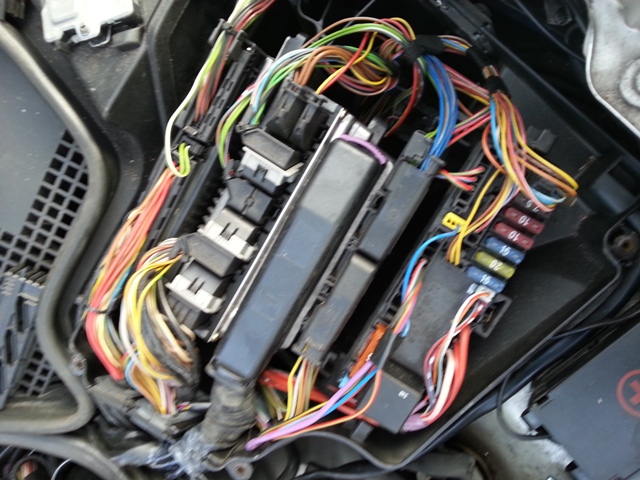
The LPG ECU is the one in the middle with the purple clip on its right hand side. See what I mean, made to measure!
So wiring up was almost a full days work to keep it as neat as possible. Wires are traced along the fuel line from the back for a safety solenoid and the LPG fuel gauge. Then, as described in the introduction, the loom has 24 connectors for the injectors. There are 8 that you plug into the original injector wires. These then provide inputs to the LPG ECU. Then there are 8 back to the original injectors and 8 to the new injectors. The ECU also requires inputs from the Lambda sensors, from various pressure and vacuum sensors and a pulse input from number 1 cylinder.
Continuing with the stealth install idea, I hid the fuel switch/fuel gauge inside/under the ashtray cover.
The switch has an LED to show when it is running on unleaded, and one for LPG. It then has 5 LED’s to show LPG fuel level. From where it is located, I can see all LED’s from the driving seat without having to move my head.
Once the install was complete, it was time to see if it worked! After a quick drive to put 10 litres of LPG in the tank, I plugged the computer into the LPG ECU, and it connected first time!

The software told me it was running on unleaded, was idling at 650 rpm, and gave readouts for the pressure and lambda sensors. All good. I told the ECU that it had 8 cylinders, what type of fuel gauge etc, then pressed configure. It then read the map from the normal ECU and configured it for the LPG system. The software has full mapping ability right through the rev range, but by just reading the inputs, it can get produce a map close enough for initial running. As it happened, it worked quite well.
Power is down slightly, but not significantly, and there is a slight misfire between 3000 and 3500 rpm when running of LPG. Above 4000 the LPG ECU mixes in a small amount of unleaded with the LPG, and the car pulls like a train!
I need to get the system certified and car papers changed to dual-fuel, so it does need to go to an approved fitter at some point, but this will cost £50 instead of £1000+ for them to fit the system. When it is with them, I will ask them to tune out the misfire.
All in all, I am quite pleased with the way it went. It took a full 4 days, I made a few mistakes, but I learnt a lot along the way and would certainly be quite happy to do it again. I think the next one would take 3 days, or less if I had another pair of hands to help feed wires and pipes around the car.
But the savings will be immediate. I am writing this from the UK after driving back from Germany a couple of days ago. It would normally cost around £120 to do our usual route, but we have put £50 of LPG in so far, and still have nearly half a tank full. I will be doing this drive at least once a month now until October, so the savings will more than pay for themselves very quickly.


 )
)

