

Hey, folks.
Since the directions to R&R and clean the duovalve are spread throughout a few threads across this forum I thought it would be useful to put them in one single post that we could sticky for the DIY thread.
Credits to: wood'sbenz, raymond- and netdvn for the following information:
Before starting, here are a few tips:
- BE SURE not to break off the small wiring attached to the gadget.
- BE SURE to pack towels beneath the duovalve to soak up spillage
- BE SURE not to drop screws or parts when removing and installing
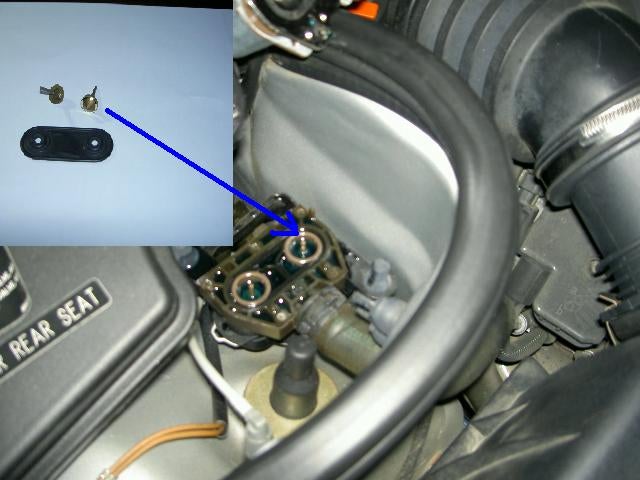
The duovalve is located on passenger's side in the engine compartment. It is easy to spot as it has two small cylindrical aluminum cylinders. There are 5 torx (I think t-10) screws holding it together. With the car COLD, remove these torx screw (use a magnetic drive so as not to lose a screw). Leave the electrical connection alone. Once the screws are removed, gently remove the aluminum cap of the duovalve - pulling straight up - you may need to use a thin/flexible putty knife to GENTLY loosen it at first.
(When reinstalling, the two small screws in back side are tight clearance so you can use painter's tape and poke a hole for the screw. Before it's fully tight, tug on the tape and rip it out.)
After you remove the aluminum cap, you'll see two plungers in the lower portion of the valve. Gently remove the plungers, dry and clean them with a clean rag - you can use carb cleaner if they're really funky. Once cleaned, lubricate the lower portion of the plungers with some Vaseline and put everything back together.
(Greg's note re: lube... I haven't done this but I think that plumber's silicone grease would be more effective for lubing the plungers, not petroleum based, thinner so it's less likely to impede actuation of these little things, lasts longer, etc.)
netdvn's pics from the longest AC thread in this forum are seen below. Note that in this case he cleaned the duovalve with it installed in the car. If you're going to do the DIY fix from gt4rcdude then it's probably easier to remove the duovalve (personally I think I would remove it to clean it, less likely to drop things, etc.).
![Image]()
.
![Image]()
.
![Image]()
.
.
.
[ADDITIONAL INFORMATION] The 1997 E420 (210.072) duovalve is COMPLETELY different, and cannot be easily dis-assembled for cleaning / repair. The same valve is also used on the 1998-1999 E300 turbodiesels (210.025) and CDI (210.026). More details in this thread:
http://www.benzworld.org/forums/w210-e-class/w210-e-class/w210...nary-tale.html
Thanks again to all who contribute to this forum, it helps so many.
Take care and enjoy the ride,
Greg
Since the directions to R&R and clean the duovalve are spread throughout a few threads across this forum I thought it would be useful to put them in one single post that we could sticky for the DIY thread.
Credits to: wood'sbenz, raymond- and netdvn for the following information:
Before starting, here are a few tips:
- BE SURE not to break off the small wiring attached to the gadget.
- BE SURE to pack towels beneath the duovalve to soak up spillage
- BE SURE not to drop screws or parts when removing and installing
The duovalve is located on passenger's side in the engine compartment. It is easy to spot as it has two small cylindrical aluminum cylinders. There are 5 torx (I think t-10) screws holding it together. With the car COLD, remove these torx screw (use a magnetic drive so as not to lose a screw). Leave the electrical connection alone. Once the screws are removed, gently remove the aluminum cap of the duovalve - pulling straight up - you may need to use a thin/flexible putty knife to GENTLY loosen it at first.
(When reinstalling, the two small screws in back side are tight clearance so you can use painter's tape and poke a hole for the screw. Before it's fully tight, tug on the tape and rip it out.)
After you remove the aluminum cap, you'll see two plungers in the lower portion of the valve. Gently remove the plungers, dry and clean them with a clean rag - you can use carb cleaner if they're really funky. Once cleaned, lubricate the lower portion of the plungers with some Vaseline and put everything back together.
(Greg's note re: lube... I haven't done this but I think that plumber's silicone grease would be more effective for lubing the plungers, not petroleum based, thinner so it's less likely to impede actuation of these little things, lasts longer, etc.)
netdvn's pics from the longest AC thread in this forum are seen below. Note that in this case he cleaned the duovalve with it installed in the car. If you're going to do the DIY fix from gt4rcdude then it's probably easier to remove the duovalve (personally I think I would remove it to clean it, less likely to drop things, etc.).

.

.
.
.
.
[ADDITIONAL INFORMATION] The 1997 E420 (210.072) duovalve is COMPLETELY different, and cannot be easily dis-assembled for cleaning / repair. The same valve is also used on the 1998-1999 E300 turbodiesels (210.025) and CDI (210.026). More details in this thread:
http://www.benzworld.org/forums/w210-e-class/w210-e-class/w210...nary-tale.html
Thanks again to all who contribute to this forum, it helps so many.
Take care and enjoy the ride,
Greg


