Mercedes-Benz Forum banner

Instruction for bumper removal, 2000-later model

43K views 27 replies 17 participants last post by  rkoko  
#1 ·
I've been asked for instruction to remove bumper on the face lift W210. Since mine (previous) car was a 98, I didn't have detail instruction.

Now that I get the ultimate software for Mercedes, the WIS (Workshop Instruction Software), identical to the one used by authorized Mercedes dealer, I'm happy to say that I have instruction for analysis & repair most Mercedes built in the last 20 years. If you need info in anything, let me know. Cost will be $0.0 to you :)

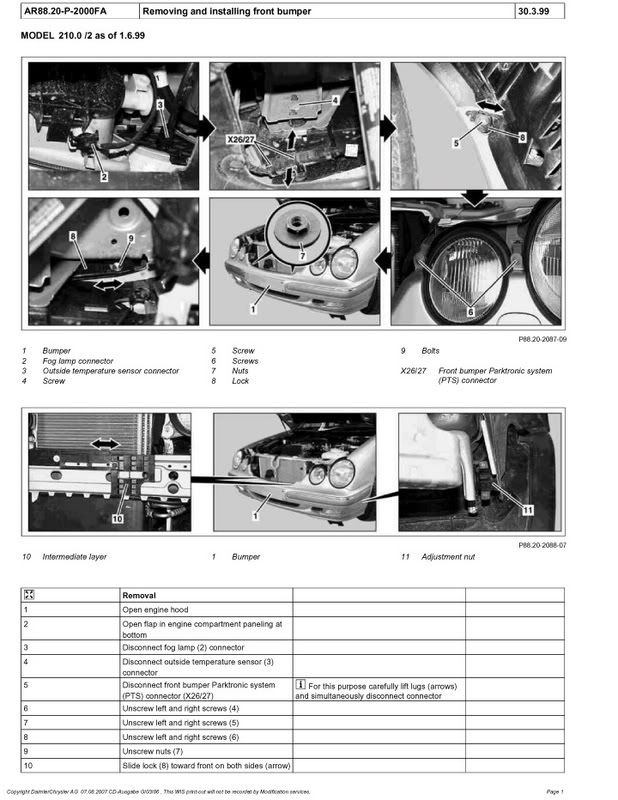
Instruction for bumper removal, haven't figure out how to make pdf file to jpeg file w/ larger size

Image


Image
 
#7 · (Edited)
OliverK said:
Could I possibly get Steering rack removal instructions.

Oh, and transfer case removal as well.

Thanks so much.
PM me your email, I'll send the pdf file to you. Converting the pdf to jpeg right now to image display take too much of time (I don't know how to do it fast)

Transfer case is VIN specific, so if you want info on it, PM me your VIN as well.


BillTMI said:
I am about to swap out a damaged back bumper skin and dented trunk lid on my '97 E420 with ones I brought from a salvage yard. Any info you can give me on doing this would be much appreciated. Regards, BillT
PM me your email.


For everyone, if you need info, pls PM me your email, I'll send you the instruction in acrobat format. If anyone volunteer to convert these pdf file to jpeg for displaying here, let me know, I'll send them to you
 
#8 ·
I was told that I can just attach the pdf file, let me give it a try here

Instruction to remove front/rear bumper, seat, trunk, steering rack, and to work on transfer case
 

Attachments

#17 ·
could you get a me pdf on detailed instructions on how to replace a coupe of things? i need the lower c member car replaced (the long straight beam under the bumper reinforcement and i also need instructions on how to remove a bumper for my w203 2003 mercedes c230 kompressor 4 dr sedan....thanks a lot.
 
#18 · (Edited)
Since these instructions are for the post facelift, here are some of the differences. The 97 and earlier have several extra components, such as chrome strips and a plastic cover just below the headlights. The advantage of the plastic cover is that it can stay on during bumper removal, but I removed it anyway just to have extra clearance.

BTY, the chrome strips are a complete PIA to install.
 

Attachments

#19 ·
There are only 4 nuts that hold on the front bumper highlighted below (2 in front of the radiator, and one on each fender next to the side light marker).

Access to the nuts in front of the radiator will require pulling up on the black plastic grid to remove the lower tab inserts. Also, due to tight clearances these nuts are best removed using a box end ratcheting wrench (such as Sears Gear Wrench). I could not get a socket wrench combo into this space.

Access to the side nuts can be done through the drop panel, and a long arm. The bumper bolt hole for the body frame is larger than the bolt to allow positioning with the bumper to get the body seam gaps to look right. This may require two people for final positioning.
 

Attachments

#20 · (Edited)
Side marker lights come out prior to dropping the bumper, as described earlier for the post-facelift models.

I found it easier to remove the fog lights after dropping the bumper onto some wooden blocks. They each have three attachment points - two slip connectors and a plastic connector close to the bumper. I cut the plastic connector off and replaced with a mechanical nut/bolt, and used threadlocker.

Photo of the backside of the bumper is shown below, with the four bolts circled. Temperature sensor on the driver's side comes out with a pulling force. Location is marked by the straight line in the photo.

For reassembly, start the nut engagement of the bolts at the front of the radiator, then start the side nuts. Best done with a helper.

Finally, as shown in the photo, I used a rubber drop cloth to protect the new bumper. Had the new pieces painted by a bodyshop at around $300, and did not want to scratch the paint.
 

Attachments

#21 ·
Folks
I am need of help in removing my post facelift bumper. The reason for the bumper removal is to gain access to the passenger side headlights. My headlights will not adjust and I need to see whats keeping that for being adjusted. Now I followed the instructions available on the sticky. I DO NOT RECOGNIZE THE LOCATION OF THE #4 LEFT AND RT SCREWS ON THE SECOND PICTURE. I HAVE REST OFF THEM REMOVED. A CLEAR COLOR PICTURE AND OR EXPLANATION OF THE INSTRCTIONS IN THE STICKY WOULD BE APPRECIATED.
KARACHITE
2001 E320
2004VOLVO XC90T6
2010VWPASSAT
 
#26 ·
Ok I'm wayyy behind in the knowledge you guys have! I can't tell you what I need instructions for because (evidently) a "Front Bumper" isn't called a front bumper at all and in fact, its not just one big piece you screw into the frame as I had always thought. In addition, I need to NAME THOSE PARTS on drivers side front because they're torn off too. So, do you have pictures of a 2001 E320 RWD Sedan that shows all the pieces of the front end and drivers side and then names those pieces so I can make just one more call to the parts guy with my shopping list? He's a grouch!
The scrap yard has a 1996 car like mine. How can I find out if any of these parts will fit on my 2001? I asked the scrap yard guy but he's grouchy too...I guess (understandably) they're not used to women who can't identify what they're trying to order. I WILL persevere however!
Thanks for reading!