Mercedes-Benz Forum banner

CLK top cables fixed for $1

1 reading
49K views 36 replies 18 participants last post by  Wolvesboy  
#1 ·
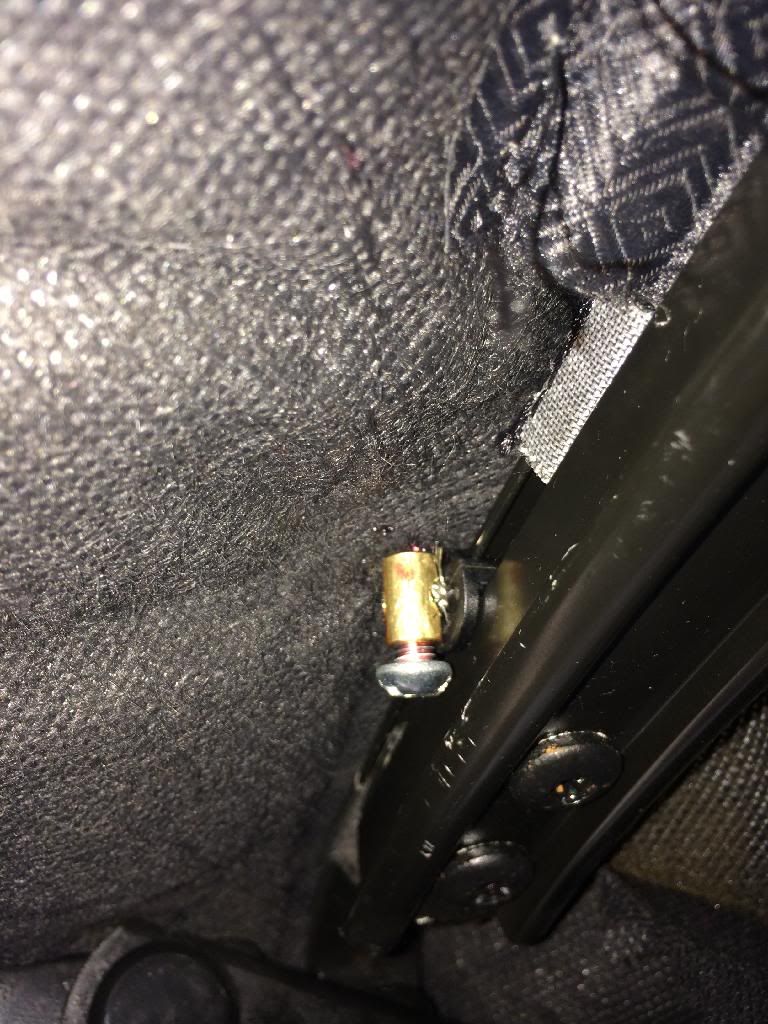
My CLK top now works perfectly with a $1 fix. I used ferrule stops from Lowes which can be found in the steel cable section of the store. Crimped (used electrical crimpers and hammered the crimper while everything was in place) these onto the end of the top cable ends, then used my grinding wheel to shape them like the factory ends that slipped off.

The attached picture shows a factory end I found and used as a guide for shaping the new ends that were crimped on.

Cables were easy to remove by just removing four screws on the header plate, pulling back gently to release plastic clips holding in place, strectch plate back gently then unbolt the 10 mm bolt holding cable strut (top handle does not necessary have to be removed), on rear top bar push the black plasitic cable retainers through toward the back of the roof bar(these round holders unsnap in half so the cable can be insterted into these retainer clips. Cable with newly created ends must be insterted through holes (they won't go thru grind and shape them smaller until they do) in rear top bar the retainers are now snapped around the cable then the cable and plastic retainer around it are pushed back through holes. now bolt the cable strut back onto the front of the top and you are done. This took about 1 hour to fix and excluded time at hardware store...
 

Attachments

#3 · (Edited)
I have opened and closed mine approx ten times so far. I do catch the roof rather than letting in plop down hard into place. If this does not hold over time, plan B is to use a method used on bicycle brakes. This will involve cutting the cable shorter, then doing a loop through ferule to add more length (could probably use smaller gauge wire on new end). Next drill hole in the top of a bolt that will fit in factory roof bar hole, feed new joined cable thru bolt, adjust tension then bolt into place with locking nut. Plan B should never come loose, but I thought i would stick with plan A for now.
 
#5 ·
Soft lead cable end will probably just break off again due to poor design. The stealership wants $200 plus tax for the cables. I ordered some genuine OEM cables online for 1/4 price but they were similar but different and longer than old ones so i had to return them (If these were modified/revised parts I don't know how to install them). Plus these cables seem to be difficult to get without going to stealership and it is also hard to find articles about them on the net.

I did an earlier post on topic and didn't get a response on what part or where to get other than using dealer.
 
#7 · (Edited)
I had a roof cable problem, but after finding the back termination point of the cables with the roof partly retracted, it seemed to me that mine were not broken, but just loosened, or "stretched". After reading some posts, I decided to check the front anchor point for the cables to see if they were broken at that end.

I removed the handle with a 2.5 or 3 mm hex wrench (make sure the roof is not latched when you do this--its easier to work with it down, and lean over the back seat), and then took the four phillips head screws off the plastic cover, and lifted the cover off. There are four plastic clips that will release with a small about of force.

Then if you peel back the roof liner at the front corner of the roof, you can find the front anchor point of the cable. Its held by a 10mm nut. After removing the nut and taking the front part of the cable out, I got a nice surprise. The bracket that it sits in is adjustable. You can see the three positions in the photo below on the left. There is another thread that says this is not adjustable, but it is, in three discrete positions. The difficulty is that the part in the picture is underneath the mounting hole, so you cant see where it is positioned once you have the screw back in the hole.

So I put it back together and before tightening the nut, I pushed the bracket all the way towards the front of the roof in order to effectively shorten the cable by about half an inch. I then did the other side, and this time, having seen how the adjustment works, I simply loosened the 10mm nut and pushed the assembly towards the front of the roof. It seems that mine were installed so that there was room for adjustment.

After that I got it back together and it solved the problem of the roof not staying fully open (front-most joint on the convertible top must stay "broken" and cannot fall into the "locked-out" straight position when the hydraulic mechanism first lifts the rear window). It takes a little more force to close the roof with the handle now, but it is no longer slamming into the top of the windshield when its closed.

Note: getting the handle re-installed was tricky. I had to put the roof down, leave the lid cover up, and remove the plastic cover again so I could install the handle to see how it actually worked. The handle actually is a cam. As you pull it down to turn it, its base presses against a ring of metal that surrounds the shaft, and that releases the latch. You can't get the threaded pin that holds it into the hole except in the "turned" position as if you were unlatching the roof. So to re-attach it, work with the roof lowered into its compartment, (but the roof compartment cover still up so that you can get to it). Press down hard with the handle oriented at right angles to the panel, and the mechanism will depress and release and allow you to turn it so you can get the pin into the hole. If you're having trouble, put the handle back on with the roof in the boot, but with the long plastic cover not on. Then operate the handle and you'll understand what has to be depressed to allow you to get the pin back in when the plastic cover is installed.
 

Attachments

#11 · (Edited)
My top was not working because when the top begins to open (when you push the button-after you have opened the front) the first movement is that the rear window moves up and forward slightly, so that the lid in the back can open. This forward movement releases a small amount of the tension in the roof. At that point, the first joint in my roof would fall back into a "straight" position. It would then resist the hydraulic attempt to lift it, since the joint was not at an angle anymore.

Its easy to find the back end of the cable when the roof is partly up (vertical, with the back lid open). The cable is coated with black insulation, and you can easily find it and see it reaching in with your hand. You will be able to tell if yours is broken at the back. Mine was not. So far, I haven't yet read about anyone having a cable that broke at the front anchor. Therefore, it is easy to determine whether your cable needs replacement, or whether simply tightening using the front adjustable bracket might provide the fix.

I should add that I originally thought that maybe the roof had a hydraulic problem. I looked at the tophydraulics website, and found the instruction on how to do the visual inspection of the hydraulic fluid level. I cut the trunk liner to gain access, and using a flashlight, it looked to me as though my reservoir was empty. So I ordered new fluid and when it arrived, I followed the DIY instructions on that website and gained access to the pump and reservoir. To my surprise, the reservoir was actually full. Somehow I had utterly mis-perceived what I had seen through the viewing hole. That's when I started looking at the cable issue.
 
#12 ·
How to check hydraulic fluid, flush the fluid, and replace latches as needed

I should add that I originally thought that maybe the roof had a hydraulic problem. I looked at the tophydraulics website, and found the instruction on how to do the visual inspection of the hydraulic fluid level. I cut the trunk liner to gain access, and using a flashlight, it looked to me as though my reservoir was empty. So I ordered new fluid and when it arrived, I followed the DIY instructions on that website and gained access to the pump and reservoir. To my surprise, the reservoir was actually full. Somehow I had utterly mis-perceived what I had seen through the viewing hole. That's when I started looking at the cable issue.
MBgrappler,

congrats on fixing the cable! We recently added the following DIY instructions to our website, which were put together by 'joetwa', and I assume that you were using them to check the fluid level. 'Joetwa' did a great job, and we are proud to host his DIY on hydraulic fluid level check, hydraulic fluid flush, and simple replacement of the two rear locks if needed: http://www.tophydraulicsinc.com/W208 Case Cover Lock and Rear Bow Lock Replacement.pdf

Thanks again, 'joetwa', you probably did thousands of CLK owners a great service!

Klaus

Top Hydraulics | Rebuilt Convertible Top Hydraulic Cylinders - Top Hydraulics, Inc
 
#13 ·
Klaus,

Yes, I used your tutorial with pictures. It was very helpful. And I had already purchased the bilstein fluid referenced on your site. So when I got to the reservoir and realized it was full, I simply drained it with a siphon and replaced the old fluid before reassembling everything.

Those contemplating that disassembly should allow some time (maybe 90 minutes) the first time they do it. I was able to successfully undo the "window shade" type trunk compartment divider as described in the instructions, and also got it back together with no trouble.

I was very glad that my fluid was completely full, but the car doesn't see much use. It has 20k miles on it.

Thanks for your site.
 
#14 ·
The proper hydraulic fluid to use, and when cylinders usually fail...

Yes, I used your tutorial with pictures. It was very helpful. And I had already purchased the bilstein fluid referenced on your site. So when I got to the reservoir and realized it was full, I simply drained it with a siphon and replaced the old fluid before reassembling everything.

Those contemplating that disassembly should allow some time (maybe 90 minutes) the first time they do it. I was able to successfully undo the "window shade" type trunk compartment divider as described in the instructions, and also got it back together with no trouble.

I was very glad that my fluid was completely full, but the car doesn't see much use. It has 20k miles on it.

Thanks for your site.
MBgrappler,

thank you for your kind words. CLKs account only for a small portion of our business, but I am always touched by how appreciative CLK owners are when we have saved them hundreds of Dollars per cylinder... :)

Since you mentioned the Bilstein fluid, I would like to point out for everyone that there are two approved fluids for the CLK, and everyone should stick to them:
1) MB fluid p/n 0009899103 ($20s per quart at the dealer)
2) FeBi 02615 ("Bilstein fluid" - identical to MB fluid, but without a dye in it...)

We are providing a link on our website to purchase the fluid online - we are not related, and we don't make a dime on this: Your Parts Search Returned 2 Part(s),

There are two cylinders in the W208 CLK that typically leak first, and those are referenced in the DIY instructions. The very same cylinders have been used in the SL-Series since 1989, and we upgrade many thousands of those annually. Please trust our experience when I tell you that they WILL fail eventually. The speed of decay depends on the climate you live in: all original seals fail as the result of a chemical reaction, and that reaction is accelerated by temperature. Mileage has nothing to do with the life expectancy of the cylinders. In fact, they might last a little longer if they are used from time to time.

I would put the average age of CLKs that we work on now to about model year 2000. A garage queen in Canada may last many more years without leaking, and I would urge any Texas CLK owner to act sooner than later. In fact, we are upgrading full sets of model year '07 CLKs from Texas at this point. The five black steel cylinders have a decay mechanism that depends on more factors than temperature alone. Let me put it this way: there is a good reason why Mercedes moved away from using steel cylinders again after 2003. The good news is, we can make those better than new, as well...

Lastly, please keep in mind that a convertible is a fun car, and it has more parts that need to be taken care of. A small price for the enjoyment, I hope! :)

I hope this helps,

Klaus

Top Hydraulics | Rebuilt Convertible Top Hydraulic Cylinders - Top Hydraulics, Inc
 
#15 ·
Great PDF! That would have been helpful when we replaced one of my locks.

Does anyone have that good of a PDF for the cables???
 
#16 ·
1. I'm an idiot.
2. Thank you to MBgrappler for his pics!
3. Easy, easy "fix".


Apparently my idea of "flop down" is different than others' idea of "flop down". It wasn't until I saw MBgrappler's pic that states "This is the joint that collapses if your cables are broken or stretched" that I realized that cables might not be my problem. My top didn't collapse there.

I had followed the steps to work my top manually -including turning the little screw "two turns to the left". So when I replaced one of the locks and refilled the reservoir, I figured that the extra work I put the top through recently must have broken my cables: "Seems like a common problem".

After seeing the pic, I realized it wasn't my problem.

What I had done was forgot to turn said screw back "two turns to the right". Tightened that bitch down and now my top works flawlessly.

So glad I didn't take it apart for no reason.

Thanks for your help.

PS...more pics of cable replacement would still be helpful for when I have to do it. :D
 
#17 ·
Hi all,

Thanks for all of this information. I am the original owner of a CLK430 cabrio with 127K miles. I stumbled upon this forum recently as I am searching for alternatives to dealer repairs as the car gets older. I love my car, but I am not a mechanic, nor do I play one on TV, and just last week, the car's top stopped retracting. It had almost always had the issue of "slamming" closed from the first joint, and my dealership could never 'find' the issue (I suspect they didn't look very hard!), so eventually I gave up and just caught the top as it lowered automatically.

I saw the PDF from TopHydraulics on checking and replacing the fluid and locks, and was planning to try that in the near future (in a few weeks as I got the time to do so), as it appeared pretty straightforward even to a complete car repair NOVICE such as myself. But after finding this thread, it appears more likely to be the cables than the hydraulics - holding the roof up manually while engaging the switch gets the car through at least step 6 of the process, then it gets too difficult to hold in position without getting out of the car.

I hate the idea of this car without her 'heart' and as a novice I would appreciate any additional advice as far as what I should and should NOT attempt myself at diagnostics before taking this to a shop/top specialist. I do plan to check the fluid level anyway as soon as I get the opportunity.

Thanks in advance
 
#20 ·
Update - $1 fix is still holding since 2010

Update- the $1 fix I performed in 2010 is still holding!! :D. I have opened and closed the top many times. When closing the top, I do make sure my wife or myself catch the top with our hand for a few seconds before it plops down with all its weight to it's pre latch position, then let go while it's finishing the close cycle (this takes little effort). Even if I had replaced the cable with a new, I would advise catching the top in down cycle to keep the stress off the cables when the front of the top plops down.
 
#21 ·
I had my top replaced along with the broken cables last year. now one of my cables broke again. I dont feel confident replacing the cable again cause i feel like its just going to break again. Do you have any other pictures of the $1 diy job? let me know as i want to attempt to do this before ordering the cable.
 
#22 ·
I don't have anymore pictures since I did the repair in 2010. Lowes hardware probably still has the ferrule ends but the packaging if most likely different. To my surprise both repaired cables are still holding up since 2010!! Follow my detailed instructions on original post.

You also could splice bicycle cable with lead end to the existing cable and adjust length with a bolt down cable joiner. The trick to making any rpair last is to catch the top before it plops down with all it's weight at the end of the top up cycle.
 
#24 ·
Be careful using your method. If the end is not recessed into the plastic holder in the rail, it could cut the top. My ferrule end was put on a grinding wheel until it was the same size as original cable end and it fit into the plastic holder. Also, my method did not shorten the cable in any way.
 
#28 ·
One of my cables snaped. But I'm trying to fix it instead of buying a new one. Can someone tell me the length of the cable?

My problem is to know the correct length of the cable, because at the moment it isn't strong enough keep the 1st section of the soft top up and I have to hold it by hand to the soft top go down completely.
 
#29 ·
Go to an auto parts store and purchase cable stops. They usually come in a variety pack. Use the smallest one so you don't make the cable too tight. The hole in the smallest one is too small so take a drill to it and make it bigger. Very easy to do. Where the cable attaches to the front of the car...it has 3 settings to place the cable...put it at the point which makes the cable the longest...it will give you few mm's.

Here is a pic of mine when finished. I also use thread locker so it won't come undone. Follow the steps mentioned here, but I would go one step further and remove the inner convertible fabric. Use your hands and pry it off...could even use a screw driver to get it started. Very easy to do and allows easy access.

 
#30 ·
My biggest problem is that the cable snapped in a position that even when I put the longest setting, it wasn't long enough. I pressed the cable to another, but even when it's real tight the top doesn't stay up. A little movement when I'm operating the soft top (like in the pictures) and the 1st section comes down, stoping the process of lowering. The cable is suppose to be in the tightest way possible when the soft top is in straight position?

Image


The way I'm seeing it, when the top is straight, the cable is really tight, when I open with the handle and put it in up position, the cable looses a little bit, how the top is suppose to stay up if the cable is a little bit loose?