Mercedes-Benz Forum banner

Windshield Wiper Motor Replacement

145K views 82 replies 29 participants last post by  Goodkid365  
#1 ·
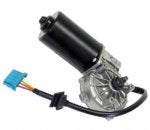
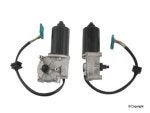
If your windshield wiper sticks, stalls, slows down, etc, a very likely cause of the problem is a bad motor. The root cause of that is two gears inside becoming damaged. I do not know of a way to replace either of these two gears alone. Not to mention, this is probably a bad solution, for several reasons, the main reason being that a full motor replacement is cheap and easy. The part costs less than $100 and I've seen it as low as $75 brand new as of this posting (March of 2010). I bought mine from aiAutoparts on eBay for $80, brand new, OEM. Most other posters seem to have bought this part from AutohausAZ. Auto Haus' site says the part "lists" for $150 and they sell it for $96.21, and it was on sale for $91.40 when I searched it. They only list one part, but there are apparently two types of motor. One is for VIN serials through A644281, the other is for VIN serials from A644282. I honestly do not see why these can not be interchanged. Autozone, O'Reilly, and Advance Auto all list only one OEM replacement, but list two refurbished models. If you tried to get one of the refurbished models you have to return your current motor to get the core back, and you have to get the matching motor replacement. Seems right. Unfortunately one of the refurbished models is twice the price of the other. Both of the refurbished models cost more than the OEM model from these Autozone and gang. All three of these models from these stores cost more than the only part available from Auto Haus, AZ, and that is a new OEM replacement. The one I purchased was not for my VIN serial, BUT it matched the one I replaced, so someone may have swapped it out before I bought the car. In any case it appears these may be interchangeable. But do not take my word for it. You are advised to get the appropriate model for your VIN. I just recently installed mine, so given enough time to find out, I could end up regretting it. For all I know I'm replacing a motor the previous owner replaced 2 years ago and because it may be the wrong model it may go bad again. They both look identical in functional form, but have some slight differences in their casings. Here they are:


For VIN serials through A644281


For VIN serials from A644282

Tools Needed
  1. Socket wrench and extension
  2. 10mm socket
  3. 13mm socket
  4. 13mm open-ended wrench
  5. 5mm hex key
  6. Phillips head screwdriver
  7. Needle-nose pliers
  8. Pliers
  9. Something to hold and separate screws and nuts... please, no jokes.
  10. Brake parts cleaner
  11. Paper towels
  12. Two "work" towels (to drape over fenders)
  13. White lithium grease
  14. Elbow grease

Procedure : Removal
  1. Remove primary and secondary fuse box covers
  2. Remove wiper motor fuse and unplug motor
  3. Remove wiper blade
  4. Remove wiper arm
  5. Remove wiper transmission cover
  6. Remove the ventilation intake registers
  7. Remove fresh air ventilation duct
  8. Remove wiper motor and wiper transmission as one unit
  9. Separate wiper motor from wiper transmission

Procedure : Inspection, Preparation
  1. Check wiper transmission for problems
  2. Clean wiper transmission linkages
  3. Lube all contacting parts on wiper transmission
  4. Park new motor by itself, unattached

Procedure : Installation (not reverse of removal, exactly)
  1. Attach new wiper motor to wiper transmission
  2. Install wiper motor and wiper transmission as one unit
  3. Plug-in motor and install motor fuse
  4. Test motor operation
  5. Install primary and secondary fuse box covers
  6. Install fresh air ventilation duct
  7. Install driver and passenger ventilation intake registers
  8. Attach wiper transmission cover
  9. Attach wiper arm
  10. Attach wiper blade
  11. Wet windshield thoroughly and test away!!!


Get Started
Here's the long description with photos. The photos were taken mostly during installation at 1am. I apologize for the lighting, but you can see everything you need to. Also, keep in mind that since these photos were taken during the installation, they may appear to have some parts taken on or taken off out of order from my description. Also, my description does not match exactly the way I did. In hindsight I learned a better way to do this project and I am sharing that with you. Use the pictures as general reference.

Alright, let's get started. Get the tools I mentioned handy. Pop your hood and put it into the full vertical position. If you have never done this before, just look for the clips at each hinge, it's pretty straight forward.

Drape your towels over the fenders to avoid scratching them.


Procedure : Removal
Step One-Two: Remove the primary and secondary fuse panel covers; remove the wiper motor fuse and unplug the motor. The first cover is removable by hand by squeezing the clip. You will need a phillips screw driver to remove the second cover by removing five screws.

Image

Image


Step Three-Five: Remove the wiper blade, arm and the transmission cover. Remove the 5mm hex head bolt, then slide the wiper arm off the post. This can be kind of tough. Keep in mind there are springs behind the arm, if you pull the arm away from the windshield these springs will tend to push the block that is on the post towards the windshield. Pulling the arm off in this manner could risk damaging your windshield, even if you place something on the windshield to prevent this. Just be careful. Replace the 5mm hex head bolt into the wiper arm you just removed so you don't lose it. Now pop the plastic cover off of the wiper transmission, it pops off on the bottom and slides off the post at the top. It should come off with ease.

Image

Image


Step Six: Remove the ventilation intake registers. Each has three plastic clips you need to push down on while pulling the vents back. I used my thumb. As with all plastic clips you run the risk of breaking them if they are dry-rotted or if you use too much pressure or concentrated force. You shouldn't need a screwdriver to press on these, and using one could break them.

Image


Step Seven: Remove the fresh air ventilation duct. It's all one piece. It has one plastic nut on each the driver and passenger sides. Remove the 10 screws across the back side of the duct, then look closely for all the clips on the front side of the duct. There's a bunch of them. I got all of them off by hand. You can roll and push the duct forward slightly to relieve some of the force on the clips.

Image

Image


Step Eight: Remove wiper motor and wiper transmission as one unit. you'll need to remove the shroud between the wiper transmission you recently took the plastic cover off of and the windshield. It comes out by hand. Two or three of the duct screws you've already removed were holding it in place to the duct. There are two nuts to remove, one clip to undo, and one bolt to loosen. This bolt doesn't appear to actually have a nut on the other side, a mere quarter turn and it is completely loose, if you turn it any farther than that you will damage the plastic ramp it tightens against. Remember this when installing later. First undo the white clip by hand, then remove the two 10mm nuts, then loosen the bolt on the rubber damper. To remove the assembly, tilt the whole assembly up while pushing back and slightly up to slide the flange out of the rubber damper. Watch your windshield here, you don't want to chip it.

Image

Image


Step Nine: Separate wiper motor from wiper transmission. Remove the one 13mm nut attaching the motor output shaft to the transmission, then remove the three 10mm bolts attaching the motor body to the transmission body. Pay attention to the orientation of the motor and the bolts for re-installation.

Image


Prep and Installation post coming next. This post shortened due to image and character limitations.
 
#2 ·
Windshield Wiper Motor Replacement Part Two

Procedure : Inspection, Preparation
Step One: Check wiper transmission for problems. With the motor taken off you should be able to move the wiper transmission around, see how it operates, note the linkage, movement and contact points, and check for problems. Mine was surprisingly stiff, but I have nothing to base this on, so it could have been normal. Take this time to take your motor apart to learn ya somethin'. Below is my motor taken apart, on the zoomed in image you can see where the worm gear was damaged. This then destroyed the plastic gear. MB engineers used the position of the plastic gear to detect the parked position, and not the position of the internal motor. This plastic gear's position directly relates to wiper position, so this problem won't cause your wiper to park in an odd place. The motor will keep running without parking unless it doesn't detect the park position for a given period of time. Then it will stop the motor anyway. So your wiper may stop in an odd place while the motor continues humming away. After a certain amount of time has elapsed the motor will just shut off. My gear was in good enough shape that I could actually move the wiper by hand in the places it got stuck to get it back to park.

Image

Image


Step Two: Clean wiper transmission linkages. Use break parts cleaner and get the old grease off that likely has grit packed in with it. Clean all the contacting points and surfaces thoroughly. This isn't your normal "lube job" on the wiper system. It could have failed due to problems in the movement. Give yourself peace of mind and spend the time to clean this well.

Step Three: Lube all contacting parts on wiper transmission. You can not see the moving parts inside part of the transmission. There's a small gear that rides inside a reverse gear as the wiper moves from side to side. This small gear being turned is what moves the elbow that is underneath and attached to the main post at its base. This creates the "M" motion the wiper makes. There are three holes you need to line up to be able to spray some white lithium down in there. If you get the post into the vertical position these should line up. Get your straw in there and spray away. Make sure you aim your straw around. Then spray all the visible moving parts. Move everything by hand and repeat your lubing as you see fit.

Step Four: Park new motor by itself, UNATTACHED!!! Make sure the car is off. Replace the fuse and plug in the motor. Have a helper hold it or get it secured somehow. Get in the car and turn it on, but don't start it. Run your wiper on intermittent and check that the motor runs, stops, runs, stops... etc. Put your wipers on slow, and check the speed and sound of the motor, remember the sound for later testing. Then put them on high and check again. Hit the sprayers to see if the motor comes on for a moment and shuts back off. Finally, run them on slow for a bit and then turn them off. Let it come to rest naturally, remove the key, unplug the motor and remove the fuse. You have parked the motor and are now ready to begin installation. You're more than halfway there.


Procedure : Installation (not reverse of removal, exactly)
Step One: Attach new wiper motor to wiper transmission. Position the motor and install the three bolts that attach it to the transmission. Your motor has been parked in the starting position, but now you need to set your transmission into the parked position before pressing the transmission's main arm onto the motor shaft. Since the motor spins constantly in the same direction and it is your transmission that makes your wiper move back and forth, you can choose to start your wiper in whatever position you like such as on the passenger side, up the center, or maybe at a 15.67 degree angle, whatever you like. To return it to "factory" settings there is an alignment mark on your transmission linkage to show you how everything lines up. That mark (or just a little bit of common sense) will show you exactly how to position everything before putting it back on the motor. I wouldn't worry about it being perfect. In fact, where I placed mine the arm wasn't straight with the alignment mark. Press the arm on and tighten the nut on the shaft. As you tighten you might get beyond the motor's internal friction point and begin turning it. This is where your 13mm open end wrench comes in handy because the socket will eventually get in the way of the linkage. I'd also advise getting the motor back into the parked position before plugging it in or it will start moving as soon as you turn the car on. Use your wrench to keep turning it in the same direction until it's back to the alignment mark. Don't try to go backwards, you'll just loosen the nut! You could also damage the motor and you'll be doing this replacement again in 18 months!

Image


Step Two: Install wiper motor and wiper transmission as one unit. "Roll" the assembly into the damper bushing with the bolt, then let the other damper bushing (the one attached to the assembly) rest in the white clip, then align the bolt holes over the bolts on either side. Get the flange seated well in the damper bushing before tightening the bolt about 1/4 of a turn. DO NOT OVERTIGHTEN. This is not a traditional bolt. It merely turns on a plastic ramp. This is merely intended to absorb vibration. Clamp the white clip over the other damper bushing. I used my pliers on the wide setting and made sure they were clamping down on the very top. I could not get the clip to close completely by hand, it wouldn't click all the way in and was easy to flip back off. Once the clip is on right it should take a decent amount of effort to get it off by hand. The problem is you have to compress that bushing, and it's a bit tough to do by hand. Now put the two nuts back on and proceed.

Image


Step Three: Plug-in motor and install motor fuse. Your new motor should have a rubber grommet floating down the wire, there should also be a similar rubber split-grommet on the vehicle. Route the wire through the one on the vehicle and install the one on the wire in the side wall of the fuse panel. Pay attention to the shape, it is molded to fit in one direction only. Pull most of the wire back out of the box through the grommet to make it easier to close later. Clip the motor power cord in, then plug in the fuse and get ready to test.

Step Four: Test motor operation. Get in your car and test. With everything bolted down not much can go wrong. Your wiper can not extend too far one way or another, Mercedes' engineers are just that thoughtful. It also can't go too far to one side or the other. This test gives you a chance to see that it stops in the right place. You will also want to pay attention to the motor sound and compare it to your earlier test. Now's the last chance you'll get to see if the motor is straining due to a faulty transmission. I also used this opportunity to add lube while everything was in continuous motion. Hopefully you haven't gotten overzealous and installed your wiper - if you have and you're testing with a dry windshield then you are putting your motor at great risk.

Step Five: Install primary and secondary fuse box covers. If the test was good, turn off your wiper and the car, then remove fuse 44 for safety. Put the secondary cover on, screw it in, and then place the primary cover back on.

Step Six: Install fresh air ventilation duct. This is the big piece, but remember, the shroud under the wiper transmission needs to go on first since 2-3 screws mount through it. Slide the shroud into place, then finagle the duct into position. Install the plastic nuts on either end, don't over tighten (they are plastic...) and then install the 10 screws. You may have to play with the alignment on each screw to get them in so don't tighten any of them all the way in before getting all of them started. After the nuts and screws are in place, clip all the clips on.

Step Seven: Install driver and passenger ventilation intake registers. When you removed these all you thought about were the three clips, but flip them over and look on the back and you will notice that they have clips there that slide underneath the plastic over the windshield. Get it all lined up together as you slide all the clips in at the same time.

Image

Image


Step Eight: Attach wiper transmission cover. It clips over it with the rod going through the hole at the end. That's it.

Step Nine: Attach wiper arm. Remove the 5mm hex head bolt. Slide the arm over the post, and then install the bolt back where it goes. Tighten that down. Again, keep in mind this thing is spring loaded and it'll take a little pushing to get it on right. Attach the wiper blade.

Step Ten: Wet your windshield and test. Oh... reinstall fuse 44, first. You're done. Clean up, put away your tools and take her for a test drive.

Maintenance
You can simply remove the wiper blade and arm and then that plastic cover to periodically lube it up again. If you run your wiper and try to stop it in the middle you can even lube the inner gears. Take the vents off again if you feel like lubing the linkages in the back.

If you have any troubles I've subscribed to this post. I encourage you to ask questions here, not through PM. The whole point of a board is to share your knowledge. I created this post because all of the others were lacking in one area or another and people kept "+1"ing a post that was 3 years old. Hopefully this covers it... it IS long enough, don't ya think?!

Enjoy!
 
#55 ·
...Step Three: Lube all contacting parts on wiper transmission. You can not see the moving parts inside part of the transmission. There's a small gear that rides inside a reverse gear as the wiper moves from side to side. This small gear being turned is what moves the elbow that is underneath and attached to the main post at its base. This creates the "M" motion the wiper makes. There are three holes you need to line up to be able to spray some white lithium down in there. If you get the post into the vertical position these should line up. Get your straw in there and spray away. Make sure you aim your straw around. Then spray all the visible moving parts. Move everything by hand and repeat your lubing as you see fit...
First, I want to thank "JonzBenz" for taking the time and trouble to create this thread, and all others who've contributed to it. I encountered the same problem that most on this thread have with the damaged wiper motor gears. I found one on eBay from "Discount Auto Parts" for $45 (including S + H) with a 2-year warranty. Hopefully, it will last.

I am currently in the process of reattaching the motor and lubricating the wiper transmission. I have a question for "JonesBenz", but maybe someone else knows as well. Since I have the whole thing off I would like to be as thorough with the lubrication as possible, including the gears and mechanism that moves the wiper in-and-out, but which is not visible.

The problem is I can't seem to follow what you were saying in the part of your post above that is "bolded". You mentioned that if the post is moved into the vertical position there are three holes that line up which allow you access inside to lubricate the gears. I think I might know what you're referring to but I'm not really sure. If I'm looking at the wiper transmission from the front or top (with the post moved into the vertical position) I do see
two holes (not three) that line up; one on the bracket the post is attached to and the other on the surface plate underneath which lies close to the center of the plate. If I stick a small screwdriver down through those two holes, it does seem to go in. I couldn't find anything else which was similar to what you described.

Has anyone else had trouble with this or attempted to lubricate those gears? Any help would be much appreciated. Thanks.
 
#3 ·
Jonzbenz I just wanted to personaly thank you for this posting in detail although I have not taken mines a looses it seem the motor is working but the arm or tranmission part is not moving the blade but i can see the motor moving the part behind the arm machinism I just have to take it off and find out why the arm is not moving I thank God for you and your posting and look forward to doing the work my self because i to was quoted about a grand also I am a cook and not a machnic but I learning to be patient and to look for posting like your again thank you Dar
 
#4 ·
Hey man, thank you so much for your post it has helped so much!

My cars wiper is hitting the plastic on the passenger side. It appears that it doesnt go far enough on the driver side and then goes like an inch too far the other way and hits the plastic everytime.

Would this be fixed by simply loosening that 13mm nut and adjusting it?
 
#5 ·
dar, no problem. I hope this post and the photos help some. If I understand what you are saying correctly, you probably need to purchase a new linkage system, or what I referred to in my post as the "wiper transmission," since that was what my dealer called it. It's basically everything that isn't the motor - including the piece that actually moves your wiper blade left-to-right and up-and-down. If your motor is spinning, and you can see some of these linkages moving underneath, but your wiper isn't moving, then I can almost guarantee you that you'll need the "transmission" part. Check this video out to see if it helps you at all: My Motor and Transmission Test.
 
#6 ·
colgan220,

No, loosening the nut I mentioned and moving things around will only change the angle at which your blade parks. It will not change where the wiper goes in and out and will not solve your problem.

Try this for more reference material, it has lots of links. Follow them all and you will learn a LOT, but you're going to have to get your hands dirty to truly understand a lot of it. http://www.benzworld.org/forums/w202-c-class/1370657-w202-wiper-problem-answers.html.

That's where I started, and somewhere along the way someone mentioned something about your wiper hitting the trim on one side of the windshield. The part that does this is enclosed and not typically serviced, even when doing this repair. I suppose if the inner gear's and out gear's teeth skipped a tooth or two, OR if the "cogged wheel" mentioned in the pic below slipped on it's shaft, then the relationship between angle of the wiper and it's length of wipe would be changed, causing it to get longer/shorter in the wrong place.

Image


The next photo below is just wrong. If you want to change your park position slacken nut 2, NOT nut 1. Slacken nut 2, pull the plate off, move the wiper where you want it, then put the plate back on the shaft and tighten nut 2 back down. There is no reason to ever adjust nut 1. There is an alignment mark on this part that shows you where the factory put the park position.

Image


Please be careful messing with all this, especially once you hook power back up to the motor. If the motor is not parked it will move... just like when you shut your car off and leave your wipers on. Even if you were to turn the control stalk for the wipers to off, the next time you turn your car on, before the engine turns over, the wiper will try to go to it's park position.

Just read all this stuff, take your time, get to know what's going on, and then get to work. You'll learn 90% after you start taking everything apart.

Good luck!
 
#7 · (Edited)
The next photo below is just wrong. If you want to change your park position slacken nut 2, NOT nut 1. Slacken nut 2, pull the plate off, move the wiper where you want it, then put the plate back on the shaft and tighten nut 2 back down. There is no reason to ever adjust nut 1. There is an alignment mark on this part that shows you where the factory put the park position.
Hi JonzBenz, my name is Dec, I am the original author of the 2 pictures in the above post #6 .

I thought I should let you know that the pictures A and C below had been revised, you must have missed them here in post #12 page 2… Setting up Front Windscreen wiper - Page 2 - Mercedes-Benz Owners' Forums … the are significant in that the deal with alignment markings on the rear of the mechanism, as you can see the are not present on your copy of the pictures.

I just wanted to clarify what you say about Nut 1 being the incorrect nut to make adjustments to the park position.

When a new (pre parked) motor is installed via its 3 bolts, the short motor arm or as you describe, the plate, is attached to the new motor so as it is aligned with the V mark in picture A, below, this V mark represents the park position of the motor.

In most cases there will be no need to make any adjustments at Nut 1 if a new motor is being fitted PROVIDED the alignment marks (picture A, bottom left) are correct.

However

If a new motor is not being fitted but the wiper blade is not parking exactly where it is supposed to at the bottom of the screen on driver side, then adjustments can be made at Nut 1, again PROVIDED the V alignment mark at Nut 2 is correct and the motor has already been pre parked.

The park position of the blade can be lost if the wiper were to be switched on when the blade is frozen/snowed to the windscreen resulting in a loose Nut 1 or 2 slipping and causing the blade to park in the wrong place when the wiper is switched off at the stalk.

The intent of picture A is to illustrate the position of BOTH sets of alignment markings when a new motor (pre parked) has been installed or when the wiper blade fails to park in its correct position. The alignment marks are there for a reason and shouldn’t be ignored.


Dec

Image


Image


Image
 
#11 ·
Awesome

Thanks so much Mr JonzBenz, my wiper has been stuck in the 11 o'clock position for a couple of years now. I rely on RaineX to do the job and it works great but I am tired of having to put the thing on every time it rains, plus when it fogs up on the outside I have no way to wipe of course....sounds obvious...haha.

In any event I will be working on the wiper motor this week and i am going to make sure it is not a fuse or cleaning issue before I order the new motor.

By the way the reason I have put off the repair is because I had an independent shop that specializes in MB quote me around $1200 to repair it.... imagine that.

Again, thanks a million and I will post my results soon.
 
#13 ·
Glad this helped!

mbuser123 and MB-W202, I appreciate your thanks. I worked pretty hard on this post and it took me more time to write it up than to do it!!! I'm hoping that since this is a common problem it will continue to help others. Please, as you do these repairs, if I have any inconsistencies, let me know and I'll see if I can edit the original post so others may benefit. If you have any specific questions, post them here for everyone to benefit from the answer (assuming I have the answer... ha ha ha!).

Good luck to you both! It's an easy job, but don't let your self get frustrated with parts that are hard to remove and keep CLOSE track of all your fasteners!!!

-Jon
 
#14 ·
park position

I have taken the motor out and I am in the process of degreasing, cleaning and greasing all the moving parts. I went to my local NAPA store and they have ordered a refurbished motor from a local store and should be in my local store this PM.

My question is...does anyone know how I am able to tell if the motor comes in the park position? If not, would it help if I run the motor by itself by plugging it and then turning the inside switch off to make sure it is going to the park position.

Any suggestions will be greatly appreciated, if anyone already has posted this answer my apologies in advance.

Thanks to you all for the great thread especially the creator of it for all his hard work JonzBenz.

Cheers,

Juan in Florida.
 
#15 ·
Parking your new motor

Refer back to the preparation instructions:

Step Four: Park new motor by itself, UNATTACHED!!! Make sure the car is off. Replace the fuse and plug in the motor. Have a helper hold it or get it secured somehow. Get in the car and turn it on, but don't start it. Run your wiper on intermittent and check that the motor runs, stops, runs, stops... etc. Put your wipers on slow, and check the speed and sound of the motor, remember the sound for later testing. Then put them on high and check again. Hit the sprayers to see if the motor comes on for a moment and shuts back off. Finally, run them on slow for a bit and then turn them off. Let it come to rest naturally, remove the key, unplug the motor and remove the fuse. You have parked the motor and are now ready to begin installation. You're more than halfway there.
You will definitely want to park it first to make sure everything is lined up properly. Pay close attention for any alignment marks on your new motor, as there are at least two different versions with different markings. I have no clue if these motors come parked from the factory. Mine did, but that doesn't mean yours will. That, and I have ordered parts in the past that were returns from someone else, so someone else could have unparked it. Don't trust in a manufacturer setting you up properly, always check and always make it happen yourself.

Good luck! Glad you got the parts in so fast. I had to order mine from AutoHausAZ and it took almost a week of anxiously waiting and trusting in Rain-X.
 
#16 ·
Thanks JonzBenz, I remember reading it last night. My model is a bit different 1995 C280 and does plug into a different part, outside the fuse box, other than that everything else is the same.

NAPA usually does a good job at stocking parts....I am ready to get it all cleaned up, greased and put back together, the motor was fried, too much work, the gears were stiff so it was definitely overworked, I didn't know how to lube it properly until I ran into your thread.

If anyone is interested, the price for the refurbished motor is $106 with 1 yr warranty. The ones online run about the same and I save the shipping costs going with NAPA. I saw some motors on Ebay anywhere between $36 all the way to $245 for a new motor.

More updates to follow.

Thanks.

Juan in Tampa, FL.
 
#17 ·
Good news and bad news

Well, the good news is I replaced the motor and it works, the bad news is the wiper is not doing the up and down thing correctly and it is hitting the frame, in other words it hits the metal part of the car.

As I remember correctly this issue was already happening before (it's been a couple of years if not more since the motor burnt out) hence the reason for the motor burning out. Now, I need a plan B, I am not sure if my issue can be resolved with the current gears or I would I need to replace the other parts that are attached to the motor.

When the wiper is on the start position it wont fully retract, but it can easily be pushed back into position. The gears and moving parts were degreased and lubricated with silicone paste and it seemed to be moving well....maybe I just need to readjust them??? Would they sell the moving parts someplace?

Any one have any suggestions?

Kind regards and thanks in advance,

Juan in Florida.
 
#18 ·
hmmm....?

Do you remember a time BEFORE you had the problem with the wiper hitting the frame? What changed?

Is your wiper just too long? Can you put in a smaller blade and see if that works?

When the wiper is on the start position it wont fully retract, but it can easily be pushed back into position. The gears and moving parts were degreased and lubricated with silicone paste and it seemed to be moving well....maybe I just need to readjust them??? Would they sell the moving parts someplace?
I'm not exactly sure of what you mean by this. If you could explain this in more detail, show photos or share a video, that would help.

Also, try taking the wiper blade and arm off, leaving the rest together (with just the little stubby arm that the main wiper arm attaches to). Run the wiper system and see what happens.

I don't see how the arm is not moving in and out properly unless your wiper transmission is broken.
 
#19 ·
Wiper issues

JonzBenz, yes this was happening before the previous motor- the one I replaced- burnt out, I believe it burnt out because it being over worked because it was hitting the sides.

It is strange because when I tested it without the wiper arm it seemed to be working just fine, doing the up and down thing, and the wiper seems to be the right length.

In all honesty I think the transmission on it is not working right because I also remember that before the motor burnt out the wiper was either hitting the sides also or it was just not doing the up and down thing, just wiping in a semi circle.

Now that maybe another fix, if there is a way to make the wiper not do the up and down thing and just be on the short position, the start position the whole time. I wonder if there is a way to fix it like that. Probably not since the whole transmission is designed to move like that.

In any case, I am pretty sure I might have to replace the transmission, because it is back to where it used to be.

I also remember taking to an independent shop and the owner said he would have to replace the whole thing becasue he greased it up and it was still doing it.

Cheers,
 
#20 ·
I'm still going "hhhhmmmmm....?"

I have some thoughts on this.

Did the wiper ever NOT hit the sides? Or has it done this since you bought it? If it hasn't always done this, can you think of what changed to make it happen?

Be careful running the wiper without water on the windshield, especially if it is covered in RainX. The higher friction on the windshield will make the motor work harder. Spray it with water if you have to while testing. Trust me on this, you'll be back where you were this morning real fast if you don't! :)

Your wiper blade could be the culprit either because it is too long or because it is not seated and locked securely. I bought a Rain-X brand blade that did this and the arm in the transmission would move in and out fine, but the wiper blade did not. It moved out the first time and never came back in, constantly hitting the frame at the sides and close to it at the top. Wet down your windshield and get someone to turn the wiper on while you look closely and carefully at the interface between the arm attached to the transmission and the wiper arm that holds the blade.

From my memory of the internals of the transmission, there is no way it can't move up and down. I'm pretty certain it is all linked together. I suppose a linkage could break allow the housing to rotate but not cause the arm to move in and out. If the above testing doesn't tell you anything conclusive, try taking the transmission apart. There was a thread on here once with an internal picture. I may have linked to it previously. You should also be able to search for it with terms like "wiper motor replacement" and "wiper transmission". Keep trying different terms. Follow the links in other posts. This is all stuff I went through when replacing mine.

Worst case, even if your arm works fine except for moving in and out, go get yourself a blade short enough to not hit. You'll at least have most of your windshield covered until you get the real culprit discovered and fixed.

Sorry I couldn't locate some of that research for you. I'm still at work trying to get a board design out that's being a bit of a pain!!

-jon
 
#21 ·
Thanks Jon, I will go get a short blade while I figure out what is happening. I did see a used transmission for $40 + shipping at Ebay, so I might try that or if the shorter blade works well I might just leave it like that.

That was a great idea I will go with that and let you know how it went. I think I can sleep well now after that idea...LOL :)

Cheers and good luck with that board.

Juan.
 
#22 · (Edited)
Juan, the gear at 1, in below picture is slipping on its shaft. Its not supposed to do that, it is responsible for pushing the blade outwards and pulling the blade inwards, because it is slipping, centrifugal force is throwing the blade outwards as it crosses the screen, it is not being pulling inwards when it reaches the other side of the screen and so it strikes the windscreen trim on one or both sides.

This fault has nothing to do with your new motor.

You have 3 options

1… Replace the whole mechanism.

2… Drill a 2mm hole through the cogged wheel and its shaft and insert a 2mm roll pin that is cut to size, this will stop the cogged wheel slipping on the shaft, not always successful and difficult to drill.

3… Tape in place a lollypop stick, cut to size as illustrated at 2 in below picture, this jams the sliding mechanism so that the blade doesn’t extend at all. This wont damage anything as the damage is already done, you will have a slightly reduced field of view through the windscreen as the blade no longer extends.

Dec

Image

Image
 
#23 · (Edited)
good job

Dec, thanks so much, you are 100% correct....right on accurate...the gears were slipping and the centrifugal force was responsible for throwing the blade off track, I could not figure out why it would work fine for 2-3 swipes and then it will start hitting the sides, but what you said makes complete sense and that is what happened before the older motor burnt out, the interesting thing is that the few mechanics I checked with were not able to figure it out, all they did was lube it a little bit and then recommended replacing the whole mechanism and the motor.

I went ahead and performed the fix you recommended and used a pencil (use Dec recommendation of a lollipop stick...much better), the pencil is a bit too thick but it worked.

Also I used a bracket to secure the pencil, but I had used two brackets one on each side of the shaft but....the one bracket on the front was hitting the cover when I tried to put it back on so I removed it and used the two plastic snap ties you see on the picture. Instead of the brackets you can just use the plastic snap ties, they are much easier to install. Also, if you decide to use the bracket on the back look for the smallest bracket possible that will still fit around the shaft and stick to allow the cover to fit back on.

In any event, the wiper does work like a charm, of course it does not do the up and down but it wipes more than enough to see while driving in the rain.

The only question in my mind is that if by blocking the gears to prevent the shaft to do the up and down thing am I over-working the motor?....that is just my only concern...if not I will just leave it like that....and BRING ON THE RAIN!!!! LOL.

It has been fun taken care of this repair...some patience is needed as well as some elbow grease.

You guys are awesome, JonzBenz, Dec, and all other contributors, thanks a ton!!!

Juan in Florida.
 

Attachments

#25 · (Edited)
The only question in my mind is that if by blocking the gears to prevent the shaft to do the up and down thing am I over-working the motor?....that is just my only concern...if not I will just leave it like that....and BRING ON THE RAIN!!!! LOL.
The cogged wheel is made of some kind of carbon, very hard material but also very brittle, now that the sliding mechanism is jammed, the more powerful motor will, in the first few sweeps of the blade, totally destroy the already weakened cogged wheels remaining grip on its shaft, the result will be that the cogged wheel will just spin like a wheel, over and back on the teeth that it sits on as the blade moves over and back across the screen.

I had the same fault so put on the lollipop stick and drove the car for several months before I eventually replaced the mechanism.

Doesn’t really matter what you use to jam the mechanism as long as you stop the mechanising from sliding in and out and you can get the plastic cover back on so that it is seated properly. You could also have used one of the 2 other smaller sliding bars instead although some later mechanisms don’t have them.

Thanks for the picture Juan, it illustrates much better than words.


Dec

 
#26 ·
Awesome Stuff!

Dec and Juan,

GUYS! Awesome stuff!!! This REALLY improves this thread. Wow. :bowdown:

I (and many others) really appreciate the photos, video, descriptions, tips and advice. Very. Cool. Thank you both, so much!

One quick question for clarity:
Dec, are you saying that the cogged wheel and linkage on top of it that is part of moving the blade in and out have broken free from each other? If so, I don't think that stopping the blade from moving will affect the cogged wheel at all. The cogged wheel will ride on the outer gear as the motor rotates the body back and forth, but since it is no longer attached to the linkage (and subsequently the arm and blade) it is free to keep moving. So, the more difficult fix with a rolled pin should still be possible, later. (I think...)

Again, thanks a ton, guys!
 
#27 ·
One quick question for clarity:
Dec, are you saying that the cogged wheel and linkage on top of it that is part of moving the blade in and out have broken free from each other? If so, I don't think that stopping the blade from moving will affect the cogged wheel at all. The cogged wheel will ride on the outer gear as the motor rotates the body back and forth, but since it is no longer attached to the linkage (and subsequently the arm and blade) it is free to keep moving. So, the more difficult fix with a rolled pin should still be possible

Yes exactly, it’s broken free in that it’s slipping on its shaft so it can’t pull/push the blade in/out. By drilling a hole through the cogged wheel and its shaft and inserting a roll pin will again lock the wheel to the shaft so it can’t slip any more. This fix will depend on how good you are at things like that.

There are really 2 mechanisms in the single wiper system, one rocks the blade from side to side, that’s what the linkage does between nut 1 and 2 in picture below.

Image


The other mechanism is the sliding part under the “turtle shell” cover that you see in the video, that’s driven by the rocking motion of the blade/arm/hub through the crescent teeth, the crescent teeth move the cogged wheel which push/pull the blade in and out, as Juan’s cogged wheel is slipping on its shaft, it can’t pull the blade inwards when it reaches the side of the screen. Jamming the sliding mechanisms solves that problem but you lose the in/out action of the blade.

While your suggestion of a shorter blade would work, jamming the mechanism as suggested negates the need for a new shorter blade…to replace the existing 24 inch blade…the shorter blade would also have to be jammed in the extended out position otherwise you would loose about 3 inches of clear view through the windscreen.

There are commonly 3 things that can go wrong with the single wiper, mechanically that is, excluding electrical failure issues such as fuse, relay or wiper stalk switch;

1… Damaged gear and/or worm drive inside wiper motor gear box.
2… Loose nut 1 or 2 on rear of mechanism.
3… Failure of the cogged wheel, the in/out action as in Juan’s case.


There are 2 things that cause the above faults;

1…Turning on the wiper when the blade is frozen /snowed to the windscreen…always allow the blade to finish its cycle when you switch off the wiper in winter so that it is in the park position when you next turn on the ignition.

2… Lack of lubrication of the wiper mechanism under the “turtle shell” cover, this should be lubricated at least twice per year, only a 5 minute job when you get the hang of it.

Dec

 
#29 · (Edited)
are there any other maintenance or greasing i can do while I am at it? my wiper motor and system works fine but I have not greased or done anything to it in many years.

There is the wiper motor gear box, its cover is secured by 6 or 7 screws …all pictured in this thread… this can be accessed and greased without removing the wiper mechanism or motor from the car, just the wiper trim at the bottom of windscreen needs to be removed.

There is also the ball joint close to nut 2 on the rear of the mechanism, I think??? it can be accessed without removing the mechanism but not sure about that… you have to stop the wiper blade on the passenger side by switching off the ignition key when the blade is at the bottom of the passenger side of the windscreen, this, I think will allow access to the ball joint which you would not have if the blade was at the driver side of the windscreen.

It’s not an urgent job but worth doing if the wiper mechanism/motor has never had any attention since the car came out of the factory.

Dec