DIY - Fuel Pump, Remove & Install
INSTRUCTIONS FOR REPLACING THE FUEL PUMP
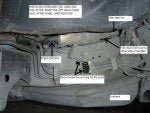
1) Remove flaps of the rear seats. See the first picture for location of access site.
2) Remove rear seat bottom covers. There are no screws, just tabs. Releasing the tabs is the most challenging step. You can easily brake the tabs. See detailed instructions in pdf about this. See picture for under surface of the cover.
3) Unscrew rear seats. There are two hex nuts and several torx bolts. Disconnect the SRS cables; one for each seat.
4) First, remove 40% seat (rear passenger side) from the car.
5) 60% seat is very heavy. Just slide it to the location of 40% seat so that you can work on the driver side.
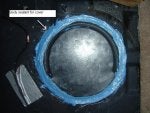
6) Fold the floor mat (driver side corner) and you will see the a round cap covering the access hole. Cap is attached to the body by sealant only.
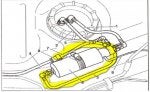
7) Remove the seal and lift the cap. You will see top of the fuel pump. Take a picture to document the alignment of the pump connections. See picture
8) Unplug the cable which is power line to the pump.
9) Start engine and wait 5-10 seconds until engine runs out of fuel and stalls.
10) Disconnect the fuel lines. Push the line, press the tabs on each side with your fingers and remove it.
Caution: The fuel line in the center (feeding line) is still pressurized from the fuel filter which stores almost 1/2 quart of remaining fuel. Collect the fuel into a cup immediately after disconnecting the line. Fuel will come from the line, not from the pump. There will be some fuel spill, so place towels around. This will minimize inhalation of the fuel vapor.
11) Turn the locking ring of the pump counterclockwise and remove it.
12) Lift the fuel pump. It won't come straight up because of the fuel sensor floating arm and secondary intake line (tail-like extension tube). Tilting and turning will be enough.
Caution: There is some fuel inside the pump reservoir (the bottom pan). Tilting the pump more than 45 degrees may cause fuel spill.
Caution: Be careful not to drop anything inside the tank at this point.
13) Carefully insert the new fuel pump. Check the alignment of the fuel lines and make sure it is same as the original.
Caution: Wrong alignment of the pump may prevent fuel sensor floating arm to be lifted completely when the tank is full. Therefore the fuel gauge will never show full tank.
14) Make sure that the rubber gasket has a tight fit between the pump and the tank. Otherwise it may cause a leak when tank is full.
15) Put the the locking ring over the pump and draw a line with a pen (mark initial position).
16) Turn the locking ring clockwise for at least 360 degrees (one full turn). If you have the specific MB tool to remove&install the locking ring, the specification is 65Nm. If you don't have the specific tool, make sure it is tight enough or one full turn. Otherwise it may cause a leak when tank is full.
17) Snap the fuel lines in place. Refer to the picture to confirm the feed line which plugs into the center. Plug-in the power cable.
18) Start the engine.
19) Use body sealant to seal the cap. See picture
20) Install everything in reverse order. Do not forget to connect the SRS cable. Use Loctite for the seat nuts and bolts (40 Nm).
Warning:
- There is risk of explosion by fuel igniting and risk of poisoning by inhaling vapor, eye or skin contact with fuel.
- In order to minimize fuel spill, have minimum amount of fuel in the tank during the procedure.
INSTRUCTIONS FOR REPLACING THE FUEL PUMP
1) Remove flaps of the rear seats. See the first picture for location of access site.
2) Remove rear seat bottom covers. There are no screws, just tabs. Releasing the tabs is the most challenging step. You can easily brake the tabs. See detailed instructions in pdf about this. See picture for under surface of the cover.
3) Unscrew rear seats. There are two hex nuts and several torx bolts. Disconnect the SRS cables; one for each seat.
4) First, remove 40% seat (rear passenger side) from the car.
5) 60% seat is very heavy. Just slide it to the location of 40% seat so that you can work on the driver side.
6) Fold the floor mat (driver side corner) and you will see the a round cap covering the access hole. Cap is attached to the body by sealant only.
7) Remove the seal and lift the cap. You will see top of the fuel pump. Take a picture to document the alignment of the pump connections. See picture
8) Unplug the cable which is power line to the pump.
9) Start engine and wait 5-10 seconds until engine runs out of fuel and stalls.
10) Disconnect the fuel lines. Push the line, press the tabs on each side with your fingers and remove it.
Caution: The fuel line in the center (feeding line) is still pressurized from the fuel filter which stores almost 1/2 quart of remaining fuel. Collect the fuel into a cup immediately after disconnecting the line. Fuel will come from the line, not from the pump. There will be some fuel spill, so place towels around. This will minimize inhalation of the fuel vapor.
11) Turn the locking ring of the pump counterclockwise and remove it.
12) Lift the fuel pump. It won't come straight up because of the fuel sensor floating arm and secondary intake line (tail-like extension tube). Tilting and turning will be enough.
Caution: There is some fuel inside the pump reservoir (the bottom pan). Tilting the pump more than 45 degrees may cause fuel spill.
Caution: Be careful not to drop anything inside the tank at this point.
13) Carefully insert the new fuel pump. Check the alignment of the fuel lines and make sure it is same as the original.
Caution: Wrong alignment of the pump may prevent fuel sensor floating arm to be lifted completely when the tank is full. Therefore the fuel gauge will never show full tank.
14) Make sure that the rubber gasket has a tight fit between the pump and the tank. Otherwise it may cause a leak when tank is full.
15) Put the the locking ring over the pump and draw a line with a pen (mark initial position).
16) Turn the locking ring clockwise for at least 360 degrees (one full turn). If you have the specific MB tool to remove&install the locking ring, the specification is 65Nm. If you don't have the specific tool, make sure it is tight enough or one full turn. Otherwise it may cause a leak when tank is full.
17) Snap the fuel lines in place. Refer to the picture to confirm the feed line which plugs into the center. Plug-in the power cable.
18) Start the engine.
19) Use body sealant to seal the cap. See picture
20) Install everything in reverse order. Do not forget to connect the SRS cable. Use Loctite for the seat nuts and bolts (40 Nm).
Warning:
- There is risk of explosion by fuel igniting and risk of poisoning by inhaling vapor, eye or skin contact with fuel.
- In order to minimize fuel spill, have minimum amount of fuel in the tank during the procedure.


 .
.