One of the most annoying things about a 30 year old 107 when we first receive them is the visors are ugly and falling apart, and will not stay up. This thread talks about the second problem staying up solid. Consider this thread to be the Viagra for visors.
First thing to understand is there are two adjustments on each visor. First adjustment holds the rod tight so it can remain suspended without the holding clip engaged. Second adjustment hold the visor tight to the rod so that it will stay up in place.
In addition there is a clip on each visor that often fails. The male portion of this clip is only available aftermarket by itself, or else you have to purchase the entire visor from MB for about $500.00. I originally replaced my clips about 5 years ago with ones I found on E-bay. They were $50 for just the 2 male pieces at the time. I replace my female clips with 2 that I bought from MB dealer.
Shortly after the 2 female pieces that I got from the dealer failed and I give 3 possible reasons:
1) Possible incompatibility of the aftermarket male piece with MB female piece. Also lack of key on old aftermarket piece.
2) Loose rod that made clip bear the full weight of the visor.
3) Broken upper windshield trim piece that provides support to the female piece.
I addressed the 1st issue by purchasing a male female aftermarket set on E-bay from a guy named "107 clips". His clips have a feature that the factory clips have and other aftermarkets including the ones I had do not have. That is the little molded in key that engages into the slot at the end of the rod.
Sun Visor Clips NEW W107 280SL 350SL 380SL 450SL 560SL | eBay
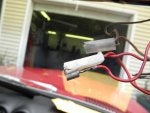
See the first 3 pictures that show my old male clip, the new male clip and the rod with the slot for the key in the new male clip.
If you need to replace your male clips or tighten the rod so it stays up you will need to remove the upper windshield trim. This is done by removing the dome lights, mirror, three screws that hold the mirror support and one screw on the outer underside of each trim piece. Note that the mirror just pulls off its mount with a sharp tug using both hands.
If you are working on the later 107s with the illuminated vanity mirrors you will have to disconnect the ground and positive wire for each mirror. Also note that the white wire terminal connector insulators are probably broken or missing. See picture #4. The part number for these is 000 546 08 45. I intend to order about 30 of these for both my cars. They are used all over the place and they are cracked all over the place. Good idea to have a few available before getting started.
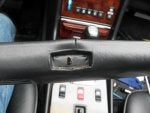
Now you are ready to remove the visor. There are three screws at the mount of each visor the outboard most and inboard most screws are the mounting screw. the middle screw is the friction adjustment screw that allows you to tighten the rod so that it will support the visor when unclipped. If you intend to replace your male clips remove the two mounting screws only. If you intend to just adjust the visor so it stays up with the visor unclipped than just tighten the center screw shown in the 5th picture
Now to remove the rod from the visor. Unfortunately I diddn' take any pictures of this, so therefore I will have to write a 1000 words. There is a screw in the visor at the point where the rod enters the visor. This is the screw that adjusts the friction on the visor so that it will be tight about the axis of the rod. If your visors rotate downward with the clip engaged then this screw needs to be tightened. But to remove the rod and male clip you will need to loosen this screw about 1 turn.
Now what you cant see. The friction clip inside the visor has a slot in it. The slot faces the screw. The rod has a key in it. In the normal installed position the key faces away from the screw. In order to remove the rod, it must be rotated so the key faces the screw. Rotate the rod 180° from its normal installed position. The rod mount may interfere and have to be twisted a little on its ball socket mount to do this. Now the key and slot are lined up and the rod can be pulled out. Make a note of the male clip orientation before pulling it out they are not symmetric, suggest you do one side at a time or you can refer to picture #6. You will be fighting allot of friction from the male clip and you will be able to feel that the key is lined up in the slot as you pass through it. Once the old male clip is clear the new one can be installed. If you get a new clip like the one I got with the key in it you will notice that it has to be installed with the key 180° out of phase making it very tight to install, but once you rotate the rod to the normal installation position after clearing the base key you will feel the clip snap into the shaft slot. Installing this clip will require allot of strength and rotating back and fort as you work the clip onto the rod.
OK now time to install the visor using the outboard and inboard most screws. Connect the wires if your illuminated. Adjust the tension of the center screw so that the rod stays up with a suitable amount of friction. Adjust the screw on the visor so that the visor stays up with a suitable amount of friction.
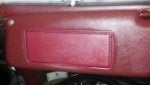
Once the frictions are set the upper windshield trim can be installed. With the friction set correctly the visor rod should not fall with the clip disengaged as shown in the last picture #7.
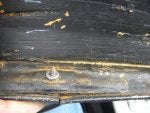
Ina addition to all this I stated that my female clip failure may have been caused by a broken trim, picture #8, which lost some of the support for the female clip. To help with this I put a washer on the back side of the trim as shown in picture #9 so that the clip would bottom out before compressing on the trim piece. I know this will relive stress on the trim but not sure it will help with the female clip cracking.
Update 3/13/2022. Dan Salmi posted this picture in another thread. I asked him If I could post them here. I think this is a great idea to tighten a warn ball and socket joint. See last picture.
First thing to understand is there are two adjustments on each visor. First adjustment holds the rod tight so it can remain suspended without the holding clip engaged. Second adjustment hold the visor tight to the rod so that it will stay up in place.
In addition there is a clip on each visor that often fails. The male portion of this clip is only available aftermarket by itself, or else you have to purchase the entire visor from MB for about $500.00. I originally replaced my clips about 5 years ago with ones I found on E-bay. They were $50 for just the 2 male pieces at the time. I replace my female clips with 2 that I bought from MB dealer.
Shortly after the 2 female pieces that I got from the dealer failed and I give 3 possible reasons:
1) Possible incompatibility of the aftermarket male piece with MB female piece. Also lack of key on old aftermarket piece.
2) Loose rod that made clip bear the full weight of the visor.
3) Broken upper windshield trim piece that provides support to the female piece.
I addressed the 1st issue by purchasing a male female aftermarket set on E-bay from a guy named "107 clips". His clips have a feature that the factory clips have and other aftermarkets including the ones I had do not have. That is the little molded in key that engages into the slot at the end of the rod.
Sun Visor Clips NEW W107 280SL 350SL 380SL 450SL 560SL | eBay
See the first 3 pictures that show my old male clip, the new male clip and the rod with the slot for the key in the new male clip.
If you need to replace your male clips or tighten the rod so it stays up you will need to remove the upper windshield trim. This is done by removing the dome lights, mirror, three screws that hold the mirror support and one screw on the outer underside of each trim piece. Note that the mirror just pulls off its mount with a sharp tug using both hands.
If you are working on the later 107s with the illuminated vanity mirrors you will have to disconnect the ground and positive wire for each mirror. Also note that the white wire terminal connector insulators are probably broken or missing. See picture #4. The part number for these is 000 546 08 45. I intend to order about 30 of these for both my cars. They are used all over the place and they are cracked all over the place. Good idea to have a few available before getting started.
Now you are ready to remove the visor. There are three screws at the mount of each visor the outboard most and inboard most screws are the mounting screw. the middle screw is the friction adjustment screw that allows you to tighten the rod so that it will support the visor when unclipped. If you intend to replace your male clips remove the two mounting screws only. If you intend to just adjust the visor so it stays up with the visor unclipped than just tighten the center screw shown in the 5th picture
Now to remove the rod from the visor. Unfortunately I diddn' take any pictures of this, so therefore I will have to write a 1000 words. There is a screw in the visor at the point where the rod enters the visor. This is the screw that adjusts the friction on the visor so that it will be tight about the axis of the rod. If your visors rotate downward with the clip engaged then this screw needs to be tightened. But to remove the rod and male clip you will need to loosen this screw about 1 turn.
Now what you cant see. The friction clip inside the visor has a slot in it. The slot faces the screw. The rod has a key in it. In the normal installed position the key faces away from the screw. In order to remove the rod, it must be rotated so the key faces the screw. Rotate the rod 180° from its normal installed position. The rod mount may interfere and have to be twisted a little on its ball socket mount to do this. Now the key and slot are lined up and the rod can be pulled out. Make a note of the male clip orientation before pulling it out they are not symmetric, suggest you do one side at a time or you can refer to picture #6. You will be fighting allot of friction from the male clip and you will be able to feel that the key is lined up in the slot as you pass through it. Once the old male clip is clear the new one can be installed. If you get a new clip like the one I got with the key in it you will notice that it has to be installed with the key 180° out of phase making it very tight to install, but once you rotate the rod to the normal installation position after clearing the base key you will feel the clip snap into the shaft slot. Installing this clip will require allot of strength and rotating back and fort as you work the clip onto the rod.
OK now time to install the visor using the outboard and inboard most screws. Connect the wires if your illuminated. Adjust the tension of the center screw so that the rod stays up with a suitable amount of friction. Adjust the screw on the visor so that the visor stays up with a suitable amount of friction.
Once the frictions are set the upper windshield trim can be installed. With the friction set correctly the visor rod should not fall with the clip disengaged as shown in the last picture #7.
Ina addition to all this I stated that my female clip failure may have been caused by a broken trim, picture #8, which lost some of the support for the female clip. To help with this I put a washer on the back side of the trim as shown in picture #9 so that the clip would bottom out before compressing on the trim piece. I know this will relive stress on the trim but not sure it will help with the female clip cracking.
Update 3/13/2022. Dan Salmi posted this picture in another thread. I asked him If I could post them here. I think this is a great idea to tighten a warn ball and socket joint. See last picture.