Mercedes-Benz Forum banner

Soft Top circuit diagram - with limit switch details

101K views 64 replies 20 participants last post by  rudeney  
#1 · (Edited)
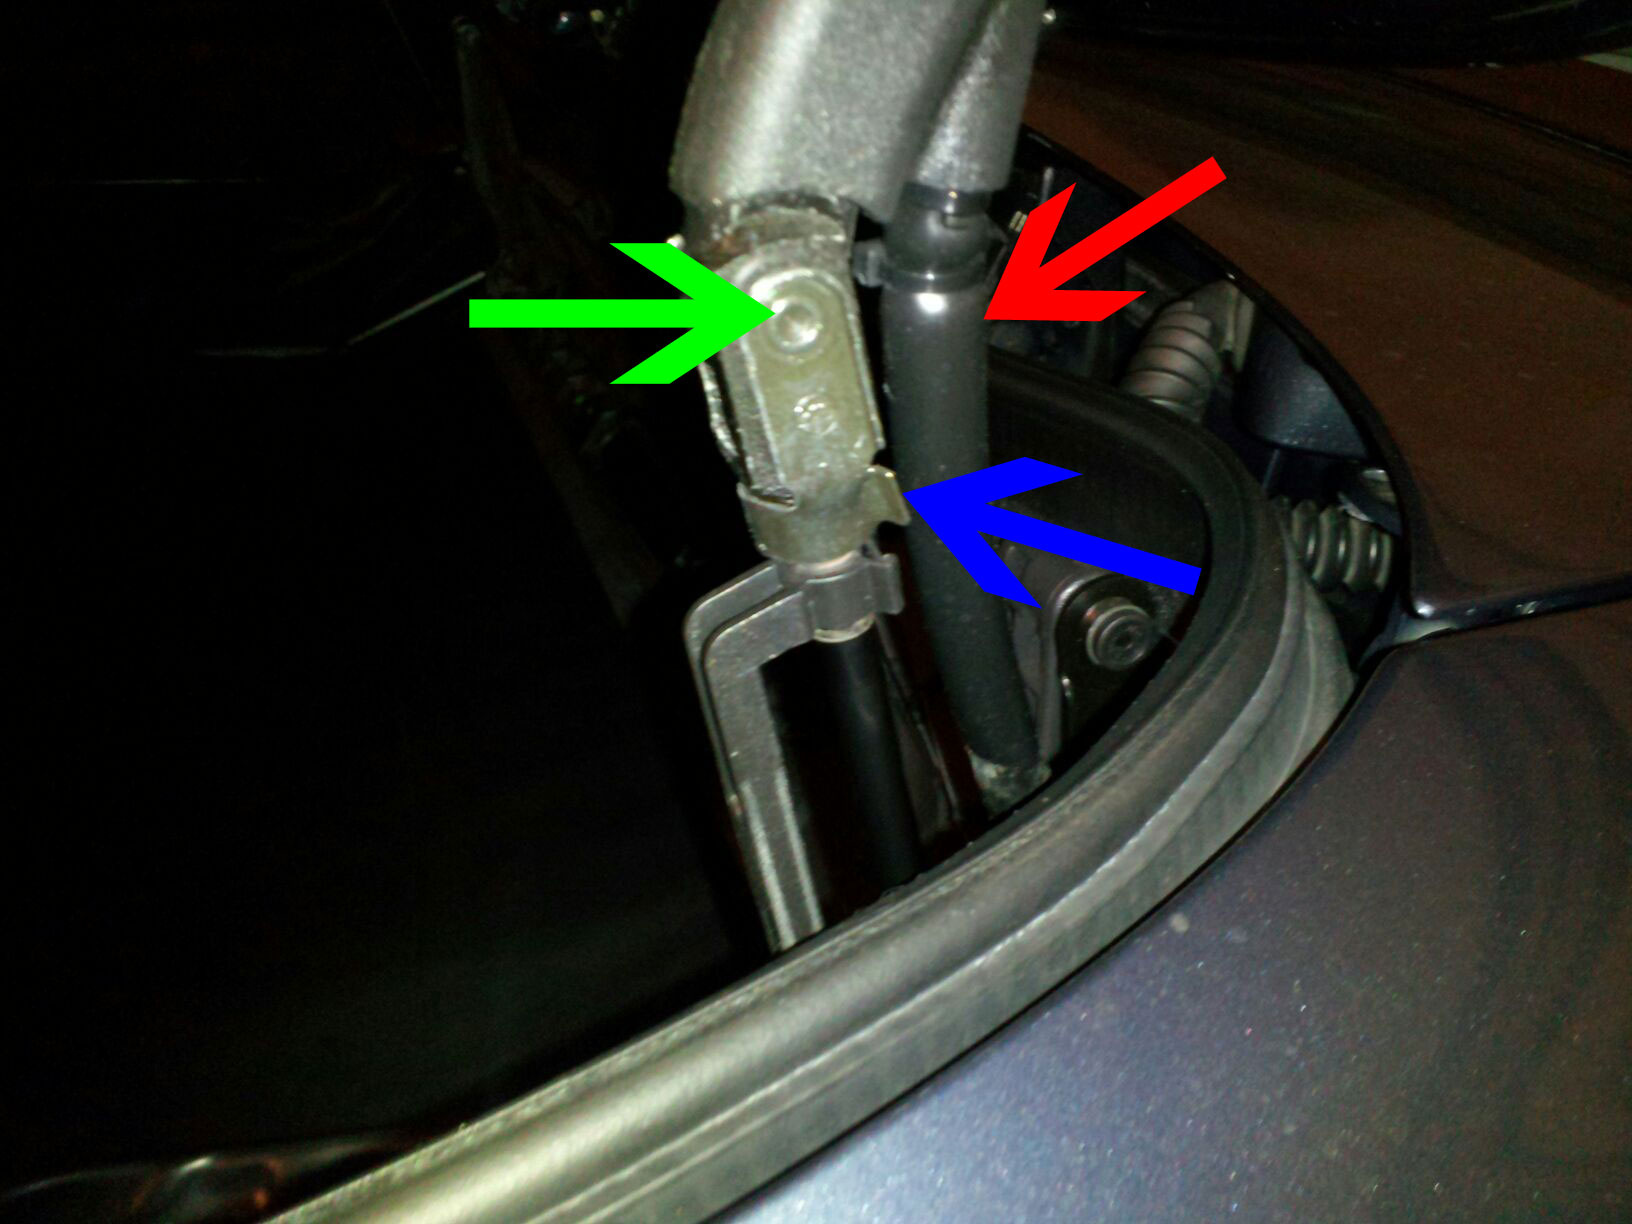
As a result of an increasing number of questions here about W209 cabriolet soft top operation problems, I have posted a full circuit diagram of the connections to the Soft Top Control Unit. (N52)

This should assist anyone looking at the operation of the many limit switches that control the open/close operation.

The diagram is supplied with a legend that defines every item that is routed to N52 via connectors. The limit switches all feed in via connector 1.

I have noted that generally one side (pin 1) of each limit switch is wired to earth (chassis) and the other side (pin 2) goes directly to N52. So it is staightforward to disconnect Connector 1 at N52 and then to use a test meter to measure continuity to earth from the relevant pin at N52 when manually operating the limit switch. This will confirm both a good earth connection, and also a good contact at the switch.

Note that there is also a change shown at date 06/2006 where S84/13 pin 3 is routed to N52 conn 1 pin 44 via the contacts of S84/23.

I hope it helps. :)

Note - please read my post #54 for an additional comment.
 

Attachments

#2 ·
Interesting.

60 visits to the thread, but only 10 have bothered to look at the drawing. :confused:

Maybe pdf is not the best way to present this information? Maybe everone cannot read this format? I think that, as the .pdf image can be zoomed, it is the best way to present this type of information. Please advise me if I am incorrect here.
 
#4 ·
Interesting.

60 visits to the thread, but only 10 have bothered to look at the drawing. :confused:
It makes sense to me: 60 people were interested enough to click on your thread and 1 out of 6 of them have a clear and present need/desire to get into the details.

Anyway I'll be linking this to the General Maintenance sticky so thanks for posting it!
 
#10 ·
@keyhole. I am going to use that pdf file you put onto the forum 2 years ago. I can use it now. But first I have to find out the whereabouts of the N52 control module in the W209 CLK from 2004. I know where this module is located in a SLK R171 and in a W208. But where is it located in the W209 ? :D

thanks in advance.
 
#12 · (Edited)
Thanks keyhole.

Will work on the car today.

Problem: roof won't open. Rollbar is already down. (cannot raise the rollbar).
Windows open with the soft top button. And then nothing else happens.

I have checked for error codes with SDS.
Current and stored codes are:
B1928
B1923

Both have something to do with the compartment cover. The limit switches.
B1928: check Limit switch S84/13s and/or S84/23
B1923: check limit switch S84/22.

So I will try and find out where they are located and see if I can erase the current codes.

And I have seen on the forum a picture of a broken plastic hinge (?)(sorry I am dutch and do not know the exact word).

See picture of my broken hinge. Would this be part of the problem ?
 

Attachments

#13 ·
That broken part of the hinge would likely not cause any problems. It's just a plastic arm that is there to lock and hold the cover in the fully upright position when servicing the hydraulics. Without it, the only problem is that the cover will have to be propped open if the hydraulic cylinders are removed for service. My advice is to completely cut off that broken plastic arm so that it does not interfere with the hinge.

Here are diagrams for the switches you are looking for:

http://benzbits.com/w209/soft_top/s84-13.pdf
http://benzbits.com/w209/soft_top/s84-23.pdf
http://benzbits.com/w209/soft_top/s84-22.pdf
 
#14 ·
For the benefit of others looking for location details of the 8 limit switches used to control the open/close of the W209 soft top, see rudeney's post on this thread:

http://www.benzworld.org/forums/w20...rg/forums/w209-clk-class/1677185-convertible-top-does-not-open.html#post5527380

To checkout if any limit switch is faulty, (without removing it from the car)you can use a testmeter on its lowest ohms range for a continuity test. Remove N52 connector 1, and do your measurements on the cable free end. As can be seen on the circuit diagram, one side of the limit switch is taken to ground. The other side goes to a specific pin on the connector. Manual operation of the switch should show a short-circuit to ground on the meter.
 
#15 ·
Thanks for that, rudeney. I can use that for sure.

But first I would have to open the soft top, or better say: lowering the soft top. I have read your comment about lowering the top : Follow the instructions in the owner's manual for raising the top manually. Lowering it is pretty much the same, just the opposite function (except you still open the hydraulic valves first).

But is there no other way to lower the top ?
There was no toolkit in the car anymore, so I cannot use the straps the manual is talking about. I can use some other stuff, but is this really the only way to lower the soft top?
 
#17 ·
The tools are nothing special. The one for unlocking the top at the windshield is just an Allen wrench. The straps are just flat nylon, about an inch wide. You could use anything strong enough that also fits between the closed trunk lid and soft top cover. And it does need to be strong - those hinges and the hydraulic struts will give a lot of resistance. You really do need to a helper because both hinges need to be pulled on simultaneously. If it just seems way too hard to pull, an alternative is to disconnect the hydraulic struts. Below is a diagram of what they look like with the cover open. With it closed, you have to look behind the carpeted panels on the side of the trunk. The blue arrow points at a clip you can snap away, then let it pivot on the green arrow, than the strut just comes loose.

Image
 
#56 ·
The tools are nothing special. The one for unlocking the top at the windshield is just an Allen wrench. The straps are just flat nylon, about an inch wide. You could use anything strong enough that also fits between the closed trunk lid and soft top cover. And it does need to be strong - those hinges and the hydraulic struts will give a lot of resistance. You really do need to a helper because both hinges need to be pulled on simultaneously. If it just seems way too hard to pull, an alternative is to disconnect the hydraulic struts. Below is a diagram of what they look like with the cover open. With it closed, you have to look behind the carpeted panels on the side of the trunk. The blue arrow points at a clip you can snap away, then let it pivot on the green arrow, than the strut just comes loose.
Just today I tracked down a broken wire for the microswitch on the tonneau cover.
(* driver side under the chrome oval. The rear window engages this switch when closing the top)

Anyway, the wires run through the plastic piece just above the red arrow.
To remove that plastic piece, it appears there are two screws but they're not torx - they look like a special three pointed star tool. Similiar to a phillips, but instead of 'cross' shape, more like the MB star pattern?

Luckily, I didn't have to remove that plastic piece, but instead tracked the wire down to near the top pump and there a wire had split.
 
#18 ·
I spend the whole afternoon trying to open the soft top compartment the way mentioned before. Turn the bolt on the hydr. pump counterclockwise and put some straps around the plastic hinges. The way it was shown on some pictures.
No way the compartment cover lid is moving !?!?:eek:

And i cannot recognize the thing as shown on your last picture.

I add a picture of my hydr pump and all the things around it. Can you recognize something that looks like the picture of the hydr. struts from rudeney ? please help.
 

Attachments

#19 ·
This black vertical thing is the strut - follow it to the top and you'll find where it connects to the cover - unlatch it from there (and then do the same on the other side).

Image
 
#20 ·
Thanks for helping me, but I cannot see anything that I can unlatch, except for 1 thing. Here are some pictures to show you what is on top of the strut for what I can see. The third picture shows the plastic thing I could unlatch a bit, but I am not sure this is what you mean.
 

Attachments

#22 ·
Glad you got it! Just in case someone else comes along...the connection of the strut to the cover is right in the middle of this picture. There is a horizontal pin that you need to remove to separate them. That brass-colored square metal thing is a keeper holding the pin in place. Remove it and then slide the pin out and now the cover should be easier to open. Newer W209s use a different style strut that releases pressure when closed so that you do not have to detach it for manual operation.

Image
 
#24 ·
merc131,

the picture you posted below shows an early version tonneau cover lift cylinder p/n 2098001072

Image
.

These cylinders have a built-in friction mechanism on the bottom that fails with time and makes it next to impossible to move the cylinder. Unfortunately, these are the only Mercedes cylinders that do not rebuild/upgrade at Top Hydraulics. The part has been superseded by p/n 2098001272:

Image
. Note the release button on the bottom, and the hydraulic line coming in at an angle.

According to US EPC, the 2098001072 was used in VINs up to -009490. Are the last digits in your VIN lower than 09490?

Klaus

Top Hydraulics | Rebuilt and Upgraded Convertible Top Cylinders, Pumps, Hydraulic Lines - Top Hydraulics, Inc
 
#25 ·
I have the early version tonneau cover lift cylinder p/n 2098001072 on this car. Which by the way is from 2003, not 2004 as stated before. Sorry for any confusion this may have caused. The last digits in my VIN are indeed lower than 09490.

I have seen that the later version tonneau cover lift cylinder p/n 2098001272 has a second locking mechanism, which is easy to see on your picture. I also have such a car for repair for a friend of mine, which has oil leaks. Oil leak is coming from the hydraulic line, for as far as I could determine, because one part of this double line, which goes all the way from the hydraulic pump to the front cylinder, is loose, somewhere in the middle ? That is not originally so, so I assume there was a leak before and they did not want to replace the whole hydraulic line, because of the costs (appr. 300 euro) and work that has to be done.
But it also seems there is no repair kit available for this.
 
#26 ·
Hydraulic line going to front lock/top lock 2098000781

I also have such a car for repair for a friend of mine, which has oil leaks. Oil leak is coming from the hydraulic line, for as far as I could determine, because one part of this double line, which goes all the way from the hydraulic pump to the front cylinder, is loose, somewhere in the middle ? That is not originally so, so I assume there was a leak before and they did not want to replace the whole hydraulic line, because of the costs (appr. 300 euro) and work that has to be done.
But it also seems there is no repair kit available for this.
merc131,

the line(s) must be replaced. You are in luck, as Top Hydraulics manufactures these lines much cheaper than what you would have to pay for OEM parts, and we sell them individually. The hoses/lines (aka pipes in the UK) going from the pump to the front lock cylinder 2098001172 have numbers on them, close to the fittings. Those are either #65 or #66. These two lines are the most common ones to fail on W209s, as they are routed along the moving soft top frame. OEM p/n 2098000781. Pdf from EPC is attached.

Klaus

Top Hydraulics | Rebuilt and Upgraded Convertible Top Cylinders, Pumps, Hydraulic Lines - Top Hydraulics, Inc
 

Attachments

#28 ·
Is there some DIY info for replacing these lines (lines going from the hydraulic pump to the front cylinder) ?
Nothing about pulling out individual lines that I can find.

This technical information on removal/connection of the hydraulic lines might be of some assistance.
 

Attachments

#30 ·
WIS is not going to show how to replace individual lines because the "official" solution is to replace the entire soft top! Yes, MBZ does some great engineering, but sometimes, they just don't get that owners aren't going to be happy spending ten to 20 times the price of a simple failed component by replacing and entire assembly. Case in point - the $10 actuators that break requiring the replacement of a $1000 intake manifold.
 
#31 ·
Member-created DIYs are awesome!

WIS is not going to show how to replace individual lines because the "official" solution is to replace the entire soft top!
That's where forums like this one come in, with intrepid members creating awesome DIYs... :)

Top Hydraulics is happy to host good DIYs related to hydraulic cylinder, line, or pump replacement - see our collection of hosted DIYs: DIY Instructions - Top Hydraulics, Inc. Special mention goes to "joetwa" who has created some excellent W208 CLK-Class DIYs, and to "taylor192" with in-depth instructions for BMW E46 lines and cylinders. We are going to add bhoeffner's DIY for the W209 hydraulic pump removal shortly.

Klaus

Top Hydraulics | Rebuilt and Upgraded Convertible Top Cylinders, Pumps, Hydraulic Lines - Top Hydraulics, Inc
 
#32 ·
Hydraulic lines are replaced. Extra o-rings came along with the order. Placed them also. No leaks. Soft top is working fine now. So that was my friends car.

Now back to mine: Already figured out that there is a problem with the limit switch S84/22. Wanted to order a new one at Mercedes and they stated this car, checked with vinnumber, has 2 of those limit switches, 1 on the left and 1 on the right. Problem is that I cannot trace the one on the right. No wiring for this switch in the neighbourhood.
How is this possible? This car is 6 month older then my friends W209. His car does have those 2 limit switches S84/22.

Should this second limit switch (the one on the right side of the car) be there or not ?!?!

Does somebody know or recognize this?